


17
1
2
ArtNo.324-0002 Oven shelf
ArtNo.324-0010 Plate warming shelf
FRONT
Rear stop
Front
bracket
2
1
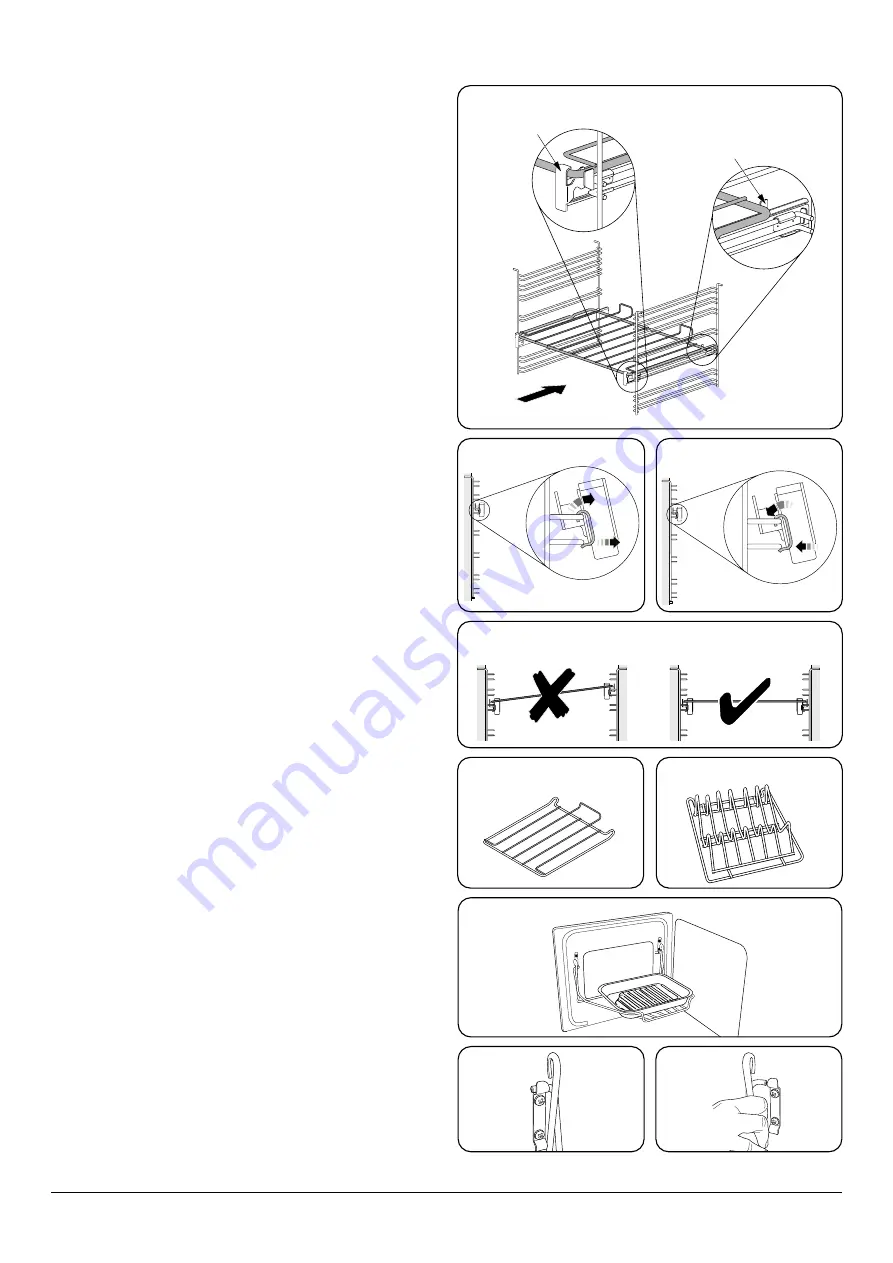
To remove the glide-out runners
Twist to unclip the base of the runners from the shelf
supports. Then unhook the runner from the top rung of the
shelf support and remove (
Fig. 2.22
).
To refit the glide-out runners
Hook the rear of the runner over the top rung of a pair of shelf
supports. Then hook the front of the runner onto the same
rung. Push to clip under the bottom rung (
Fig. 2.23
).
Ensure that the shelf runners are fitted in the same position
on each side (
Fig. 2.24
).
The front of the shelf runners can be identified by the bracket
(
Fig. 2.21
).
n
DO NOT put the glide-out shelf runners in a
dishwasher.
Oven Shelves
– Right-hand (Tall) Oven
The tall oven is supplied with four flat cooking shelves
(
Fig. 2.25
) and a plate warming shelf (
Fig. 2.26
).
When using the tall oven, you can cook on all four shelves at
the same time, but make sure that they are well spaced out to
allow the hot air to circulate.
The Handyrack
(Optional extra)
The Handyrack (
Fig. 2.27
) fits to the left-hand oven door
only. Food cooking on it is easy to attend to, because it is
accessible when the door is open.
The maximum weight that can be held by the Handyrack
is 5.5 kg (12 lb). It should only be used with the supplied
roasting tin, which is designed to fit the Handyrack. Any other
vessel could be unstable.
It can be fitted at two different heights. One of the oven
shelves must be removed and the other positioned to suit.
When the Handyrack is used in its highest position, other
dishes can be cooked on the bottom shelf position or base of
the oven.
When the Handyrack is used in its lowest position, other
dishes can be cooked on the second shelf position or base of
the oven.
To fit the Handyrack, locate one side of it on the door bracket
(
Fig. 2.28
).
Then spring the other side out to clip it onto the other
bracket (
Fig. 2.29
).
Fig. 2.21
Fig. 2.23
Fig. 2.24
Fig. 2.25
Fig. 2.26
Fig. 2.27
Fig. 2.28
Fig. 2.29
Fig. 2.22
ArtNo.320-0015
Fitting the Handyack 1
ArtNo.320-0014 Handyrack on LH door
ArtNo.320-0016
Fitting the handyrack 2
Содержание Nexus 90 Induction
Страница 1: ...USER GUIDE INSTALLATION INSTRUCTIONS Nexus 90 Induction Australia U111049 06d...
Страница 2: ......
Страница 4: ...ii...
Страница 49: ...45 NOTE...
Страница 50: ...46 NOTE...
Страница 51: ...47 NOTE...
Страница 52: ......
Страница 53: ......
Страница 54: ......
Страница 55: ......
Страница 56: ...Clarence Street Royal Leamington Spa Warwickshire CV31 2AD England www falconworld com...


