11.1.2 Changing the Oil
Open the drain valve and drain the oil at min. 60°C
into the receptacle.
CLOSE THE DRAIN VALVE.
Attention!
Used oil should be treated according to local
regulations. IT SHOULD NEVER be poured down
a drain.
11.1.3 Pumping of Spoiled Oil
The system allows the pumping of spoiled
oil into a transport container or special barrel
for used oil .
Proceed as follows:
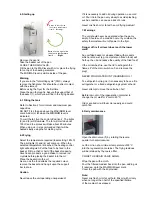
1. Release the drain pipe (5) from fast coupling (4)
and secure it to the diposal hose.
Attention - This will be hot.
2. Secure the other end of the disposal hose to the
fast coupling (4).
3. Hang the drain pipe (5) over into the transport
container or barrel.
4. Start the pump by pressing button (2).
5. When the oil tank is empty, release the
disposal hose and reposition the drain pipe (5)
on the fast coupling (4).
Attention!
When frying and also when putting the cover plate
over the pan, please remove the drain pipe (5).
11.1.4 Cleaning of the Oil Pumping System
The oil receptacle (9) and the filters ( 6 & 7 )can be
removed from the drawer ( 8 ) and put into the
dishwasher.
Note
Before refilling fresh oil or fat, the system has
to be cleaned with water and a recommended
detergent. Rinse well (to avoid foaming) and dry.
12. After-Sales Service
In the case of a breakdown, contact the nearest repair
centre. However, before contacting it check:
- That the fuses have not blown.
- If the electric plug is pushed right into the socket.
- If the unit has been started correctly.
- If the safety thermostat is switched on,
otherwise press the red re-start button.
- If the oil level is correct.
Important!
If you call the repair centre, state the type and
serial number of the unit. This information can
be found on a small plate, located on the panel
behind the door.
Enter the type and number of your fryer below:
- Type _____________________________________
- Apparatus no.______________________________
- Power supply ______________________________
- Service Telephone number ___________________
4
5
6
7
9
8


