background image

ACCESSORIES

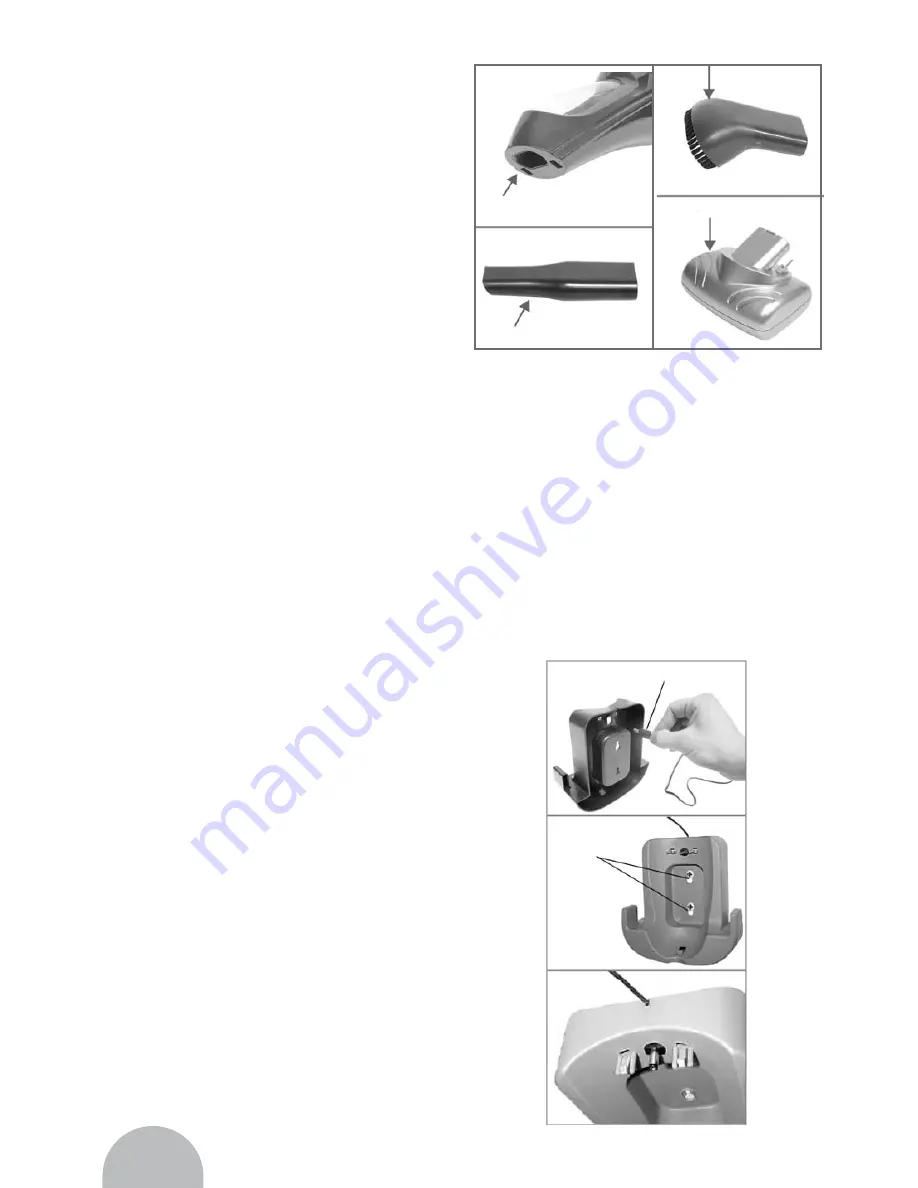
This unit comes with 3 accessories which

are fitted by directly inserting them into

the nozzle.

Crevice Tool

The Crevice tool can be used to clean

hard to reach places. Fit the crevice tool

directly into the nozzle.

Brush Attachment

The Brush attachment can be fitted

directly into the nozzle.

Motorized Brush

The motorized brush is designed for

cleaning short pile carpets and rugs. It

should not be used for cleaning long pile

carpets. This attachment is especially

good at picking up pet hairs.

INSTALLING THE WALL
MOUNTED CHARGING BASE

It is recommended that the charging

base should be mounted on a wall to

provide a convenient storage and

charging point for the cleaner.

1. Find a suitable indoor wall location near

a mains power socket but out of the reach

of children.

2. Do not mount the charging base in direct

sunlight or close to a heating source.

3. Make sure that there are no hidden

electrical wires or pipes in the chosen

location.

4. Insert the adaptor plug through the rear

of the charging base and twist to lock

into position.

5. Mark the location of the mounting holes

and drill two suitable holes, insert the

rawl plugs supplied into the holes.

6. Make sure that the charging plug is

correctly located and that the adaptor

lead is threaded through the slot in the

charging base. Excess lead can be

stored at the rear of the charging base.

7. Screw the charging base to the wall,

using the screws provided.

8. The cleaner should be stored in the

charging base. This will ensure that the

battery remains fully charged and the

cleaner always ready for use.

12

Crevice tool

Motorised brush

Brush attachment

Nozzle

Adaptor plug

Mounting

holes

Содержание RCT109 Cyclonic

Страница 1: ...RCT 109 Cyclonic Rechargeable Cleaner Instruction Manual fiarjl El Süpürgesi Kullanma K lavuzu ...

Страница 2: ......

Страница 3: ...n uzak bir seviyede tutunuz fiarjl süpürgeyi yan c veya tehlikeli s v lar için kullanmay n z fiarjl süpürgeyi yanan sigara kibrit veya s cak kül gibi s cak veya yanan cisimleri almak için kullanmay n z fiarjl süpürgeyi haznesi ve filtresi tak lmadan kullanmay n z fiarjl süpürgeyi kullan rken çocuklar ve evcil hayvanlar güvenli bir mesafede tutunuz fiarjl Süpürge sadece hafif kuru kapal alan kullan m iç...

Страница 4: ... n z E er flarj adaptörü fifliniz ile uyumlu de il hatal hasarl ya da bataryay flarj edemez durumda ise de ifltirilmeli ve uygun bir yol ile imha edilmelidir Bu ifllem için Fakir Yetkili Servisi ne baflvurunuz fiarj adaptörü 220V 240V 50Hz flebeke voltaj ile çal flacak flekilde tasarlanm flt r Adaptörün baflka özellikteki flebekeye ba lanmas adaptöre zarar verebilir Süpürgenin veya adaptörün ya mur ya da neme ...

Страница 5: ... haznesi b Filtre Toz haznesinin içinde c Toz haznesi açma dü mesi d Açma Kapama dü mesi e Tutma sap f Motor pil yuvas g Duvara monte flarj ünitesi h Kenar köfle aparat i Mobilya f rças j Motorlu dönen f rça kafas k fiarj lambas ...

Страница 6: ...ilir 1 Elektrik prizine yak n kapal bir alanda çocuklar n ulaflamayaca bir yer belirleyiniz 2 fiarj ünitesini do rudan günefl alt nda kalacak bir yerde ya da s cak bir kayna n yak n na ocak f r n vb kurmay n z 3 Seçti iniz yerde duvar içinde baflka kablo ya da boru olmad ndan emin olunuz 4 Adaptörün ucunu flarj cihaz n n arka taraf na getirin ve uygun pozisyondayken çevirerek tak n 5 Monte vidalar n n ...

Страница 7: ...3 E er iki haftadan fazla kullan lmaya caksa adaptör prizden ç kart lmal d r AÇMA KAPAMA fiarjl süpürgeyi açmak için tutma sap ndaki açma kapama dü mesini kullan n z NOT E er flarjl süpürgenin vakum gücü zay fsa veya azalm flsa flarjl süpürgenizi yeniden flarj edilmeye ihtiyac vard r MOTORLU DÖNEN FIRÇASININ KULLANIMI UYARI Motorlu f rça kafas na dönerken dokunmay n z kiflisel yaralanmalar neden olabili...

Страница 8: ...mal ve temizlenmelidir Filtre düzenli olarak s cak ve sabunlu su ile y kanmal ve iyice durulanmal d r 1 Ünitenin kapal oldu undan emin olun 2 Toz haznesini boflaltmak ve filtreyi ç karmak için toz haznesi açma dü mesine bas n z 3 Toz haznesini resimde gösterildi i flekilde motorun oldu u k s mdan çekiniz 4 Filtreyi toz haznesinden ç kar n z 5 Hazneyi boflalt p temizleyiniz 6 Filtreyi s cak ve sabunlu...

Страница 9: ...ble or corrosive liquids Do not use any charger other than the one provided Does not use the vacuum cleaner to pick up burning objects as this is a fire risk Do not pick up hot objects such as coal and ash Do not operate the cleaner without the container and filters installed This cleaner has been designed for light dry indoor use only The use of any accessory or attachment or the performance of a...

Страница 10: ...are no user serviceable parts inside and it does not require any electrical adjustments Warning DO NOT ATTEMPT TO OPEN THE CHARGING ADAPTOR If the charging adaptor is not suitable for your socket becomes damaged or fails to charge your battery it must be replaced and disposed of in a safe and environmentally protective way Always refer to qualified personnel This charging adaptor is designed to op...

Страница 11: ...11 Specification a Dust Container b Filter Inside dust container c Release Button d On Off Switch e Handle f Motor Battery Housing g Charging Stand h Crevice Tool Small Brush j Motorized Brush k Led ...

Страница 12: ...near a mains power socket but out of the reach of children 2 Do not mount the charging base in direct sunlight or close to a heating source 3 Make sure that there are no hidden electrical wires or pipes in the chosen location 4 Insert the adaptor plug through the rear of the charging base and twist to lock into position 5 Mark the location of the mounting holes and drill two suitable holes insert ...

Страница 13: ...o indicate charging is in progress NOTE The On Off switch must be in the off position for charging You may leave this unit on charge permanently thereby ensuring that the unit is always ready to use If the unit is not to be used for at least two weeks disconnect the charger from the mains outlet Switching On Off To switch the vacuum cleaner on push the ON OFF switch located above the handle forwar...

Страница 14: ...emove the hair from the brush to maintain pick up performance Emptying the Dust Container To empty and clean the unit carry out the following procedure 1 Ensure the unit is switched off 2 Press and hold the release button 3 Remove the dust container by pressing the release button and tilting the container holder away from the motor housing 4 Push the container out of the unit as shown 5 Pull out t...

Отзывы: