background image

www.Fagorcommercial.com


                                                                                                                                                                         PAGE 6 


REACH-INS OPERATIONAL SERVICE MANUAL / Rev.JUN. 2015


3


INSTALLATION 


3.1


UN CRATING 


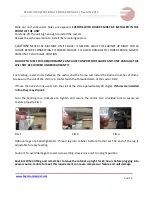
Remove the outer packaging. 

Cut the 4 clamps that hold the refrigerator to the skid. Lift the unit off 

the skid.


If  machine  was  laid  down  during  this  operation,  remember  to  leave  the  cabinet  up 
right for 24 hours before connecting to power source. 


3.2


LOCATION 

 
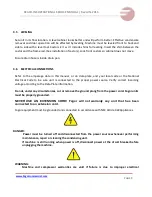
Units represented in this manual are intended for indoor use only. Be sure the location chosen has a 
floor  strong  enough  to  support  the  total  weight  of  the  unit  and  its  contents.  For  the  most  efficient 
operation, be sure to provide at least three (3) inches between sides, back and top of the unit.  
 

                          THE MACHINES NEEDS TO BE INSTALLED 2 FEET AWAY FROM ANY HEAT SOURCES

.  


The unit should not be installed under ambient temperatures higher than 100 °F.  
If  the  relative  humidity  is  higher  than  60  %,  the  door  frames  may  sweat  water.  This  is  not  a 
malfunctioning of the unit.  


WARNING  
 
The following actions will void your warranty: 

-Modification of power cord. 
-Connecting the unit to any extension cord. 
-Neglecting to install the castors or optional legs.


Inside cabinet: 
 
The first cleaning must happen when you unpack the unit and before it is turned ON. For this, you 
have to clean the unit with warm water and mild detergent. When it is cleaned and dry, proceed to 
install  accessories  and  plug  your  unit  into  a  dedicated  outlet. 

WAIT  24  HOURS  BEFORE  PLACING 

PRODUCT IN THE UNIT

. This will guarantee that it is working properly. 

Consequential damages are 

not covered under warranty. 

Содержание QR-1

Страница 1: ...REFRIGERATORS AND FREEZERS Manual for installation use and maintenance...

Страница 2: ...6 3 3 DATA PLATE 7 3 4 INSTALLATION OF CASTORS OR OPTIONAL LEGS 7 3 5 LEVELING 9 3 6 ELECTRICAL CONNECTIONS 9 3 7 SHELVING INSTALLATION 10 4 OPERATION 10 4 1 ELECTRONIC CONTROL 10 4 2 OTHER FUNCTIONS...

Страница 3: ...aterial until inspection has been made Contact the dealer through which you purchased the unit Check the compressor compartment thousing and visually inspect the refrigeration package Be sure lines ar...

Страница 4: ...3 1666 11 3 R 134a 295 QR 2 49 6 2104 13 4 R 134a 475 QF 1 23 3 2493 16 6 R 404A 295 QF 2 49 6 3644 21 5 R 404A 475 QR 1G 23 3 1666 11 3 R 134a 295 QR 2G 49 6 2104 13 4 R 134a 475 QVR 1 21 3 1666 11 3...

Страница 5: ...QVR 1 5 6 3 1 1 4 115 220 5 15P 2P TT 15 amp 10 amp 14 AWG 14 AWG 14 AWG 14 AWG 12 AWG 14 AWG 12 AWG 14 AWG 12 AWG 10 AWG 12 AWG QVR 2 6 9 3 5 1 3 3 8 115 220 5 15P 2P TT 15 amp 10 amp 14 AWG 14 AWG 1...

Страница 6: ...THE MACHINES NEEDS TO BE INSTALLED 2 FEET AWAY FROM ANY HEAT SOURCES The unit should not be installed under ambient temperatures higher than 100 F If the relative humidity is higher than 60 the door...

Страница 7: ...The data plate is essential to identify the particular features of your machine and it is of great benefit to installers operators and maintenance personnel It is recommended that in the event the da...

Страница 8: ...shims between the castor and the frame rail Install the desired number of shims Make sure the slot of the shim is in contact with the threaded stem of the castor FIG 2 If more than one shim is used t...

Страница 9: ...l code or the National Electrical Code to be sure unit is connected to the proper power source Verify correct incoming voltage according to the Data Plate information Do not under any circumstances cu...

Страница 10: ...rly 4 OPERATION 4 1 ELECTRONIC CONTROL After connecting your unit turn ON rocker switch located next to the controller The display will light up showing the temperature inside the unit Also the compre...

Страница 11: ...www Fagorcommercial com PAGE 11 REACH INS OPERATIONAL SERVICE MANUAL Rev JUN 2015...

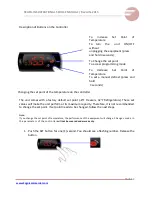
Страница 12: ...hanging the set point of the temperature on the controller The unit comes with a factory default set point 8 F Freezers 32 F Refrigerators These set values will make the unit perform at its maximum ca...

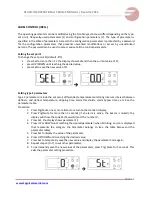
Страница 13: ...anging the reading temperature from F to C To change the reading of the temperature from F to C or vice versa you need access to the programming mode in the controller To do this press and hold the SE...

Страница 14: ...exit manual defrost hold the DOWN button arrow for 5 seconds The snow flake icon will turn off Wait 2 minutes for the compressor to start Note If the equipment doesn t reach the temperature first ver...

Страница 15: ...rs Type F parameters include the set point differential temperature monitoring interval interval between defrosts end defrost temperature dripping time alarm thresholds alarm bypass times etc See the...

Страница 16: ...the Parameter belongs to see the table below and the parameter table 5 Press the SET button to display the value of the parameter 6 Press UP DOWN until reaching the desired value 7 Press Set to tempor...

Страница 17: ...y food products have an acidic content which can deteriorate the stainless steel finish Be sure to clean ALL food products from any stainless steel surface Failure to do so will result in spots and ru...

Страница 18: ...tom panel 5 3 GASKET Gaskets require regular cleaning to prevent mold and mildew build up and to keep the elasticity of the gasket Gasket cleaning can be done with the use of warm soap and water Avoid...

Страница 19: ...with the drain hose inside of the pan Units installed in a humid environment will produce large amounts of water in the drain pan This is NOT a malfunction of the unit It is the customer s responsibil...

Страница 20: ...e maximum level mark located on the internal wall of the unit f If FREEZER check that the temperature is not Celsius C g Check that the gasket is in good condition and door is sealed h Check that the...

Страница 21: ...www Fagorcommercial com PAGE 21 REACH INS OPERATIONAL SERVICE MANUAL Rev JUN 2015 7 WIRING DIAGRAMS QR 1 QVR 1...

Страница 22: ...www Fagorcommercial com PAGE 22 REACH INS OPERATIONAL SERVICE MANUAL Rev JUN 2015 QF1 QVF 1...

Страница 23: ...www Fagorcommercial com PAGE 23 REACH INS OPERATIONAL SERVICE MANUAL Rev JUN 2015 QR2 QVR 2...

Страница 24: ...www Fagorcommercial com PAGE 24 REACH INS OPERATIONAL SERVICE MANUAL Rev JUN 2015 QR 1G QVR 1G...

Страница 25: ...ill be replaced and the replacement unit s will carry the same warranty period from the original unit s installation date original Warranty commencement date Additional Two Year Compressor Part Warran...

Страница 26: ...waived unless submitted by the User to Fagor within 30 days after the date the User discovered or should have discovered the claim In connection with all claims under this Warranty Fagor will have the...

Страница 27: ...n deliveries that are beyond our control Damaged Merchandise Inspect shipment for any damage before accepting it If damaged open and inspect the contents with the carrier Any damage should be noted an...

Страница 28: ...w Fagorcommercial com PAGE 28 REACH INS OPERATIONAL SERVICE MANUAL Rev JUN 2015 Fagor Commercial Inc 13105NW 47thAve Miami Fl 33054 Tel 305 7790170 Fax 305 7790173 1 866 GO FAGOR www fagorcommercial c...

Отзывы: