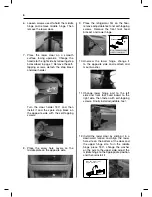
Fagor BMF-300X Скачать руководство пользователя страница 7

7

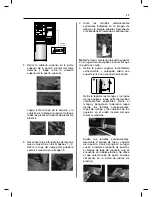
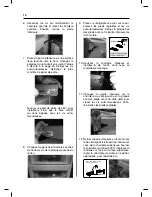
13. Unscrew the upper hinge axis, turn the 

upper hinge over and fi x axis on it. Then 
place it aside for later use.

14. Reconnect the wires on the left and right 

slots of the refrigerator body.

15. Place the door in the correct position. 

Move the ground wire into the slot on 
the upper door from right to left and then 
fasten the upper hinge and ground wire 
with the self-tapping screws. Hold door 
in place when installing.

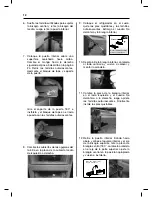
16. Install the upper hinge cover (in plastic 

bag) and reconnect any remaining wires.

17. Turn the corner cover of the door 180° 

and install it onto the right corner of the 
upper door, then mount the upper cover 
of the upper door.

18. Take the connector out of the cover  and 

mount it on the spare cover (found in 
spare parts bag, marked with an R). Put 
the cover you just removed in the parts 
bag.


Note: 

Be sure the front side of the 

connector fi ts correctly when mounting.

19. Install the corner cover, connect the wire 

and install the upper cover of the upper 
door.

20. Open the upper door, mount door racks 

and then securely close the door.

Содержание BMF-300X

Страница 1: ...1 BMF 300X 24 REFRIGERATOR Refrigerador de 24 Write the serial number here _______________ Installation Manual Manual del Instalaci n...

Страница 2: ......

Страница 3: ...low the doors to open 135 Dimensions of the appliance with door Height x Width x Depth 72 83 x 23 42 x 26 9 Dimensions of the appliance without door Height x Width x Depth 71 53 x 23 42 x 23 03 Note T...

Страница 4: ...the door and put them into the plastic bag 2 Place the handle on the left side of the door align the screw holes with the handle and attach with the screws provided Then install the handle covers Reve...

Страница 5: ...overs then remove the self tapping screws Remove the handle and switch it to the right side then install the self tapping screws handle screw covers and screw hole covers Loosen the self tapping screw...

Страница 6: ...nward motion and align the lower hole site on the bottom of the door and the upper hinge site Turn the middle hinge piece 180 change the washer on the axis to the upper side adjust the middle hinge to...

Страница 7: ...Install the upper hinge cover in plastic bag and reconnect any remaining wires 17 Turn the corner cover of the door 180 and install it onto the right corner of the upper door then mount the upper cove...

Страница 8: ......

Страница 9: ...135 Dimensiones del electrodom stico con la puerta Altura x Anchura x Profundidad 72 83 x 23 42 x 26 9 Dimensiones del electrodom stico sin la puerta Altura x Anchura x Profundidad 71 53 x 23 42 x 23...

Страница 10: ...zquierdo de la puerta y pongalas en la bolsa pl stica 2 Coloque el mango al lado izquierdo de la puerta manteniendo los orificios de los tornillos en el mango y la puerta en l nea como muestra la imag...

Страница 11: ...autorroscantes especiales Retire el mango y p ngalo en la derecha luego instale los tornillos autorroscantes tapas de mango y las cubiertas de los agujeros en el orden inverso del que fueron removidos...

Страница 12: ...tirando hacia abajo y alinee el agujero inferior y el eje de la bisagra superior Gire la pieza de bisagra central 180 cambie la arandela en el eje de la parte superior ajuste la bisagra central en la...

Страница 13: ...de l minas de acuerdo con el paso 3 p gina 24 y luego instale la cubierta de la bisagra superior en la bolsa pl stica 17 Gire la cubierta de la esquina de la puerta 180 e inst lelo en la esquina dere...

Страница 14: ......

Страница 15: ...es de 135 Dimensions de l appareil avec porte hauteur x largeur x profondeur 72 83 x 23 42 x 26 9 Dimensions de l appareil sans porte hauteur x largeur x profondeur 71 53 x 23 42 x 23 03 Remarque Ce r...

Страница 16: ...s caches de vis du c t gauche de la porte et mettez les dans le sac en plastique 2 Placez la poign e du c t gauche de la porte en alignant les trous de vis de la poign e et de la porte comme le montre...

Страница 17: ...irez les vis sp ciales auto taraudeuses Retirez la poign e et remettez la du c t droit puis vissez les auto taraudeuses les cache de poign e et caches des trous de vis dans l ordre inverse de la d mon...

Страница 18: ...a porte inf rieure en la tirant vers le bas et alignez le site du trou inf rieur et l axe de la charni re sup rieure Tourner la charni re du milieu 180 d placez la rondelle sur l axe sur la face sup r...

Страница 19: ...lames comme l tape 3 page 43 puis installez le cache de la charni re sup rieure qui se trouve dans le sac en plastique 17 Tournez le cache du coin de la porte de 180 et installez le sur le coin droit...

Страница 20: ...877 743 2467 For additional support please call 1 800 207 0806 Email infoappliances fagoramerica com www fagoramerica com V06182014 USA The manufacturer reserves the right to modify the items describ...

Отзывы: