


5
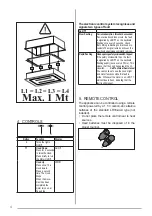
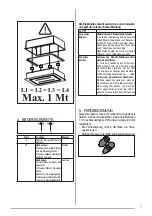
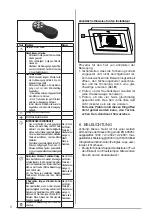
Button Function
Display
Turns the Motor On/Off.
-
Hood Closed:
- Press the button briefly to start lowering
the hood
- It will stop when the button is pressed
again.
When the movement has been com-
pleted the motor will start at speed 2.
-
Hood Open:
- Press and hold for 2 seconds to activate
raising of the hood, which stops when
it reaches the stop.
- Press (briefly) to stop the movement
(before the stop is reached).
- Press again briefly to turn the motor
on/off.
- Press and hold for 2 seconds to start
raising of the hood.
- If the motor is on, it will first stop the
motor and then start the movement.
-
Decreases the speed of the Motor.
-
Increases the speed of the Motor.
-
INTENSIVE
- This can only be activated with the
hood lowered and when the delay
or 24h functions are not active.
- Activates Intensive speed from any
other speed.
To disable it, simply press the same
button again or turn the motor off.
- Intensive speed is timed to run for 10
minutes. At the end of the 10 minutes
the system will automati cally return
to the speed that was set before.
The led on
the motor
button (on
the hood
controls) will
flash once a
second.
Press briefly for the Delay Function:
Can only be activated if the Intensive
or 24h function is not active.
Activates and deactivates total
shutdown of the hood (motor+lights)
after 30 minutes:To disable the Delay,
simply press the button again or turn
the motor off.
The led on
the motor
button (on
the hood
controls) will
flash once
every 0.5
seconds.
Press and hold for 2 sec. for the
24H Function:
Can only be activated if the Intensive
or Delay function is not active.
Activates and deactivates the 24H fun-
ction for 10 minutes every hour, for 24
hours. After this time it is deactivated.
The led on
the motor
button (on
the hood
controls) will
flash once
every 2
seconds.
Turns the Hood lights On/Off.
-
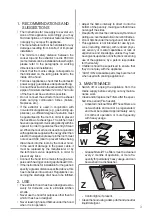
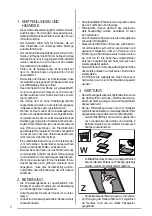
Additional information for the installation
technician
%
Procedure to be used in case of malfunction
on the movement:
1. Check that the fuse is properly inserted and
that it has not burned out, for replacing the
fuse open the lighting unit and unscrew the
fuser holder and replace it with one having the
same characteristics (Rif.
B
).
2. Check that the hood canopy is fitted level (the
use of a spirit level is recommended).
3. Check that the four cables are all at the same
tension. The front left cable must not be slacker
than the others.
If even these operations do not solve the
problem contact the Technical Assistance.
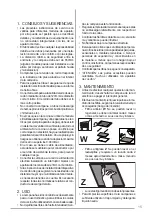
6. LIGHTING
Warning: This appliance is fitted with a
white LED lamp classed as 1M according
to EN 60825-1: 1994 + A1:2002 + A2:2001
standards; maximum optical power emitted
@439nm: 7µW. Do not look directly at the light
through optical devices (binoculars, magnifying
glasses…).
• For replacement contact technical support.
(“To purchase contact technical support”).
Содержание SKYLIFT X/WH F90
Страница 36: ...36 1 650 I 120 0 04 3 2 3 W 4 Z 2 Z...
Страница 37: ...37 L1 L2 L3 L4 Max 1 Mt L1 L2 L3 L4 4 L T1 2 T1 T1 2 T1 250 T1 5 1 5 LR03 AAA...
Страница 38: ...38 2 2 2 24h 10 10 1 24h 30 0 5 2 24H 24 10 24 2 1 B 2 3 6 1M EN60825 1 1994 A1 2002 A2 2001 439nm 7...
Страница 48: ...48 1 650 I 120 0 04 3 2 3 W 4 Z 2 Z...
Страница 49: ...49 L1 L2 L3 L4 Max 1 Mt L1 L2 L3 L4 4 L T1 2 2 T1 T1 2 T1 250 T1 5 LR03 AAA 1 5...
Страница 50: ...50 2 2 2 24 10 10 24 30 2 24 24 10 24 2 1 B 2 3 6 1 EN60825 1 1994 A1 2002 A2 2001 439 7...
Страница 72: ...72 1 650 mm I 120 mm 0 04 mBar 3 mm 2 3 W 4 Z 2 Z...
Страница 73: ...73 L1 L2 L3 L4 Max 1 Mt L1 L2 L3 L4 4 L T1 2 Led T1 2 Led T1 Led T1 250ms Led T1 5 1 5V LR03 AAA...
Страница 78: ...78 1 650 mm I 120 mm 0 04 mbar 3 mm 2 3 W 4 Z 2 Z...
Страница 79: ...79 L1 L2 L3 L4 Max 1 Mt L1 L2 L3 L4 4 L T1 2 Led T1 LED 1 2 LED 1 250 LED 1 5 1 5V LR03 AAA...
Страница 80: ...80 2 2 2 24 10 10 24 30 0 5 2 24 24 10 24 2 1 B 2 3 6 1M EN60825 1 1994 A1 2002 A2 2001 439nm 7 W...
Страница 81: ...81 1 650 1 120 0 04 3 2 3 W 4 Z 2 Z...
Страница 82: ...82 L1 L2 L3 L4 Max 1 Mt L1 L2 L3 L4 4 L T1 2 T1 T1 2 T1 250 T1 5 LR03 AAA 1 5...
Страница 83: ...83 2 2 24 10 10 24 30 0 5 24 2 24 10 24 2 1 B 2 3 6 EN60825 1 1M 1994 A1 2002 A2 2001 439 7 W...
Страница 84: ...84 1 650 I 120 0 04 mbar 3 2 3 W 4 Z 2 Z...
Страница 85: ...85 L1 L2 L3 L4 Max 1 Mt L1 L2 L3 L4 4 L T1 2 Led T1 LED T1 2 LED T1 250 LED T1 5 1 5 V LR03...
Страница 90: ...90 1 650mm 1 120mm 0 04mbar 3 mm 2 3 W 4 Z 2 Z...
Страница 91: ...91 L1 L2 L3 L4 Max 1 Mt L1 L2 L3 L4 4 L T1 2 LED T1 LED T1 2 LED T1 250 ms LED T1 5 1 5 V LR03 AAA...
Страница 92: ...92 2 2 24 10 10 24 30 2 24 24 10 24 1 B 2 3 6 LED 1M EN 60825 1 1994 A1 2002 A2 2001 439 nm 7 W...
Страница 93: ...93 65 I 120 04 0 4 2 W 65 I 120 04 0 4 2 1 2 3 Z...
Страница 95: ...95 2 On Off 2 1 delay 24h 10 10 0 5 delay 24h 30 2 2 24H delay 24 10 24...
Страница 97: ......
Страница 98: ......
Страница 99: ......
Страница 100: ...991 0339 596_02 141117...


