Faber MATRIX EG10 X A90 ACTIVE Скачать руководство пользователя страница 11


EN 

1

11 

MAINTENANCE


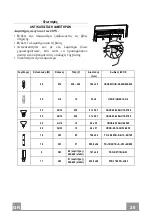
REMOTE CONTROL (OPTIONAL) 

The appliance can be controlled using a remote control powered 
by a 1.5 V carbon-zinc alkaline batteries of the standard LR03-
AAA type (not included). 
•  Do not place the remote control near to heat sources. 
•  Used batteries must be disposed of in the proper manner. 
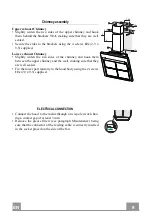
 

Ducting  panels 

•  Open the ducting panels. 
•  Disconnect the panel from the hood canopy by sliding the fix-

ing pin lever.


•  Clean the outside using a damp cloth and neutral liquid deter-

gent. 

•  Clean the inside using a damp cloth and neutral detergent; do 

not use wet cloths or sponges, or jets of water; do not use abra-
sive substances.


Содержание MATRIX EG10 X A90 ACTIVE

Страница 1: ...Instructions Manual Manual de instrucciones Kullanim Kilavuzu...

Страница 2: ...ALLATION 7 USE 10 MAINTENANCE 11 15 18 19 22 23 27 30 31 34 35 INDICE CONSEJOS Y SUGERENCIAS 39 CARACTER STICAS 42 INSTALACI N 43 USO 46 MANTENIMIENTO 47 I ERIKLER TAVSIYELER VE NERILER 51 ZELLIKLER 5...

Страница 3: ...ect the extractor to the exhaust flue through a pipe of minimum diameter 120 mm The route of the flue must be as short as possible Do not connect the extractor hood to exhaust ducts carrying combustio...

Страница 4: ...poses other than for which it has been designed Never leave high naked flames under the hood when it is in operation Adjust the flame intensity to direct it onto the bottom of the pan only making sure...

Страница 5: ...avy usage Failure to carry out cleaning as indicated will result in a fire hazard Clean the hood using a damp cloth and a neutral liquid detergent The symbol on the product or on its packaging indicat...

Страница 6: ...pper Section 2 2 1 Lower Section 8 1 Directional Air Outlet grille 9 1 Flange 16 1 Filter cover Ref Q ty Installation Components 7 2 1 2 Upper Chimney Section Fixing Brackets 11 6 Wall Plugs 11a 2 Wal...

Страница 7: ...n the other side checking that the two marks are level Drill at the points 1 marked using a 12 mm drill bit Drill at the points 2 marked using a 8 mm drill bit Insert the bracket plugs 11a into the ho...

Страница 8: ...hen installing the ducted version connect the hood to the chimney using either a flexible or rigid pipe the choice of which is left to the installer Insert the flange 9 optional on the hood body out l...

Страница 9: ...the chimney and hook them between the upper chimney and the wall making sure that they are well seated Fix the lower part laterally to the hood body using the 2 screws 12c 2 9 x 9 5 supplied 12c 2 1...

Страница 10: ...the alarm can be reset by pressing and holding this button for approximately 3 seconds These indications are only visible when the motor is turned off FF flashes three times When the procedure termina...

Страница 11: ...mote control near to heat sources Used batteries must be disposed of in the proper manner Ducting panels Open the ducting panels Disconnect the panel from the hood canopy by sliding the fix ing pin le...

Страница 12: ...Press button E see the paragraph on Use Cleaning the Filters Open the Comfort panels by pulling on the recess Remove the Filters one at a time pushing them towards the back of the unit and at the same...

Страница 13: ...r off Press D and hold for approximately 5 Seconds The message FC Puntino flashes twice A C Filter saturation alarm ACTIVATED The message FC Puntino flashes once A C Filter saturation alarm DEACTIVATE...

Страница 14: ...W Socket Voltage V Dimension mm ILCOS Code 28 E14 220 240 104 x 35 HSGSB C UB 28 220 240 E14 20 G4 12 33 x 9 HSG C UB 20 12 G4 35 GU10 230 51 x 50 7 HAGS 35 230 GU10 51 40 50 GU10 230 51 x 50 7 HAGS 3...

Страница 15: ...GR 1 15 650 mm 120 mm 0 04 mbar 2...

Страница 16: ...GR 1 16 3 mm 8...

Страница 17: ...GR 1 17 2 4...

Страница 18: ...k ji Min 250mm Min 250mm 1270 MIN 1270 MAX 1720 1 1 2 1 1 2 2 1 8 1 9 1 16 1 7 2 1 2 11 6 11a 2 SB 12 10 12a 6 4 2 x 44 4 12c 10 2 9 x 6 5 12d 2 2 9 x 9 5 1 1 16 12c 11 12a 12d 8 2 1 2 2 12c 9 12a 7 2...

Страница 19: ...GR 1 19 7 2 1 X 1 2 11a 11 12a 112 A A Min 250 Max 400 710 A 1 2 1 2 200 200 180 180 A 710 mm A 1 200 mm 2 180 mm 112 mm A 12 mm 1 8 mm 2 11a 1 11 2 7 2 1 1 2 mm 7 2 1 X mm X 8 mm 11 12a 4 2x44 4...

Страница 20: ...GR 2 20 A Vr 11a B 11a Vr 11 A B Vr h ji 9 150 9 120 12c 2 9 x 6 5 8 2 12d 2 9 x 9 5 16 12c 12d 8...

Страница 21: ...GR 2 21 7 2 1 4 12c 2 9 x 9 5 2 12c 2 9 x 9 5 12c 2 1 2 2 2 7 2 1 12c 3 mm...

Страница 22: ...GR 2 22 A B C D 6 HI 5 FC 2 FC 1 E 24H 10 24 3 FF FG 100 FC 200 F Delay 30 5 IR 2 IR 1 G H A B C D E F G H...

Страница 23: ...GR 2 23 1 5 V LR03 AAA...

Страница 24: ...GR 2 24 FG 2 24h Confort Panel Confort Panel...

Страница 25: ...GR 2 25 FC 4 D 5 2 FC 1 FC 24h Confort Panel A B Confort Panel A B...

Страница 26: ...230 GU10 51 40 50 GU10 230 51 x 50 7 HAGS 35 230 GU10 51 20 20 GU4 12 40 x 35 HRGS 20 12 GU4 35 30 20 GU5 3 12 46 x 51 HRGS 20 12 GU5 3 50 10 16 G13 95 720 x 26 FD 16 40 1B E G13 26 720 18 G13 57 589...

Страница 27: ...RU 2 27 650 I 120 0 04 2...

Страница 28: ...RU 2 28 3 8...

Страница 29: ...RU 2 29 2 4...

Страница 30: ...0 Min 250mm Min 250mm 1270 MIN 1270 MAX 1720 1 1 2 1 1 2 2 1 8 1 9 1 16 1 7 2 1 2 11 6 11a 2 SB 12 10 12a 6 4 2 x 44 4 12c 10 2 9 x 6 5 12d 2 2 9 x 9 5 1 1 16 12c 11 12a 12d 8 2 1 2 2 12c 9 12a 7 2 1...

Страница 31: ...RU 3 31 7 2 1 X 1 2 11a 11 12a 112 A A Min 250 Max 400 710 A 1 2 1 2 200 200 180 180 A 710 A 1 200 2 180 112 A 12 1 8 2 11a 1 11 2 7 2 1 1 2 7 2 1 X X 8 11 12a 4 2 x 44 4...

Страница 32: ...RU 3 32 A Vr 11a B 2 11a Vr 11 A B Vr 9 150 9 120 4 12c 2 9 x 6 5 8 2 12d 2 9 x 9 5 16 12c 12d 8...

Страница 33: ...RU 3 33 7 2 1 4 12c 2 9 x 9 5 2 12c 2 9 x 9 5 12c 2 1 2 2 2 7 2 1 12c 3...

Страница 34: ...RU 3 34 A B C D 6 HI 5 FC 2 FC 1 E 24H 10 24 3 FF FG 100 FC 200 F Delay 30 5 IR 2 IR 1 G H A B C D E F G H...

Страница 35: ...RU 3 35 1 5 LR03 AAA...

Страница 36: ...RU 3 36 FG 2 24 E...

Страница 37: ...RU 3 37 FC 4 D 5 2 FC 1 FC 24 E A B A B...

Страница 38: ...S 35 230 GU10 51 40 50 GU10 230 51 x 50 7 HAGS 35 230 GU10 51 20 20 GU4 12 40 x 35 HRGS 20 12 GU4 35 30 20 GU5 3 12 46 x 51 HRGS 20 12 GU5 3 50 10 16 G13 95 720 x 26 FD 16 40 1B E G13 26 720 18 G13 57...

Страница 39: ...la campana extractora al conducto de humo a trav s de un tubo con un di metro m nimo de 120 mm La trayectoria del humo debe ser lo m s corta posible No conecte la campana extractora a los conductos d...

Страница 40: ...distintos de aquellos para los que fue dise ada No deje nunca llamas altas bajo la campana cuando est en funcionamiento Ajuste la intensidad de la llama para dirigirla s lo a la parte inferior del re...

Страница 41: ...za muy frecuentemente Existe el riesgo de incendio si la limpieza no se realiza conforme a las instrucciones Limpie la campana con un pa o h medo y un detergente l quido suave El s mbolo en el product...

Страница 42: ...imenea Superior 2 2 1 Camino Inferior 8 1 Rejilla de direcci n de salida del aire 9 1 Brida 16 1 Tapa filtrante Ref Cant Componentes de Instalaci n 7 2 1 2 Bridas de fijaci n chimenea superior 11 6 Ta...

Страница 43: ...eraci n en la parte opuesta controlando el correcto nivelado Agujerear con una punta de 12 mm los puntos 1 marcados Agujerear con una punta de 8 mm los puntos 2 marcados Colocar los tacos y la abrazad...

Страница 44: ...Para la instalaci n de la versi n aspirante conectar la campana al tubo de salida mediante un tubo r gido o flexible a discreci n del instalador Introducir la brida de reducci n 9 en la salida del cue...

Страница 45: ...enea engancharlas entre la chimenea superior y la pared y cerrarlas hasta el tope Fijar lateralmente la parte inferior en el cuerpo de la campana con los 2 tornillos 12c 2 9 x 9 5 en dotaci n 12c 2 1...

Страница 46: ...la alarma filtros en curso presionando la tecla por aproximadamente 3 segundos se efect a el reset de la alarma Dichas se alizaciones son visibles s lo con el motor apa gado Parpadea FFtrasveces Una...

Страница 47: ...lor Tirar las pilas cuando se hayan agotado en los contenedores especiales colocados con dicho fin Paneles aspirantes Abrir los paneles aspirantes Desenganchar el panel del cuerpo de la campana desliz...

Страница 48: ...E Ver p rrafo de uso Limpieza de los filtros Abrir los Confort Panel tir ndolos en la muesca espec fica Quitar los Filtros uno por vez empuj ndolos hacia la parte posterior del grupo y tirando simult...

Страница 49: ...ci n Presionar la tecla D por 5 segundos aproximadamente 2 parpadeos sigla FC Punto Alarma saturaci n Filtro C A ACTIVA 1 parpadeo sigla FC Punto Alarma saturaci n Filtro C A DESACTIVADA SUSTITUCI N F...

Страница 50: ...mpara Consumo de energ a W Casquillo Voltaje V Dimensi n mm C digo ILCOS 28 E14 220 240 104 x 35 HSGSB C UB 28 220 240 E14 20 G4 12 33 x 9 HSG C UB 20 12 G4 35 GU10 230 51 x 50 7 HAGS 35 230 GU10 51 4...

Страница 51: ...emin olun Aspirat r egzoz bacas na minimum ap 120 mm olan bir boru vas tas yla ba lay n Baca hatt m mk n oldu u kadar k sa olmal d r Davlumbaz tutu abilir gazlar ta yan egzoz kanallar na ba lamay n k...

Страница 52: ...r Davlumbaz asla tasarland ama lar haricinde kullanmay n Davlumbaz al rken alt nda bo una yanan y ksek ate asla b rakmay n Ate yo unlu unu sadece tencere alt nda kalacak ve yanlardan ta mad ndan emin...

Страница 53: ...aha s k olarak de i tirilmelidir Temizli in talimatlara uygun olarak yap lmad durumlarda yang n riski vard r Davlumbaz nemli bir bez ve n tr s v deterjanla temizleyin r n st ndeki veya paketindeki sem...

Страница 54: ...kte bir davlumbaz g vdesi 2 1 1 st baca 2 2 1 Alt baca 8 1 stikamet ayarl hava k zgaras 9 1 Flan 16 1 Filtre kapak Rif Miktar Montaj komponentleri 7 2 1 2 st baca tespit unsurlar 11 6 Dubel 11a 2 Dube...

Страница 55: ...referans noktas i aretleyin Terazisine dikkat etmek sureti ile ayn i lemi di er tarafta da tekrarlay n aretlenen noktalar 1 12 mm u la delin aretlenen noktalar 2 8 mm u la delin 11a ask lar ile dubell...

Страница 56: ...i Versiyonda kurulum i in Davlumbaz kurulumu yapan ki inin tercihine g re sert veya esnek bir boruyla k kanal na ba lay n z ember 9 u iste e ba l Davlumbaz G vdesinin k na yerle tiriniz Boruyu uygun b...

Страница 57: ...n hafif e a n z st Baca ile duvar ara s na ge irip tam dayanana kadar kapat n z Cihaz donan m nda verilen 2 adet vidayla 12c 2 9 x 9 5 alt taraf n Davlumbaz G vdesine sabitleyiniz 12c 2 1 2 2 2 7 2 1...

Страница 58: ...a 3 saniye boyunca basarak alarm s f rlayabilirsiniz Bu bildirimler sadece motor kapal iken g r nt lenir FF kez yan p s ner Prosed r tamamland ktan sonra daha nce g r nt lenen i aret s ner FG ya lanma...

Страница 59: ...yak n nda b rakmayn z Pilleri evreye atmay n z bunlara ayr lm p toplama kapla r na at n z Emici Paneller Emici panelleri a n Paneli davlumbaz g vdesinden ay r n Sabitleme piminin kolunu kayd r n D ta...

Страница 60: ...tu una bas n Kullan m paragraf na bak n Filtrelerin Temizlenmesi Confort Panellerini uygun ekilde ekerek a n Ya nleyici Filtreleri grubun arka b l m ne do ru iterek ve ayn anda a a ya do ru ekerek bir...

Страница 61: ...D tu una bas n FC Nokta yaz s 2 kez yan p s n yorsa C A Filtre doygunluk Alarm DEVREDED R FC Nokta yaz s 1 kez yan p s n yorsa C A Filtre doygunluk Alarm DEVRE DI IDIR AKT F KARBON KOKU NLEY C F LTREN...

Страница 62: ...c W Duy Soket Ampul Voltaj V Boyut mm ILCOS Kodu 28 E14 220 240 104 x 35 HSGSB C UB 28 220 240 E14 20 G4 12 33 x 9 HSG C UB 20 12 G4 35 GU10 230 51 x 50 7 HAGS 35 230 GU10 51 40 50 GU10 230 51 x 50 7...

Страница 63: ...SA 6 63 650 I 120 0 04 2...

Страница 64: ...SA 6 64 3 8...

Страница 65: ...SA 6 65 2 4...

Страница 66: ...66 Min 250mm Min 250mm 1270 MIN 1270 MAX 1720 1 1 1 1 2 1 2 2 1 8 1 9 1 16 2 1 2 7 6 11 12 10 2 11 a 4 2 44 4 6 12 a 2 9 6 5 10 12 c 2 9 9 5 2 12 d 1 1 16 12c 11 12a 12d 8 2 1 2 2 12c 9 12a 7 2 1 11...

Страница 67: ...SA 6 67 7 2 1 X 1 2 11a 11 12a 112 A A Min 250 Max 400 710 A 1 2 1 2 200 200 180 180 A 710 A 1 200 2 180 112 A 1 12 2 8 11 a 1 11 2 1 2 7 1 2 1 2 7 X X 8 11 12 a 4 2 44 4...

Страница 68: ...SA 6 68 A Vr 11 a B 11 a Vr 11 A B Vr 9 150 9 120 12c 2 9 12 5 8 12d 2 9 9 5 16 12c 12d 8...

Страница 69: ...SA 6 69 7 2 1 4 12 C 2 9 x 9 5 12c 2 1 2 2 2 7 2 1 12c...

Страница 70: ...SA 7 70 A B C HI z 6 D FC 2 FC 1 5 24 24 H 10 E FF FG 100 FC 200 3 30 F IR 2 IR 1 5 G H A B C D E F G H...

Страница 71: ...1 5 LR AAA 12 c 2 9 12 5 8 12 d 2 9 9 5...

Страница 72: ...SA 7 72 FG 2 24 E...

Страница 73: ...SA 7 73 FC 4 D 5 FC 1 FC 24 E A B A B...

Страница 74: ...x 50 7 230 GU10 35 HAGS 35 230 GU10 51 20 51 x 50 7 230 GU10 50 HRGS 20 12 GU4 35 30 40 x 35 12 GU4 20 HRGS 20 12 GU5 3 50 10 46 x 51 12 GU5 3 20 FD 16 40 1B E G13 26 720 720 x 26 95 G13 16 FD 18 40 1...

Страница 75: ......

Страница 76: ...436005065_ver3 D002382_00...

Отзывы: