Faber INSM24GR250-B Скачать руководство пользователя страница 3

3

ALL WALL AND FLOOR OPENINGS WHERE THE RANGEHOOD IS INSTALLED MUST BE SEALED.

This rangehood requires at least 24" of clearance

 between the bottom of the rangehood and the 

cooking surface or countertop.  This hood has been approved by UL at this distance from the cooktop.  

The maximum depth of overhead cabinets is 13". Overhead cabinets on both sides of this unit must be 

a minimum of 18" above the cooking surface or countertop.

Consult the cooktop or range installation instructions given by the manufacturer before making any cutouts.  

MOBILE  HOME  INSTALLATION  The installation of this rangehood must conform to the Manufactured 

Home Construction and Safety Standards, Title 24 CFR, Part 3280 (formerly Federal Standard for Mobile 

Home Construction and Safety, Title 24, HUD, Part 280).  Four wire power supply must be used and the 

appliance wiring must be revised.  See Electrical Requirements.

• Venting system MUST terminate outside the home.

• 

DO NOT

 terminate the ductwork in an attic or other enclosed space.

• 

DO NOT

 use 4" laundry-type wall caps.

• Flexible-type ductwork is not recommended.

• 

DO NOT

 obstruct the flow of combustion and ventilation air.

• Failure to follow venting requirements may result in a  fire.

   WARNING

!

Cold Weather installations

An additional back draft damper should be installed to minimize backward cold air flow and a 

nonmetallic thermal break should be installed to minimize conduction of outside temperatures as 

part of the vent system. The damper should be on the cold air side of the thermal break. The break 

should be as close as possible to where the vent system enters the heated portion of the house.

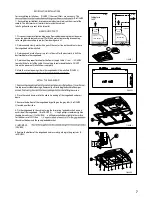
VENTING   REQUIREMENTS

Determine which venting method is best for your application. Ductwork can extend either through the wall 

or the roof.

The length of the ductwork and the number of elbows should be kept to a minimum to provide efficient 

performance.  The size of the ductwork should be uniform.  Do not install two elbows together.  Use duct tape 

to seal all joints in the ductwork system.  Use caulking to seal exterior wall or floor opening around the cap.

Flexible ductwork is not recommended. Flexible ductwork creates back pressure and air turbulence that 

greatly reduces performance.

Make sure there is proper clearance within the wall or floor for exhaust duct before making cutouts.  Do 

not cut a joist or stud unless absolutely necessary.  If a joist or stud must be cut, then a supporting frame 

must be constructed. 

WARNING - To Reduce The Risk Of Fire, Use Only Metal Ductwork.

CAUTION - To reduce risk of fire and to properly exhaust air, be sure to duct air outside – Do 

not vent exhaust air into spaces within walls or ceilings or into attics, crawl spaces, or garages. 

3.  When cutting or drilling into wall or ceiling, do not damage electrical wiring and 

other hidden utilities.

4.  Ducted fans must always be vented to the outdoors.

ATTENTION: 

THE INCA SMART IS NOT DESIGNED FOR USE OVER PRO-STYLE COOKING 

SURFACES, INSTALLATIONS OVER PRO-STYLE COOKING SURFACES WILL COMPLETELY 

VOID THE WARRANTY OF THIS PRODUCT."

Содержание INSM24GR250-B

Страница 1: ...INSM24GR250 B INSM28GR250 B Installation Instructions Use and Care Information Instructions d installation Utilisez et d entretien...

Страница 2: ...re with your back to an exit Based on Kitchen Firesafety Tips published by NFPA WARNING TO REDUCE THE RISK OF FIRE OR ELECTRIC SHOCK do not use this fan with any solid state speed control device WARNI...

Страница 3: ...temperatures as part of the vent system The damper should be on the cold air side of the thermal break The break should be as close as possible to where the vent system enters the heated portion of th...

Страница 4: ...ld be connected directly to the fused disconnect or circuit breaker through flexible armored or nonmetallic sheathed copper cable Allow some slack in the cable so the appliance can be moved if servici...

Страница 5: ...des installations avec L Inca HC SS enlevez la section perfor e additionnelle RANGEHOOD DIMENSIONS DIMENSIONS DE LA HOTTE LINER DIMENSIONS DIMENSIONS DU CADRE Pre Planning Your Installation Important...

Страница 6: ...T OUT WHEN INSTALLING THE STANDARD LINER WITH THE INCA SMART MODEL THIS PERFORATION IS ONLY REMOVED FOR USE WITH THE INCA HC SS MODEL Consider the shape size and weight of the Inca Smart and Liner to...

Страница 7: ...ocated on either side 4 Fix the rangehood to the cabinet using the two spring loaded brackets one on each side of the rangehood B in FIGURE 4 Using a philips screwdriver tighten theadjustmentscrew Cin...

Страница 8: ...rgent solution or washed in the dishwasher The g moved by pressing the handle of the filter as indicated in FIGURE 6 When replacing make sure that the filters are with the handles in front and visible...

Страница 9: ...or more frequently with heavy usage Remove the grease filters Remove the saturated carbon filter Fit the new filter by hooking it into its seating Replace the grease filters Replacing the bulbs E 14...

Страница 10: ...handles A in FIGURE 7 Unscrew the two FIGURE 6 WIRING DIAGRAM This rangehood uses two 40W incandescent bulbs Schema Elettrico Schema Electrisch Electric Diagram Esquema El ctrico Sch ma Electrique Es...

Страница 11: ...om accident alteration misuse abuse fire flood acts of God improper installation installation not in accordance with electrical or plumbing codes or Faber documentation or use of products not approved...

Страница 12: ...nevoiedesortiesetrouvederri revouspendantquevous teignezlesflammes D apr sleguide KitchenFiresafetyTips publi parlaNFPAaux tats Unis AVERTISSEMENT POURR DUIRELERISQUED INCENDIEOUDECHOC LECTRIQUE n uti...

Страница 13: ...meilleure efficacit la longueur des conduits et le nombre de coudes doivent tre le plus limit squepossible Lediam tredesconduitsdevrait treuniforme N installezpasdeuxcoudesensemble Utilisezunrubanpour...

Страница 14: ...Quincy Massachusetts 02269 tats Unis Cet appareil devrait tre branch directement au sectionneur fusible ou au disjoncteur par un c ble flexible de cuivre avec blindage ou gaine non m tallique Laissez...

Страница 15: ...r des installations avec L Inca HC SS enlevez la section perfor e additionnelle RANGEHOOD DIMENSIONS DIMENSIONS DE LA HOTTE LINER DIMENSIONS DIMENSIONS DU CADRE Pre Planning Your Installation Importan...

Страница 16: ...PERFORATIONESTSEULEMENT ENLEV E POUR L USAGE AVEC LE MOD LE DE L INCA HC SS INSTALLATIONS AVEC CADRES PI CES FOURNIES POUR L INSTALLATION 1 registre clapet 10 vis Compartiment de filage 1 n cessaire d...

Страница 17: ...jeter la bo te 2 Placer le registre rond dans l ouverture d chappement de la hotte et appuyer forte ment sur le registre 3 Retirer le bas de la hotte en tirant sur les pattes grises A de la FIGURE 3...

Страница 18: ...y in hot detergent solution or washed in the dishwasher The g moved by pressing the handle of the filter as indicated in FIGURE 6 When replacing make sure that the filters are with the handles in fron...

Страница 19: ...ac s environ tous les 4 mois d utilisation ou plus souvent en cas d utilisation intensive Retirez les filtres graisse Retirez le filtre charbon satur Posez le nouveau filtre en l installant son emplac...

Страница 20: ...handles A in FIGURE 7 Unscrew the two FIGURE 6 WIRING DIAGRAM This rangehood uses two 40W incandescent bulbs Schema Elettrico Schema Electrisch Electric Diagram Esquema El ctrico Sch ma Electrique Esq...

Страница 21: ...es d coulant d un accident d une modification de l utilisation incorrecte ou abusive d un incendie d une inondation d un cas de force majeure d une installation inad quate d une installation non confo...

Страница 22: ...22...

Страница 23: ...23...

Страница 24: ...991 0457 357_02 160607 D002842_01...

Отзывы: