Faber INLT21SSV Скачать руководство пользователя страница 37

37

PIÈCES

RÉF. PIÈCE

QTÉ

A

Bâti de la hotte

1

B

Brides de fixation 

2

D

Grille d'évent de recyclage

2

E

Volets de registre

2

F

Anneau métallique du registre

1

Z

Télécommande

1

RÉF. PIÈCE

G

Vis à tête Pozidriv (1/8" x 3/8")


2

I

Vis à tête Pozidriv (1/8" x 5/8")


4

L

Caches à vis

2

PIÈCES INCLUSES

Содержание INLT21SSV

Страница 1: ...LT21SSV INLT28SSV INLT35SSV Installation Instructions Use and Care Information Instructions d installation Utilisez et d entretien Instrucciones de instalaci n Informaci n de uso y cuidado INCA IN LIG...

Страница 2: ...Choosing venting method 16 Attach venting option 1 rear or top vented 17 Attach venting option 2 non ducted recirculating 18 Connecting house power 19 Operating the controls 22 Remote control 23 Clea...

Страница 3: ...ment is being called 4 You can fight the fire with your back to an exit Based on Kitchen Firesafety Tips published by NFPA WARNING TOREDUCETHERISKOFFIREORELECTRICSHOCK donotusethisfanwith any solid st...

Страница 4: ...nd either through the wall or the roof The length of the ductwork and the number of elbows should be kept to a minimum to provide efficient performance The size of the ductwork should be uniform Do no...

Страница 5: ...copper cable Allow some slack in the cable so the appliance can be moved if servicing is ever necessary A UL Listed 1 2 conduit connector must be provided at each end of the power supply cable at the...

Страница 6: ...6 RANGE HOOD DIMENSIONS DRAFT 19 JUN 2020 14 46 21 28 35 21 28 35 DRAFT 19 JUN...

Страница 7: ...7 INSTALLATION HEIGHT REQUIREMENTS MIN 24 OVER ELECTRIC MIN 30 OVER GAS Min 24 Min 30...

Страница 8: ...RT QTY A Hood body 1 B Bracket 2 D Recirculation vent grill 2 E Damper flaps 2 F Metallic damper ring 1 Z Remote Control 1 REF PART G Pozi Screws 1 8 x 3 8 2 I Pozi Screws 1 8 x 5 8 4 L Screws plug 2...

Страница 9: ...9 A D E F Z B...

Страница 10: ...oal Filter Kit FILTER1 Activated Charcoal Filter Kit Washable Long Lasting FILTER1LL Direct Connect Wiring Box WIREBOX Standard Liner 24 Use only with INLT21SSV LINE24ST Standard Liner 30 Use only wit...

Страница 11: ...11 VENTING METHOD Option 1 REAR OR TOP VENTED Option 2 RECIRCULATING Rear 6 1 Requires purchase of Activated Charcoal Accessory kit 6 Top...

Страница 12: ...elf supporting liner LINSPT301228 or LINSPT361228 please follow the instructions included in the corresponding self supporting liner manual If you do not use the Self supporting liner create a cut out...

Страница 13: ...I as shown in the center of the cut out on each side The edge of the bracket should align with the cut out edge If you are installing a Self supporting liner LINSPT301228 or LINSPT361228 brackets nee...

Страница 14: ...14 Open the filter panel cover away from you by pulling down from the magnetic catch Remove the grease filters by pushing the release tab towards the back of the hood 4 5 MIN 200mm 6 5 Z Z...

Страница 15: ...de installation clips snap into place above the previously installed side wall brackets Lock the hood into position by tightening the 2 screws Vf from underneath Insert the 2 plastic hole covers L one...

Страница 16: ...16 CHOOSING VENTING METHOD Option 1 REAR OR TOP VENTED Option 2 RECIRCULATING 7 Requires purchase of Activated Charcoal Accessory kit Rear 6 6 Top Go to Pg 17 Go to Pg 18...

Страница 17: ...the top of the hood before connecting ductwork Install Roof or Wall Cap purchased separately Connect the 6 metal ductwork to the Roof or Wall Cap and then attach ductwork Seal with foil tape D Install...

Страница 18: ...d Recirculation venting route the ductwork to a location above the hood where the discharge is vented back into the room Use the included Recirculation Vent Grill D to cover the opening Secure the gri...

Страница 19: ...must be grounded In the event of an electrical short circuit grounding reduces the risk of electric shock by providing an escape wire for the electric current This appliance is equipped with a cord h...

Страница 20: ...and rotate the filter clockwise towards the front of the insert hood until it locks into place Turn counterclockwise towards the back of the insert hood to remove for more details see paragraph Changi...

Страница 21: ...21 Reinstall the grease filters removed previously Close the filter panel cover by pushing it back into place until the magnetic latch has secured the panel 10 11...

Страница 22: ...can be operated by pressing any of the fan setting buttons Hold down this button for 2 seconds to activate delayed off function which will keep the fan On for 15 minutes and automatically shut Off T1...

Страница 23: ...each time it is pressed Intensive Activates the Intensive function Delay Activates Deactivates the Delay function Light Lights On Off Press for 2 seconds to modify the intensity of the Light Increase...

Страница 24: ...instructions Clean exterior surfaces with a commercially available stainless steel cleaner CLEANING STAINLESS STEEL CLEANING THE FILTER COVER PANEL 1 Open the Panel by pulling it down 2 Clean the outs...

Страница 25: ...ARING FOR FILTERS CLEANING METAL GREASE FILTERS The metal grease filters can be cleaned in hot detergent solution or washed in the dishwasher They should be cleaned every 2 months use or more fre quen...

Страница 26: ...me pulling downward 3 Remove the saturated Activated Charcoal Filters as indicated A 4 Fit the new Filters as indicated B 5 Replace taking care to ensure that the handle faces forwards 6 Close the Pan...

Страница 27: ...nto the area below the motor and then insert the lower portion of the filter 2 Turn the filter to the right around the motor and slide the filter between the motor and side wall 3 Position the filter...

Страница 28: ...28 120V 60Hz WIRING DIAGRAM...

Страница 29: ...ng from accident alteration misuse abuse fire flood acts of God improper installation installation not in accordance with electrical or plumbing codes or Faber documentation or use of products not app...

Страница 30: ...45 Raccord de ventilation option 1 ventilation vers l arri re ou vers le haut 46 Raccord de ventilation option 2 recyclage sans canalisation 47 Branchement l alimentation domestique 48 Utilisation de...

Страница 31: ...l pour teindre le feu Cela pourrait provoquer une violente explosion de vapeur d Utilisez un extincteur UNIQUEMENT si 1 Vous tes certain qu il s agit d un extincteur de classe ABC et que vous connaiss...

Страница 32: ...t rieur ou le plancher autour du clapet Iln estpasrecommand d utiliserdesconduitsflexibles Lesconduitsflexiblesprovoquent unecontre pressionetdelaturbulencequidiminuentgrandementl efficacit del appare...

Страница 33: ...eu dans le c ble pour permettre le d placement de l appareil si des travaux d entretien s av raient n cessaires Un raccord de conduit homologu par l UL de 1 2 doit tre install aux deux extr mit s du c...

Страница 34: ...re ou de mise la terre peut entra ner un choc lectrique Consultez un lectricien qualifi si vous n tes pas certain de la mise la terre de la hotte Le non respect des exigences de la fiche technique lec...

Страница 35: ...35 DIMENSIONS DE LA HOTTE DRAFT 19 JUN 2020 14 46 21 28 35 21 28 35 DRAFT 19 JUN...

Страница 36: ...36 HAUTEUR REQUISE POUR L INSTALLATION MIN 24 AU DESSUS D UNE SURFACE LECTRIQUE MIN 30 AU DESSUS D UNE SURFACE AU GAZ Min 24 Min 30...

Страница 37: ...tte 1 B Brides de fixation 2 D Grille d vent de recyclage 2 E Volets de registre 2 F Anneau m tallique du registre 1 Z T l commande 1 R F PI CE G Vis t te Pozidriv 1 8 x 3 8 2 I Vis t te Pozidriv 1 8...

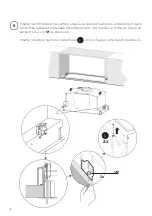
Страница 38: ...38 A D E F Z B...

Страница 39: ...de filtre charbon actif lavable longue dur e FILTER1LL Bo te de c blage connexion directe WIREBOX Garniture standard 24 Utiliser uniquement avec INLT21SSV LINE24ST Garniture standard 30 Utiliser uniq...

Страница 40: ...40 M THODE DE VENTILATION Option 1 VENTILATION VERS L ARRI RE OU VERS LE HAUT Option 2 RECYCLAGE Arri re 6 1 Exige l achat de la trousse de l accessoire charbon actif 6 Haut...

Страница 41: ...garniture autoportante LINSPT301228 ou LINSPT361228 suivre les instructions incluses dans le manuel de la garniture autoportante correspondant Si vous n utilisez pas la garniture autoportante cr er u...

Страница 42: ...tr au centre de chaque c t de l ouverture Le bord de la bride doit tre align avec le bord de l ouverture Si vous installez une garniture autoportante LINSPT301228 ou LINSPT361228 les supports doivent...

Страница 43: ...rotection du filtre loin de vous en le tirant vers le bas pour le d tacher du dispositif de retenue magn tique Retirez les filtres graisse en poussant les pattes de d gagement vers l arri re de la hot...

Страница 44: ...squ ce que les fixations s enclenchent dans les brides lat rales install es pr c demment Verrouillez la hotte en place en serrant les 2 vis Vf du dessous Ins rez les deux caches de plastique L un de c...

Страница 45: ...X DE LA M THODE DE VENTILATION Option 1 VENTILATION VERS L ARRI RE OU VERS LE HAUT Option 2 RECYCLAGE 7 Exige l achat de la trousse de l accessoire charbon actif Arri re 6 6 Haut Allez la p 46 Allez l...

Страница 46: ...ez le clapet de toiture ou le clapet mural achet s par ment Raccordez le conduit m tallique de 6 au clapet de toiture ou au clapet mural puis raccordez les conduits Scellez en utilisant le ruban m tal...

Страница 47: ...lisation dirigez les conduits un emplacement au dessus de la hotte o l air vacu est retourn dans la pi ce Utilisez la grille d vent de recyclage D incluse pour couvrir l ouverture Fixez la grille l ai...

Страница 48: ...E LA TERRE Cet appareil doit tre mis la terre La mise la terre r duit le risque de choc lectrique en cas de court circuit car elle fournit un fil d vacuation au courant lectrique Cet appareil est muni...

Страница 49: ...des aiguilles d une montre vers l avant de la hotte encastrable jusqu ce qu il soit verrouill en place Faites tourner dans le sens contraire des aiguilles d une montre vers l arri re de la hotte enca...

Страница 50: ...50 Remettez en place les filtres graisse enlev s pr c demment Fermez le panneau de protection du filtre en le poussant en place jusqu ce que le m canisme de verrouillage s enclenche 10 11...

Страница 51: ...ant sur l un ou l autre des boutons de r glage Tenez ce bouton enfonc pendant 2 secondes pour activer la fonction de d sactivation retard e qui teindra automatiquement le ventilateur apr s 15 minutes...

Страница 52: ...e working speed each time it is pressed Intensive Activates the Intensive function Delay Activates Deactivates the Delay function Light Lights On Off Press for 2 seconds to modify the intensity of the...

Страница 53: ...ydable Nettoyez les surfaces ext rieures avec un agent nettoyant pour l acier inoxydable disponible sur le march NETTOYAGE DE L ACIER INOXYDABLE NETTOYAGE DU PANNEAU DE PROTECTION DU FILTRE 1 Ouvrez l...

Страница 54: ...SSE M TALLIQUES Les filtres graisse m talliques peuvent tre lav s dans une solution d eau chaudesavonneuseoudanslelave vaisselle Ilsdevraient trenettoy stousles 2 mois d utilisation ou plus fr quemmen...

Страница 55: ...s filtres charbon actif satur s comme indiqu A 4 Posez les nouveaux filtres comme indiqu B 5 Remettez le en place en vous assurant que la poign e se trouve vers l avant 6 Refermez le panneau ATTENTION...

Страница 56: ...lehautetdanslazonesousle moteur puisins rezlapartie inf rieure du filtre en place 2 Tournez le filtre droite autour du moteur et faites glisser le filtre entre le moteur et le mur lat ral 3 Placez le...

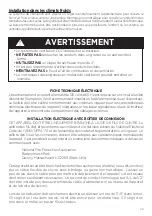
Страница 57: ...57 120V 60Hz SCH MA DE C BLAGE...

Страница 58: ...ng from accident alteration misuse abuse fire flood acts of God improper installation installation not in accordance with electrical or plumbing codes or Faber documentation or use of products not app...

Страница 59: ...el m todo de ventilaci n 74 Conectar la ventilaci n opci n 1 ventilaci n trasera o superior 75 Conectar la ventilaci n opci n 2 recirculaci n sin conducto 76 Conexi n de la energ a de la casa 77 Opera...

Страница 60: ...ENTE si 1 Usted sabe que tiene un extintor Clase ABC y ya sabe c mo operarlo 2 El incendio es peque o y est contenido en el rea donde comenz 3 Se llama al departamento de bomberos 4 Puede luchar contr...

Страница 61: ...ura del piso alrededor de la tapa NOserecomiendanconductosflexibles Losconductosflexiblescreanunacontrapresi n y turbulencias de aire que reducen en gran medida el rendimiento Aseg rese de que haya es...

Страница 62: ...ational Fire Protection Association Batterymarch Park Quincy Massachusetts 02269 Este electrodom stico debe conectarse directamente a la desconexi n por fusible o disyuntor a trav s de un cable flexib...

Страница 63: ...e tierra Si la tuber a de agua fr a est interrumpida por juntas de pl stico de materiales no met licos u otros materiales NO la utilice para conexi n a tierra NO conecte a tierra a una tuber a de gas...

Страница 64: ...64 DIMENSIONES DE LA CAMPANA EXTRACTORA DRAFT 19 JUN 2020 14 46 21 28 35 21 28 35 DRAFT 19 JUN...

Страница 65: ...65 REQUISITOS DE ALTURA DE INSTALACI N M N 24 SOBRE PLACA EL CTRICA M N 30 SOBRE PLACA DE GAS M n 24 M n 30...

Страница 66: ...1 B Soporte 2 D Rejilla de ventilaci n para recirculaci n 2 E Trampillas amortiguadoras 2 F Anillo amortiguador met lico 1 Z Mando remoto 1 REF PIEZA G Tornillos Pozi 1 8 x 3 8 2 I Tornillos Pozi 1 8...

Страница 67: ...67 A D E F Z B...

Страница 68: ...tro de Carb n Activo FILTER1 Kit de Filtro de Carb n Activo Lavable de larga duraci n FILTER1LL Caja de Cableado de Conexi n Directa WIREBOX Revestimiento Est ndar 24 Use solo con INLT21SSV LINE24ST R...

Страница 69: ...69 M TODO DE VENTILACI N Opci n 1 VENTILACI N TRASERA O SUPERIOR Opci n 2 RECIRCULACI N Parte trasera 6 1 Requiere compra del kit de accesorios de carb n activado 6 Parte superior...

Страница 70: ...ento auto portante LINSPT301228 o LINSPT361228 por favor siga las instrucciones incluidas en el correspondiente manual del revestimiento auto portante Si no usa el revestimiento auto portante realice...

Страница 71: ...mo se muestra en el centro del corte en cada lado El borde del soporte debe alinearse con el borde cortado Si est instalando un revestimiento Auto portante LINSPT301228 o LINSPT361228 los soportes nec...

Страница 72: ...del panel del filtro en direcci n opuesta a usted tirando hacia abajo del cierre magn tico Retire los filtros de grasa empujando la leng eta de liberaci n hacia la parte posterior de la campana 4 5 MI...

Страница 73: ...aterales encajen en su lugar sobre los soportes de pared lateral instalados previamente Bloquee la campana en su posici n apretando los 2 tornillos Vf desde abajo Inserte las 2 tapas de pl stico para...

Страница 74: ...M TODO DE VENTILACI N Opci n 1 VENTILACI N TRASERA O SUPERIOR Opci n 2 RECIRCULACI N 7 Requiere compra del kit de accesorios de carb n activado Parte trasera 6 6 Parte superior Vaya a la p gina 75 Vay...

Страница 75: ...e conectar los conductos Instale el techo o la tapa de pared comprados por separado Conecte el conducto met lico de 6 al techo o a la tapa de pared y luego conecte el conducto Selle con cinta de alumi...

Страница 76: ...sin conducto dirija la tuber a a una ubicaci n por encima de la campana donde la descarga se ventila de regreso a la sala Use la rejilla de ventilaci n de recirculaci n incluida D para cubrir la abert...

Страница 77: ...la conexi n a tierra reduce el riesgodedescargael ctricaalproporcionaruncabledeescapeparalacorriente el ctrica Este equipo est provisto de un cable que tiene un cable de conexi n a tierra con un ench...

Страница 78: ...tido horario hacia la parte delantera de la campana a insertar hasta que encaje en su lugar Gire en sentido antihorario hacia la parte posterior de la cubierta del inserto para quitar para obtener m s...

Страница 79: ...79 Reinstale los filtros de grasa retirados previamente Cierre la cubierta del panel del filtro empuj ndola hacia su lugar hasta que el pestillo magn tico haya asegurado el panel 10 11...

Страница 80: ...iera de los botones de ajuste del ventilador Mantenga presionado este bot n durante 2 segundos para activar la funci n de apagado retardado que mantendr el ventilador encendido durante 15 minutos y se...

Страница 81: ...ch time it is pressed Intensive Activates the Intensive function Delay Activates Deactivates the Delay function Light Lights On Off Press for 2 seconds to modify the intensity of the Light Aumenta la...

Страница 82: ...l acabado de acero inoxidable Limpie las superficies exteriores con un limpiador de acero inoxidable disponible en el mercado LIMPIEZA DEL ACERO INOXIDABLE LIMPIEZA DEL PANEL DE COBERTURA DEL FILTRO 1...

Страница 83: ...ILTROS DE GRASA MET LICOS Los filtros de grasa met licos se pueden limpiar en soluci n de detergente caliente o lavarse en el lavavajillas Se deben limpiar cada 2 meses de uso o m s frecuentemente si...

Страница 84: ...e carb n activado saturados como se indica A 4 Coloque los nuevos filtros como se indica B 5 Reemplace teniendo cuidado de asegurarse de que la manija mire hacia adelante 6 Cierre el panel PRECAUCI N...

Страница 85: ...ltro hacia arriba y hacia el rea debajo del motor y luegoinsertelaparteinferior del filtro 2 Gire el filtro hacia la derecha alrededordelmotorydeslice el filtro entre el motor y la pared lateral 3 Col...

Страница 86: ...86 120V 60Hz DIAGRAMA DE CABLEADO...

Страница 87: ...m stico distinto al normal 4 Da os resultantes de accidente alteraci n mal uso abuso incendio inundaci n eventos naturales instalaci n incorrecta instalaci n no conforme a los c digos el ctricos o de...

Страница 88: ...991 0636 908_02 210118 D00007291_01...

Отзывы: