Faber Flexa Скачать руководство пользователя страница 7

15

GB

ELECTRICAL CONNECTION

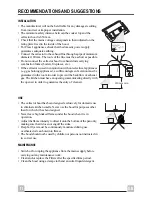
• Connect the hood to the mains through a two-pole switch having a contact gap of at least 3 mm.
• When opening the sliding carriage for the first time after installing the hood, pull it out briskly until it 

clicks.

USE

Control panel

L

Light 

Switches the lighting system on 
and off

L

Light 

Switches the lighting system on 
and off

M

Motor

Switches the extractor motor on 
and off

M

Motor

Switches the extractor motor on 
and off

V

Speed

Sets the operating speed of the 
extractor:
1. Low speed, used for a 

continuous and silent air 
change in the presence of 
light cooking vapour.

2. Medium speed, suitable for 

most operating conditions 
given the optimum treated air 
flow/noise level ratio.

3. Maximum speed, used for 

eliminating the highest 
cooking vapour emission, 
including long periods

V

Speed

Sets the operating speed of the 
extractor:

Low speed, used for a continuous 
and silent air change in the 
presence of light cooking vapour.

Maximum speed, used for 
eliminating the highest cooking 
vapour emission, including long 
periods

L

M-V

L

M - V

0

1

0

1

2

3

Содержание Flexa

Страница 1: ...Flexa IT Libretto Istruzioni 2 GB Instruction Manual 10 FR Manuel d Instructions 18 DE Bedienungsanleitung 26 NL Gebruiksaanwijzing 34...

Страница 2: ...tions contained in this Instruction Manual your appliance will give you constant high performance and will remain efficient for many years to come CONTENTS RECOMMENDATIONS AND SUGGESTIONS 11 CHARACTER...

Страница 3: ...aeration must be guaranteed in the room in order to prevent the backflow of exhaust gas The kitchen must have an opening communicating directly with the open air in order to guarantee the entry of cl...

Страница 4: ...ty Product Components 1 1 Hood Body complete with Controls Light Blower Filters 8 1 Directional Air Outlet grille 20 1 Closing element Ref Q ty Installation Components 12a 4 Screws 4 2 x 44 4 12e 2 S...

Страница 5: ...ce using the drilling template provided Fix using the 4 screws 12a 4 2 x 44 4 provided The hood can be installed either directly on the bottom surface of the wall units min 650 mm above the hob using...

Страница 6: ...screws supplied for this purpose Cut a hole 125 mm in the wall unit over the hood Connect the hood body outlet to the top part of the wall unit using a rigid or flexible pipe 120 mm to be selected by...

Страница 7: ...motor on and off V Speed Sets the operating speed of the extractor 1 Low speed used for a continuous and silent air change in the presence of light cooking vapour 2 Medium speed suitable for most ope...

Страница 8: ...every two months of operation or more frequently with heavy usage and can be washed in a dishwasher Release the filter retaining grill using the lateral sliding handles Remove the filter retaining cli...

Страница 9: ...seating Replace the metal grease filters or close the filter retaining grill 20 W halogen light Remove the 2 Screws fixing the Lighting support and pull it out of from the Hood Extract the Lamp from...

Страница 10: ...t conforme la norme europ enne en mati re de basse tension C E E 73 23 de s curit lectrique ainsi qu aux normes europ ennes C E E 89 336 en mati re de compatibilit lectromagn tique et C E E 93 68 en m...

Отзывы: