Faber FLEXA FLEX24SS300 Скачать руководство пользователя страница 67

67

5

Introduzca la campana en el recorte hasta que los clips de instalación 
laterales encajen en su sitio. Bloquee la campana en su posición apre-
tando los 2 tornillos 

Vf

 desde abajo.

[

Vf

Destornillador Phillips

Содержание FLEXA FLEX24SS300

Страница 1: ...FLEX24SS300 FLEX30SS300 Installation Instructions Use and Care Information Instructions d installation Utilisez et d entretien Instrucciones de instalaci n Informaci n de uso y cuidado FLEXA...

Страница 2: ...the cabinet 13 Install the rear trim strip 16 Choosing venting method 17 Attach venting option 1 rear or top vented 18 Attach venting option 2 non ducted recirculating 19 Connecting house power 20 Op...

Страница 3: ...ment is being called 4 You can fight the fire with your back to an exit Based on Kitchen Firesafety Tips published by NFPA WARNING TOREDUCETHERISKOFFIREORELECTRICSHOCK donotusethisfanwith any solid st...

Страница 4: ...nd either through the wall or the roof The length of the ductwork and the number of elbows should be kept to a minimum to provide efficient performance The size of the ductwork should be uniform Do no...

Страница 5: ...y plastic nonmetallic gaskets or other materials DO NOT use for grounding DO NOT ground to a gas pipe DO NOT have a fuse in the neutral or grounding circuit A fuse in the neutral or grounding circuit...

Страница 6: ...6 RANGE HOOD DIMENSIONS RANGE HOOD 24 DRAFT 09 APR 2021 19 45...

Страница 7: ...7 RANGE HOOD 30 DRAFT 09 APR 2021 19 39...

Страница 8: ...8 INSTALLATION HEIGHT REQUIREMENTS MIN 24 OVER ELECTRIC MIN 30 OVER GAS Min 24 Min 30...

Страница 9: ...9 PARTS REF PART QTY A Hood body 1 B Rear Trim Strip 1 C Recirculation vent grill 1 D Damper flaps 2 E Metal ring 1 REF PART F Pozi Screws 3 16 x 1 2 2 G Pozi Screws 1 8 x 1 2 2 PARTS INCLUDED...

Страница 10: ...10 A C B E D...

Страница 11: ...nd Metal Ductwork Foil tape TOOLS NEEDED TOOL Tape Measure Pencil Electric Drill with 5 16 Drill Bit Phillips Screwdriver Pozi Screwdriver Metal sheers Work gloves ACCESSORIES AVAILABLE ACCESSORY SKU...

Страница 12: ...12 VENTING METHOD Option 1 REAR OR TOP VENTED Option 2 RECIRCULATING Rear 5 1 Requires purchase of Activated Charcoal Accessory kit 5 Top...

Страница 13: ...cabinet bottom Wood blocks should be flush or recessed 1 16 to 1 8 within the cabinet bottom as shown 20 1 16 9 16 ATTACHING THE HOOD TO THE CABINET PREPARING THE CABINET Create a cut out in the bott...

Страница 14: ...14 24 9 16 RANGE HOOD 30 Remove the grease filters by pushing the release tab towards the side of hood 4...

Страница 15: ...15 5 Insert the hood in the cut out until the side installation clips snap into place Lock the hood into position by tightening the 2 screws Vf from underneath Vf Phillips Screwdriver...

Страница 16: ...TRIP 2x 4 2 x 12 7 F B 1 A rear trim strip B is included to cover the underside of any remaining exposed cabinet Attach the vinyl strip to the bottom of the back of the rangehood with the two screws F...

Страница 17: ...17 CHOOSING VENTING METHOD Option 1 REAR OR TOP VENTED Option 2 RECIRCULATING 5 Requires purchase of Activated Charcoal Accessory kit Rear 5 5 Top Go to Pg 18 Go to Pg 19...

Страница 18: ...uded with the Hood Then install the damper flaps D by snapping the tabs into place inside the top of the hood before connecting ductwork 2 Install Roof or Wall Cap purchased separately Connect the 5 m...

Страница 19: ...on above the hood where the discharge is vented back into the room Use the included Recirculation Vent Grill C to cover the opening Secure the grill with the 2 screws G provided in the Install Kit A s...

Страница 20: ...instructions are not completely understood or if doubt exists as to whether the appliance is properly grounded Do not use an extension cord If the power supply cord is too short have a qualified elect...

Страница 21: ...k grid on the blower side and rotate the filter clockwise towards the front of the hood until it locks into place Turn counterclockwise towards the back of the hood to remove for more details see para...

Страница 22: ...Moving the switch to the 1 Position turns the light On Moving the switch to the 0 Position turns the light Off M V Motor Speed M V shows the speed control switch for the blower Moving the switch to th...

Страница 23: ...every 2 months use or more fre quently if use is particularly heavy 1 Pull out the sliding suction panel 2 Remove the grease filters by pushing the release tab towards the side of hood 3 Wash the filt...

Страница 24: ...filters by pushing the release tab towards the side of hood 3 Remove the saturated carbon filter by releasing the fixing hooks 4 Fit the new filter by hooking it into its seating 5 Replacethefilter ta...

Страница 25: ...f ballasted led lamps listed in accordance with ul 1993 nmxj 578 1 ance csa c22 2 No 1993 1 Pull out the sliding suction panel 2 Remove the filter 3 Replace the lamp with a new one of the same type 4...

Страница 26: ...eation date 10 06 2021 FABER Corrad Created by 991 0656 574 Code SW3 R V CN3 LB WH A GR CN2 SW2 1 2 3 6 5 4 7 8 9 BK BR CN1 SW1 1 2 3 6 5 4 9 8 7 110 127V 60HZ 0 1 RED VLT WHT BRW BLU PNK OFF GRY 1 BL...

Страница 27: ...ng from accident alteration misuse abuse fire flood acts of God improper installation installation not in accordance with electrical or plumbing codes or Faber documentation or use of products not app...

Страница 28: ...de de garniture arri re 42 Choix de la m thode de ventilation 43 Fixation de la ventilation option 1 ventilation arri re ou sup rieure 44 Ventilation de la fixation option 2 recirculation non canalis...

Страница 29: ...mbattre le feu en tournant le dos une sortie Bas sur les Conseils de s curit pour la cuisine publi par l ANPI AVERTISSEMENT POURR DUIRELERISQUED INCENDIEOUDECHOC LECTRIQUE n utilisez pas ce ventilateu...

Страница 30: ...soit par le mur soit par le toit Lalongueurdesconduitsetlenombredecoudesdoivent trer duitsauminimumpourassurer uneperformanceefficace Latailledesconduitsdoit treuniforme N installezpasdeuxcoudes ensem...

Страница 31: ...es mat riaux NE l utilisez PAS pour la mise la terre NE mettez PAS la terre un tube de gaz N ayez PAS de fusible dans le circuit neutre ou de mise la terre Un fusible dans le circuit neutre ou de mise...

Страница 32: ...32 DIMENSIONS DE LA HOTTE HOTTE DE CUISINE 24 POUCES DRAFT 09 APR 2021 19 45...

Страница 33: ...33 HOTTE DE CUISINE 30 POUCES DRAFT 09 APR 2021 19 39...

Страница 34: ...34 EXIGENCES EN MATI RE DE HAUTEUR D INSTALLATION MIN 24 POUCES AU DESSUS DE L LECTRICIT MIN 30 POUCES AU DESSUS DU GAZ Min 24 Min 30...

Страница 35: ...I CE QT A Corps de la hotte 1 B Bande de garniture arri re 1 C Grille d a ration de recirculation 1 D Volets du clapet 2 E Anneau m tallique 1 R F PI CE F Vis Pozi 3 16 x 1 2 2 G Vis Pozi 1 8 x 1 2 2...

Страница 36: ...36 A C B E D...

Страница 37: ...d de 5 pouces Ruban d aluminium OUTILS N CESSAIRES OUTIL M tre ruban Crayon Perceuse lectrique avec m che de 5 16 pouces Tournevis Phillips Tournevis Pozi Ciseaux m taux Gants de travail ACCESSOIRES D...

Страница 38: ...38 M THODE DE VENTILATION Option 1 VENTILATION PAR L ARRI RE OU PAR LE HAUT Option 2 RECIRCULATION Arri re 5 1 N cessite l achat du kit d accessoires pour charbon actif 5 Haut...

Страница 39: ...blocs de bois doivent tre align s ou encastr s de 1 16 pouces 1 8 pouces dans le fond de l armoire comme illustr 20 1 16 9 16 FIXATION DE LA HOTTE L ARMOIRE PR PARATION DE L ARMOIRE Cr ez une d coupe...

Страница 40: ...40 24 9 16 HOTTE DE CUISINE 30 POUCES Retirez les filtres graisse en poussant la languette de d gagement vers le c t de la hotte 4...

Страница 41: ...41 5 Ins rez la hotte dans la d coupe jusqu ce que les clips d installation lat raux s enclenchent Verrouillez la hotte en position en serrant les 2 vis Vf par le dessous Vf Tournevis Phillips...

Страница 42: ...URE ARRI RE 2x 4 2 x 12 7 F B 1 Une bande de garniture arri re B est incluse pour dissimuler le dessous de l armoire expos e restante Fixez la bande en vinyle au bas de l arri re de la hotte l aide de...

Страница 43: ...HODE DE VENTILATION Option 1 VENTILATION PAR L ARRI RE OU PAR LE HAUT Option 2 RECIRCULATION 5 N cessite l achat du kit d accessoires pour charbon actif Arri re 5 pou ces 5 pou ces Haut Allez la page...

Страница 44: ...a hotte Installez en suite les volets du clapet D en enclenchant les languettes l int rieur du haut de la hotte avant de raccorder les conduits 2 Installez le capuchon de toit ou de mur achet s par me...

Страница 45: ...e la hotte o l vacuation est renvoy e dans la pi ce Utilisez la grille d vent de recirculation incluse C pour couvrir l ouver ture Fixez la grille l aide des 2 vis G fournies dans le kit d installatio...

Страница 46: ...si vous avez des doutes quant la mise la terre de l appareil N utilisez pas de rallonge lectrique Si le cordon d alimentation est trop court demandez un lectricien qualifi d installer une prise proxim...

Страница 47: ...lateur et tournez le filtre dans le sens horaire vers l avant de la hotte jusqu ce qu il se verrouille en place Tournez dans le sens antihoraire vers l arri re de la hotte pour le retirer pour plus de...

Страница 48: ...pour allumer la lumi re En pla ant l interrupteur sur la position 0 la lumi re s teint M V Moteur vitesse Le M V indique l interrupteur de contr le de la vitesse du ventilateur En pla ant l interrupt...

Страница 49: ...toy stousles2mois d utilisation ou plus fr quemment si l utilisation est particuli rement intensive 1 Retirez le panneau d aspiration coulissant 2 Retirez les filtres graisse en poussant la languette...

Страница 50: ...e de d gagement vers le c t de la hotte 3 Retirez le filtre charbon satur en rel chant les crochets de fixation 4 Mettez en place le nouveau filtre en l accrochant dans son logement 5 Remettez le filt...

Страница 51: ...E12 auto ballast es list es conform ment la norme ul 1993 nmxj 578 1 ance csa c22 2 No 1993 1 Retirez le panneau d aspiration coulissant 2 Retirez le filtre 3 Remplacez l ampoule par une nouvelle du m...

Страница 52: ...reation date 10 06 2021 FABER Corrad Created by 991 0656 574 Code SW3 R V CN3 LB WH A GR CN2 SW2 1 2 3 6 5 4 7 8 9 BK BR CN1 SW1 1 2 3 6 5 4 9 8 7 110 127V 60HZ 0 1 RED VLT WHT BRW BLU PNK OFF GRY 1 B...

Страница 53: ...ommages d coulant d un accident d une modification de l utilisation incorrecte ou abusive d un incendie d une inondation d un cas de force majeure d une installation inad quate d une installation non...

Страница 54: ...5 Instalaci n de la moldura trasera 68 Elecci n del m todo de ventilaci n 69 Fijar la ventilaci n opci n 1 ventilado trasero o superior 70 Fijar la ventilaci n opci n 2 recirculaci n sin conductos 71...

Страница 55: ...onsejos de Seguridad contra Incendios en la Cocina publicado por la NFPA ADVERTENCIA PARA REDUCIR EL RIESGO DE INCENDIO O DE CHOQUE EL CTRICO no utilice este ventilador con ning n dispositivo de contr...

Страница 56: ...la pared o del techo La longitud de la red de conductos y el n mero de codos deben reducirse al m nimo para conseguir un rendimiento eficaz El tama o de la red de conductos debe ser uniforme No instal...

Страница 57: ...co juntas no met licas u otros materiales NO la utilice para la conexi n a tierra NO conecte a tierra una tuber a de gas NO tenga un fusible en el circuito neutro o de conexi n a tierra Un fusible en...

Страница 58: ...58 DIMENSIONES DE LA CAMPANA EXTRACTORA CAMPANA EXTRACTORA DE 24 DRAFT 09 APR 2021 19 45...

Страница 59: ...59 CAMPANA EXTRACTORA DE 30 DRAFT 09 APR 2021 19 39...

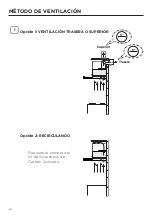
Страница 60: ...60 REQUERIMIENTOS DE ALTURA PARA LA INSTALACI N M N 24 SOBRE EL CTRICO M NIMO 30 SOBRE GAS M n 24 M n 30...

Страница 61: ...T A Cuerpo de la campana 1 B Moldura Trasera 1 C Rejilla de ventilaci n de recircu laci n 1 D Solapas del regulador 2 E Anillo met lico 1 REF PIEZA F Tornillos Pozi 3 16 x 1 2 2 G Tornillos Pozi 1 8 x...

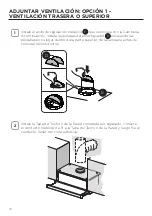
Страница 62: ...62 A C B E D...

Страница 63: ...e 5 Cinta adhesiva HERRAMIENTAS NECESARIAS HERRAMIENTA Cinta M trica L piz Taladro El ctrico con Broca de 5 16 Destornillador Phillips Destornillador Pozi Tijeras de metal Guantes de trabajo ACCESORIO...

Страница 64: ...64 M TODO DE VENTILACI N Opci n 1 VENTILACI N TRASERA O SUPERIOR Opci n 2 RECIRCULANDO Trasera 5 1 Requiere la compra del kit de Accesorios de Carb n Activado 5 Superior...

Страница 65: ...del armario Los bloques de madera deben estar al ras o empotrados 1 16 a 1 8 dentro del fondo del armario como se muestra 20 1 16 9 16 FIJACI N DE LA CAMPANA AL ARMARIO PREPARACI N DEL ARMARIO Cree un...

Страница 66: ...66 24 9 16 CAMPANA EXTRACTORA DE 30 Retire los filtros de grasa empujando la pesta a de liberaci n hacia el lado de la campana 4...

Страница 67: ...Introduzca la campana en el recorte hasta que los clips de instalaci n laterales encajen en su sitio Bloquee la campana en su posici n apre tando los 2 tornillos Vf desde abajo Vf Destornillador Phil...

Страница 68: ...Se incluye una moldura trasera B para cubrir la parte inferior de cualquier armario que quede al descubierto Fije la tira de vinilo a la parte inferior de la parte trasera de la campana extractora co...

Страница 69: ...I N DEL M TODO DE VENTILACI N Opci n 1 VENTILACI N TRASERA O SUPERIOR Opci n 2 RECIRCULANDO 5 Requiere la compra del kit de Accesorios de Carb n Activado Trasera 5 5 Superior Vaya a la P g 18 Vaya a l...

Страница 70: ...ontinuaci n instale las solapas del amortiguador D encajando las pesta as en su lugar dentro de la parte superior de la campana antes de conectar los conductos 2 Instale la Tapa del Techo o de la Pare...

Страница 71: ...scarga se ventila de nue vo en la habitaci n Utilice la Rejilla de Ventilaci n de Recirculaci n C incluida para cubrir la abertura Asegure la rejilla con los 2 tornillos G suministrados en el Kit de I...

Страница 72: ...conexi n a tierra no se entienden completamente o si existen dudas sobre si el aparato est correc tamente conectado a tierra No utilice un cable alargador Si el cable de alimentaci n es demasiado cort...

Страница 73: ...ro en el sentido de las agujas del reloj hacia la parte delantera de la campana hasta que se bloquee en su lugar Gire en sentido contrario a las agujas del reloj hacia la parte posterior de la campana...

Страница 74: ...s de la moldura frontal Al mover el interruptor a la Posici n 1 se enciende la luz Al mover el interruptor a la Posici n 0 la luz se apaga M V Motor Velocidad M V muestra el interruptor de control de...

Страница 75: ...avavajillas Deben limpiarse cada 2 meses de uso o con mayor frecuencia si el uso es particularmente intenso 1 Extraiga el panel de succi n deslizante 2 Retire los filtros de grasa empujando la pesta a...

Страница 76: ...ando la pesta a de liberaci n hacia el lado de la campana 3 Retire el filtro de carb n saturado soltando los ganchos de fijaci n 4 Coloque el nuevo filtro enganch ndolo en su alojamiento 5 Vuelvaacolo...

Страница 77: ...as led autobalastradas E12 listadas de acuerdo con ul 1993 nmxj 578 1 ance csa c22 2 No 1993 1 Extraiga el panel de succi n deslizante 2 Retire el filtro 3 Sustituya la l mpara por una nueva del mismo...

Страница 78: ...Creation date 10 06 2021 FABER Corrad Created by 991 0656 574 Code SW3 R V CN3 LB WH A GR CN2 SW2 1 2 3 6 5 4 7 8 9 BK BR CN1 SW1 1 2 3 6 5 4 9 8 7 110 127V 60HZ 0 1 RED VLT WHT BRW BLU PNK OFF GRY 1...

Страница 79: ...m stico distinto al normal 4 Da os resultantes de accidente alteraci n mal uso abuso incendio inundaci n eventos naturales instalaci n incorrecta instalaci n no conforme a los c digos el ctricos o de...

Страница 80: ...991 0661 628_01 211216 D00008317_00...

Отзывы: