Faber DAMA30SSV2 Скачать руководство пользователя страница 60

60

TÉLÉCOMMANDE (EN OPTION)

L’appareil  peut  être  contrôlé  à  l’aide  d’une  télécommande  alimentée  par  des  piles 
alcalines  carbone-zinc  de  1,5  V  de  type  standard  LR03-AAA  (non  fournies).

• 

Les  piles  usagées  doivent  être  éliminées  de  manière  appropriée.

Attention :

•  Ne placez pas la télécommande 

à proximité de sources de 

chaleur.

• 

Ne jetez pas les piles avec 

les déchets normaux, elles 

doivent être placées dans des 
conteneurs spécifiques. 

• 

Assurez-vous que le 
compartiment à piles est vissé à 

plat et bien serré.

Содержание DAMA30SSV2

Страница 1: ...DAMA30SSV2 DAMA36SSV2 Installation Instructions Use and Care Information Instructions d installation Utilisez et d entretien Instrucciones de instalaci n Informaci n de uso y cuidado DAMA...

Страница 2: ...talling 12 Choosing venting method 17 Attach venting ducted 18 Attach venting non ducted recirculating 22 Connecting house power 26 Operating the controls 27 Remote Control Optional 28 Cleaning stainl...

Страница 3: ...you already know how to operate it 2 The fire is small and contained in the area where it started 3 The fire department is being called 4 You can fight the fire with your back to an exit Based on Kit...

Страница 4: ...p Consult the cooktop or range installation instructions given by the manufacturer before making any cutouts MOBILE HOME INSTALLATION The installation of this rangehood must conform to the Manufacture...

Страница 5: ...near the field wiring compartment Electrical ground is required on this rangehood If cold water pipe is interrupted by plastic nonmetallic gaskets or other materials DO NOT use for grounding DO NOT gr...

Страница 6: ...6 RANGE HOOD DIMENSIONS DRAFT 27 JAN 2 30 36...

Страница 7: ...7 INSTALLATION HEIGHT REQUIREMENTS MIN 24 OVER ELECTRIC MIN 30 OVER GAS Min 24 Min 30...

Страница 8: ...ARTS REF PART QTY A Hood body 1 B Bracket 2 D Upper Chimney 1 E Lower Chimney 1 F Damper Flaps 2 REF PART G Pozi Screws 3 16 x 1 3 4 6 I Torx Screws 1 8 x 7 16 2 L Torx Screws 1 8 x 5 16 2 PARTS INCLU...

Страница 9: ...9 D E F A B...

Страница 10: ...ACCESSORY SKU Direct Connect Wiring Box WIREBOX High Ceiling Chimney Kit Upper and Lower Chimney Flue to replace the original flue s to fit up to 11 ceilings HIGH3 Ductless Kit Includes Ductless Dive...

Страница 11: ...11 VENTING METHOD Ducted Venting Installation Non Ducted Recirculation 1 Requires purchase of Activated Charcoal Accessory 6 6 Horizontal Vertical...

Страница 12: ...upper limit at the center of the area in which the hood will be installed Draw a horizontal line Y from where the bottom edge of the hood will be located a minimum of 24 above an electric cooking sur...

Страница 13: ...racket at the height of the upper chimney section supplied and aligning the centers notch with the vertical line Attention If the position of the second bracket B below the first bracket is less than...

Страница 14: ...t not completely the two screws G supplied in the hood body fixing holes as shown 5 4 Installation screws provided must be secured with wall plugs purchase separately I 6x L 2x OK 3 16 G Phillips Scre...

Страница 15: ...15 6 7 Hook the hood body onto the hood body fixing screws Use a level to insure that hood body is level and then fully secure the two screws Phillips Screwdriver Phillips Screwdriver...

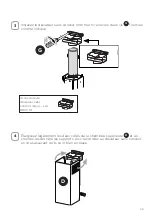
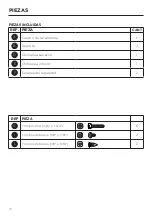
Страница 16: ...16 Tighten the 2 screws G as shown 8 G Phillips Screwdriver...

Страница 17: ...17 CHOOSING VENTING METHOD VENTED RECIRCULATING Go to Pg 18 Go to Pg 22...

Страница 18: ...the 6 metal ductwork to the Roof or Wall Cap and then attach ductwork Seal with foil tape Install the Damper flaps F that are included with hood by snapping the tabs into place inside the top of the...

Страница 19: ...19 3 Install the 2 Chimney brackets B to the middle and upper holes and secure with screws G as shown L 4x G B B Phillips Screwdriver...

Страница 20: ...re the sides to the brackets by using the 2 screws I Slightly widen the two sides of the upper chimney D and hook them behind the brackets B making sure that they are well seated B D Torx Screwdriver...

Страница 21: ...laterally to the hood body using the 2 screws L supplied N 2x Slightly widen the two sides of the the lower chimney hood E and hook them between the upper section and the wall making sure that they a...

Страница 22: ...lied as shown Only for the recirculation version connect the hood to the Air outlet Con nect 6 metal ductwork to the hood air outlet with foil tape The 6 duct ing needs to be cut to the size of the di...

Страница 23: ...imney D and hook them be hind the brackets and connect to the Ductless Diverter making sure that they are well seated Install the Ductless Diverter not supplied with the two screws G supplied as shown...

Страница 24: ...chased separately 5 6 Secure the sides to the brackets B by using the 2 screws I Attach a charcoal filter in the correct position and block it by the attaching hooks as shown Unlock the hooks push tow...

Страница 25: ...chimney hood E laterally to the hood body using the 2 screws L supplied N 2x Slightly widen the two sides of the the lower chimney hood E and hook them between the upper section and the wall making s...

Страница 26: ...Consult a qualified electrician if the grounding instructions are not com pletely understood or if doubt exists as to whether the appliance is properly grounded Do not use an extension cord If the po...

Страница 27: ...can be operated by pressing any of the fan setting buttons Hold down this button for 2 seconds to activate delayed off function which will keep the fan On for 15 minutes and automatically shut Off T1...

Страница 28: ...es of the standard LR03 AAA type not included Used batteries must be disposed of in the proper manner Caution Do not place the remote control near heat sources Do not discard the batteries with normal...

Страница 29: ...on or more frequently for par ticularly heavy usage and can be washed in a dishwasher Remove the Filters one at a time pushing them towards the back of the unit and at the same time pulling downward W...

Страница 30: ...ing them towards the back of the unit and at the same time pulling downward Remove the saturated charcoal filter by releasing the hooks Fit the new filter and fasten it in its correct position Replace...

Страница 31: ...8 4V SNOOPY LED Approved date Denomination Approved by Doc Type 11 Gen 2018 Creation date DOLCE CORRADO Created by Code BRW GRY 1 2 3 6 5 4 7 8 9 1 2 3 6 5 4 9 8 7 PNK M8 4V BRW ORG M1 WHT BLU BLK GRY...

Страница 32: ...ay repair or replace the product or components necessary to restore the product to good working condition Franke Home Solutions Warranty for Franke and Faber Branded Product Effective March 1 2022 In...

Страница 33: ...ents do not include liability for project delays Product replacements are not guaranteed to be exact replacements If the original product is not available at the time of the warranty claim at Franke s...

Страница 34: ...de ventilation 49 Fixation de la ventilation avec conduit 50 Fixation de la ventilation recirculation sans conduit 54 Raccordement au r seau lectrique de la maison 58 Utilisation des commandes 59 T l...

Страница 35: ...s imm diatement VACUEZ ET APPELEZ LES POMPIERS b Ne RAMASSEZ JAMAIS UNE CASSEROLE ENFLAMM E Vous pourriez vous br ler c N UTILISEZ PAS D EAU y compris des torchons ou des serviettes humides une violen...

Страница 36: ...pprouv e par les LA cette distance de la table de cuisson Ce d gagement minimum peut tre plus lev selon les codes du b timent locaux Pour les tables de cuisson au gaz et les cuisini res combin es un m...

Страница 37: ...be d eau froide est interrompu par du plastique des joints non m talliques ou d autres mat riaux NE l utilisez PAS pour la mise la terre NE mettez PAS la terre un tube de gaz N ayez PAS de fusible dan...

Страница 38: ...38 DIMENSIONS DE LA HOTTE DRAFT 27 JAN 2 30 36...

Страница 39: ...39 EXIGENCES EN MATI RE DE HAUTEUR D INSTALLATION MIN 24 AU DESSUS DE L LECTRICIT MIN 30 AU DESSUS DU GAZ Min 24 Min 30...

Страница 40: ...PI CE QT A Corps de la hotte 1 B Support 2 D Chemin e sup rieure 1 E Chemin e inf rieure 1 F Volets du clapet 2 R F PI CE G Vis Pozi 3 16 x 1 3 4 6 I Vis Torx 1 8 x 7 16 2 L Vis Torx 1 8 x 5 16 2 PI...

Страница 41: ...41 D E F A B...

Страница 42: ...connexion directe WIREBOX Kit de chemin e pour plafond haut conduit de chemin e sup rieur et inf rieur pour remplacer le conduit d origine pour s adapter des plafonds jusqu 11 HIGH3 Kit sans conduit...

Страница 43: ...43 M THODE DE VENTILATION Installation de ventilation avec conduit Sans conduit Recirculation 1 N cessite l achat de l accessoire de charbon actif 6 6 Horizontale Verticale...

Страница 44: ...p rieure au centre de la zone o la hotte sera install e Tracez une ligne horizontale Y partir de l endroit o le bord inf rieur de la hotte sera situ jusqu un minimum de 24 au dessus d une surface de c...

Страница 45: ...remier support la hauteur de la section de chemin e sup rieure fournie et en alignant le centre encoche avec la ligne verticale Attention Si la position du deuxi me support B sous le premier support e...

Страница 46: ...ement les deux vis G fournies dans les trous de fixation du corps de la hotte comme indiqu 5 4 Les vis d installation fournies doivent tre fix es avec des chevilles acheter s par ment I 6x L 2x OK 3 1...

Страница 47: ...le corps de la hotte sur les vis de fixation du corps de la hotte Utilisez un niveau pour vous assurer que le corps de la hotte est de niveau puis serrez compl tement les deux vis Tournevis Phillips T...

Страница 48: ...48 Serrez les 2 vis G comme indiqu 8 G Tournevis Phillips...

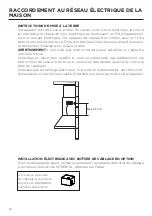
Страница 49: ...49 CHOIX DE LA M THODE DE VENTILATION VENTIL RECIRCULATION Allez la page 50 Allez la page 54...

Страница 50: ...de 6 pouces au capuchon de toit ou de mur puis fixez le conduit Scellez avec du ruban adh sif Installez les volets du clapet F qui sont inclus avec la hotte en enclenchant les languettes l int rieur d...

Страница 51: ...51 3 Installez les 2 supports de chemin e B dans les trous du milieu et du haut et fixez les avec des vis G comme indiqu L 4x G B B Tournevis Phillips...

Страница 52: ...c t s aux supports l aide des 2 vis I largissez l g rement les deux c t s de la chemin e sup rieure D et accrochez les derri re les supports B en vous assurant qu ils sont bien en place B D Tournevis...

Страница 53: ...alement au corps de la hotte l aide des 2 vis L fournies N 2x largissez l g rement les deux c t s de la chemin e inf rieure E et accro chez les entre la section sup rieure et le mur en vous assurant q...

Страница 54: ...indiqu Uniquement pour la version recirculation raccordez la hotte la sortie d air Raccordez les conduits m talliques de 6 la sortie d air de la hotte avec du ruban d aluminium Le conduit de 6 doit t...

Страница 55: ...et ac crochez les derri re les supports puis raccordez au d viateur sans conduit en vous assurant qu ils sont bien en place Installez le d viateur sans conduit non fourni avec les deux vis G fournies...

Страница 56: ...ment 5 6 Fixez les c t s aux supports B l aide des 2 vis I Fixez un filtre charbon dans la bonne position et verrouillez le avec les crochets de fixation comme indiqu D verrouillez les crochets pousse...

Страница 57: ...ieure E lat ralement au corps de la hotte l aide des 2 vis L fournies N 2x largissez l g rement les deux c t s de la chemin e inf rieure E et accro chez les entre la section sup rieure et le mur en vo...

Страница 58: ...onsultez un lectricien qualifi si vous ne comprenez pas parfaitement les instructions de mise la terre ou si vous avez des doutes quant la mise la terre de l appareil N utilisez pas de rallonge lectri...

Страница 59: ...r l un de ses boutons de r glage Maintenez ce bouton enfonc pendant 2 secondes pour activer la fonction d arr t diff r qui maintient le ventilateur en marche pendant 15 minutes et l arr te auto matiqu...

Страница 60: ...type standard LR03 AAA non fournies Les piles usag es doivent tre limin es de mani re appropri e Attention Ne placez pas la t l commande proximit de sources de chaleur Ne jetez pas les piles avec les...

Страница 61: ...mois de fonctionnement ou plus fr quem ment en cas d usage particuli rement intensif et peuvent tre lav s au lave vaisselle Retirez les filtres un par un en les poussant vers l arri re de l appareil t...

Страница 62: ...e l appareil tout en les tirant vers le bas Retirez le filtre charbon satur en lib rant les crochets Montez le nouveau filtre et fixez le dans sa position correcte Remettez le en place en veillant ce...

Страница 63: ...M8 4V SNOOPY LED Approved date Denomination Approved by Doc Type 11 Gen 2018 Creation date DOLCE CORRADO Created by Code BRW GRY 1 2 3 6 5 4 7 8 9 1 2 3 6 5 4 9 8 7 PNK M8 4V BRW ORG M1 WHT BLU BLK G...

Страница 64: ...ts d taill es dans le pr sent document chacune une garantie et collectivement les garanties Les produits doivent tre correctement install s conform ment aux instructions d installation de Franke dans...

Страница 65: ...Product replacements are not guaranteed to be exact replacements If the original product is not available at the time of the warranty claim at Franke s option the product replacements will be of simi...

Страница 66: ...Elecci n del m todo de ventilaci n 81 Fijar ventilaci n con conductos 82 Fijar ventilaci n recirculaci n sin conductos 86 Conexi n a la energ a de la casa 90 Operaci n de los controles 91 Mando a dis...

Страница 67: ...E BOMBEROS b NUNCA AGARRE UNA SART N EN LLAMAS Puede quemarse c NO UTILICE AGUA incluyendo pa os de cocina o toallas mojadas se producir una violenta explosi n de vapor d Utilice un extintor SOLO si 1...

Страница 68: ...e construcci n locales Para encimeras de gas y cocinas combinadas se recomienda un m nimo de 30 y es posible que esto sea necesario Los armarios superiores a ambos lados de esta unidad deben estar a u...

Страница 69: ...ca del comparti miento de cableado de campo Esta campana extractora necesita una toma a tierra Si la tuber a de agua fr a est interrumpida por juntas de pl stico no met licas u otros materiales NO la...

Страница 70: ...70 DIMENSIONES DE LA CAMPANA EXTRACTORA DRAFT 27 JAN 2 30 36...

Страница 71: ...71 REQUISITOS DE ALTURA PARA LA INSTALACI N M NIMO 60 90 CM 24 SOBRE EL CTRICO M NIMO 76 2 CM 30 SOBRE GAS M n 24 M n 30...

Страница 72: ...rpo de la campana 1 B Soporte 2 D Chimenea superior 1 E Chimenea inferior 1 F Solapas del regulador 2 REF PIEZA G Tornillos Pozi 3 16 x 1 3 4 6 I Tornillos de torque 1 8 x 7 16 2 L Tornillos de torque...

Страница 73: ...73 D E F A B...

Страница 74: ...aja de cableado de conexi n directa WIREBOX Kit de chimenea para techo alto Chimenea superior e inferior para reemplazo de chimenea original con adaptaci n a techos de hasta 11 HIGH3 Kit sin conductos...

Страница 75: ...75 M TODO DE VENTILACI N Instalaci n de ventilaci n con conductos Recirculaci n sin conductos 1 Requiere la compra del accesorio de carb n activado 6 6 Horizontal Vertical...

Страница 76: ...erior en el centro del rea en la que se instalar la campana Trace una l nea horizontal Y desde donde se ubicar el borde inferior de la campana un m nimo de 24 por encima de una superficie de cocci n e...

Страница 77: ...altura de la secci n superior de la chimenea suministrada y alineando los centros muesca con la l nea vertical Atenci n Si la posici n del segundo soporte B debajo del primer soporte est a menos de 1...

Страница 78: ...nillos G suministrados en los orificios de fijaci n del cuerpo de la campana como se muestra 5 4 Los tornillos de instalaci n provistos deben asegurarse con tacos de pared se compran por separado I 6x...

Страница 79: ...campana en los tornillos de fijaci n del cuerpo de la campana Use un nivel para asegurarse de que el cuerpo de la campana est nivelado y luego asegure completamente los dos tornillos Destornillador P...

Страница 80: ...80 Apriete los 2 tornillos G como se muestra 8 G Destornillador Phillips...

Страница 81: ...81 ELECCI N DEL M TODO DE VENTILACI N VENTILADO RECIRCULACI N Vaya a la P g 82 Vaya a la P g 86...

Страница 82: ...a la Tapa del Techo o de la Pared y luego fije el conducto Sellar con cinta adhesiva Instale las solapas del amortiguador F que se incluyen con la campana ajustando las leng etas en su lugar dentro de...

Страница 83: ...83 3 Instale los 2 soportes de la chimenea B en los orificios central y superior y aseg relos con tornillos G como se muestra L 4x G B B Destornillador Phillips...

Страница 84: ...es a los soportes usando los 2 tornillos I Ensanche ligeramente los dos lados de la chimenea superior D y eng nchelos detr s de los soportes B asegur ndose de que est n bien asentados B D Destornillad...

Страница 85: ...l cuerpo de la campana usando los 2 tornillos L suministrados N 2x Ensanche ligeramente los dos lados de la campana inferior de la chimenea E y eng nchelos entre la secci n superior y la pared asegur...

Страница 86: ...a Solo para la versi n de recirculaci n conecte la campana a la salida de aire Conecte el conducto de metal de 6 a la salida de aire de la campana con cinta de aluminio El conducto de 6 debe cortarse...

Страница 87: ...chelos detr s de los soportes y con ctelos al desviador sin conductos asegur ndose de que est n bien asentados Instale el desviador sin conductos no suministrado con los dos tornillos G suministrados...

Страница 88: ...Fije los laterales a los soportes B usando los 2 tornillos I Coloque un filtro de carb n en la posici n correcta y bloqu elo con los ganchos de fijaci n como se muestra Desbloquee los ganchos empuje...

Страница 89: ...ferior E lateralmente al cuerpo de la campana usando los 2 tornillos L suministrados N 2x Ensanche ligeramente los dos lados de la campana inferior de la chimenea E y eng nchelos entre la secci n supe...

Страница 90: ...na conexi n a tierra inadecuada puede suponer un riesgo de descarga el ctrica Consulte a un electricista cualificado si las instrucciones de conexi n a tierra no se entienden completamente o si existe...

Страница 91: ...iera de los botones de ajuste del ventilador Mantenga pulsado este bot n durante 2 segundos para activar la funci n de apa gado retardado que mantendr el ventilador encendido durante 15 minutos y se a...

Страница 92: ...tipo est ndar LR03 AAA no incluidas Las bater as usadas deben desecharse de la manera adecuada Precauci n No coloque el control remoto cerca de fuentes de calor No deseche las pilas con los residuos...

Страница 93: ...e cada 2 meses de funcionamiento o con mayor frecuencia en caso de un uso especialmente intenso y pueden lavarse en el lavavajillas Retire los filtros uno a la vez empuj ndolos hacia la parte posterio...

Страница 94: ...de la unidad y al mismo tiempo tirando hacia abajo Retire el filtro de carb n saturado soltando los ganchos Monte el filtro nuevo y f jelo en su posici n correcta Vuelvaacolocarlo teniendocuidadodeque...

Страница 95: ...M M8 4V SNOOPY LED Approved date Denomination Approved by Doc Type 11 Gen 2018 Creation date DOLCE CORRADO Created by Code BRW GRY 1 2 3 6 5 4 7 8 9 1 2 3 6 5 4 9 8 7 PNK M8 4V BRW ORG M1 WHT BLU BLK...

Страница 96: ...o de Franke o Faber de acuerdo con las garant as espec ficas del producto que se detallan en este documento cada una una Garant a y colectivamente las Garant as Los productos deben ser instalados corr...

Страница 97: ...guaranteed to be exact replacements If the original product is not available at the time of the warranty claim at Franke s option the product replacements will be of similar size material and value A...

Страница 98: ......

Страница 99: ......

Страница 100: ...991 0681 525_01 220825 D000000008743_00...

Отзывы: