Faber Axia Isola Island Mount Canopy Rangehood Скачать руководство пользователя страница 8

Version 3/08 - Page 8

For ductless installations, install the CHARCOAL FILTER 

(G in 

FIGURE 8) 

behind the center grease filter opening by inserting 

and locking into place.

   WARNING

DUE TO THE SIZE AND WEIGHT OF THIS RANGE

-

HOOD,  THREE  PEOPLE  ARE  REQUIRED  TO 

INSTALL THE CANOPY.  Two people must hold the 

canopy in place while the third person installs the 

screws that attach the canopy to the chimney.  The 

manufacturer assumes no responsibility for injury or 

damage caused by improper installations.
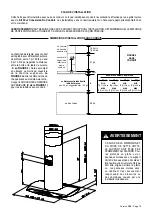
4.

  From below, attach the CANOPY SECTION 

(A in FIGURE 

10)

 to the assembled chimney support using the four screws 

provided 

(F in FIGURE 10).

FIGURE 10

FIGURE 13

FIGURE 12

7. 

Install the grease filters using two hands by first pulling and 

turning the knob to the left so that the locking lever does not 

protrude from the filter 

(as in FIGURE 14)

.  Insert the opposite 

end of the filter into the retaining channel.  Insert the knob end 

next, then turn knob to the right to lock the filter into place.

FIGURE 14

8.

 Turn the power supply on.  Turn on blower and lights.  If the 

rangehood does not operate, check that the circuit breaker is 

not tripped or the house fuse blown.  If the unit still does not 

operate, disconnect the power supply and check that the wiring 

connections have been made properly.

6.

  Run the control cable 

(A in FIGURE 12)

 from inside the 

chimney through the hole

 (H in FIGURE 11)

 in the appropriate 

bracket.  Be sure to place the black rubber grommet around 

the cable inside the hole to protect the cable from being nicked 

by  the  metal  hole.  Connect  the  control  cables  together  as 

indicated in 

FIGURE 12

.  Tuck them away under the brackets 

and reinstall the brackets.  Repeat this process for the lighting 

cables 

(B in FIGURE 12)

.

FIGURE 11

5.

  Remove the metal brackets located on the top and bottom of 

the underside of the rangehood by removing the screws 

(FIGURE 

11)

.  Removing these brackets provides access to the control 

and lighting cables which must connect to the control and lighting 

cables from the inside of the chimney 

(FIGURE 12)

.

H

MAKE THE INTERNAL ELECTRICAL CONNECTIONS

B

A

!

Содержание Axia Isola Island Mount Canopy Rangehood

Страница 1: ...E DE CUISSON a Ne jamais laisser un l ment de la table de cuisson fonctionner sans surveillance la puissance de chauffage maximale un renversement d bordement de mati re graisseuse pourrait provoquer...

Страница 2: ...a 1 1 4 hole in the wall A hole cut through wood must be sanded until smooth A hole through metal must have a grommet WARNING TO REDUCE THE RISK OF FIRE OR ELECTRIC SHOCK do not use this fan with any...

Страница 3: ...ssociation Am ricaine d Ing nieurs de Chauffage Frigorifaction et Air Climatis ainsi que les codes municipaux En per ant un mur veillez ne pas perforer un autre fil lectrique Une ventilateur vacuation...

Страница 4: ...packaging the entire chimney section of the hood is shipped assembled It must be disassembled completely for installation Disassemble packaged chimney components by sliding apart the chimney covers B...

Страница 5: ...he hood and the cooktop distance x in FIGURE 4 DUCTED INSTALLATION DIMENSIONS vented to the outside PLAN THE INSTALLATION This rangehood can be installed as either ducted or ductless When installed du...

Страница 6: ...distance x in FIGURE 5 upper chimney cover ductless lower chimney cover canopy cabinet base x distancefromhoodtocooktop varies depending on installation min 24 suggested max 30 also consult cooktop m...

Страница 7: ...REXTENSION HORIZONTAL D into the DIVERTER C 1 The UPPER CHIMNEY COVER C in FIGURE 9 attaches using two screws provided G in FIGURE 9 Slide up and attach the UPPER CHIMNEY COVER 2 Attach the duct work...

Страница 8: ...urn knob to the right to lock the filter into place FIGURE 14 8 Turn the power supply on Turn on blower and lights If the rangehood does not operate check that the circuit breaker is not tripped or th...

Страница 9: ...sefiltersshouldbecleanedfrequentlyin hot detergent solution or washed in the dishwasher Stainless steelcleanershouldbeusedonstainlessrangehoods Abrasives and scouring agents can scratch stainless stee...

Страница 10: ...umbing 2 Service calls to repair or replace range hood light bulbs fuses or filters Those consumable parts are excluded from warranty coverage 3 Repairs when your range hood is used for other than nor...

Страница 11: ...ures NE PAS RETIRER LE PLASTIQUE PROTECTEUR Ce plastique emp che tout dommage pouvant survenir pendant l installation S parer le COUVERCLE CHEMIN E SUP RIEURE C de la FIGURE 1 et le COUVERCLE CHEMIN E...

Страница 12: ...po min 7 pi 7 5 8 po max 8 pi 6 5 8 po x 24 po min 7 pi 5 5 8 po max 8 pi 4 5 8 po PLAN DE L INSTALLATION Cette hotte peut tre install e avec ou sans conduit Lorsque install sans conduit la ventilati...

Страница 13: ...po x 26 po min 8 pi 5 8 po max 8 pi 6 5 8 po x 24 po min 7 pi 10 5 8 po max 8 pi 4 5 8 po 20 po 2 5 8 po 3 3 4 dimensions d installatioN SANS CONDUIT La chemin e Axia Isola sans conduit estr glablepo...

Страница 14: ...E D ALIMENTATION Retirer le couvercle du compartiment de c blage NE PAS mettreencircuittantquel installationn estpascompl t e Brancher le c ble d alimentation sur la hotte Relier le fil blanc du c ble...

Страница 15: ...rsiledisjoncteurn estpasd clench ousilefusiblen est pas grill Si l appareil ne fonctionne toujours pas d brancher l alimentation et v rifier si les connexions ont t effectu es correctement 7 Installer...

Страница 16: ...de d tergent ou mettre au lave vaisselle Utiliser un nettoyant pour l acier inoxydable sur les hottes en acier inoxydable Ne pas employer de produits abrasifs ou de poudre r curer qui peuvent endommag...

Страница 17: ...parer les fusibles de votre maison ou pour corriger votre c blage ou votre syst me de plomberie 2 Les appels de service pour remplacer ou r parer les ampoules les fusibles ou les filtres de votre hott...

Отзывы: