Faber ARKEA Скачать руководство пользователя страница 17


EN 

1

17 

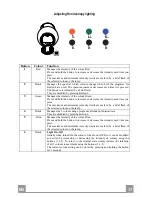
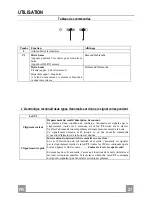
Adjusting Hood canopy lighting 


Button Colour Function 

Red 

Manages the intensity of the colour Red.  
Press and hold the button to increase or decrease the intensity each time you 
press. 
The maximum and minimum intensity limits are marked by a brief flash of 
the selected colour on the lamp. 

Black 

Manages the speed at which colours change when both the programs for 
Button 4 are used. The speed increases or decreases each time it is pressed. 
The decrease is indicated by a brief flash.  
They are disabled by pressing Button 6. 

Green 

Manages the intensity of the colour Green. 
Press and hold the button to increase or decrease the intensity each time you 
press.  
The maximum and minimum intensity limits are marked by a brief flash of 
the selected colour on the lamp. 

Black 

Manages the 2 colour change programs: Blended or Intermittent. 
They are disabled by pressing Button 6. 

Blue 

Manages the intensity of the colour Blue. 
Press and hold the button to increase or decrease the intensity each time you 
press.  
The maximum and minimum intensity limits are marked by a brief flash of 
the selected colour on the lamp. 

Black 

Light On / Off 

Initially when turned On the colour of the Hood is White. It can be modified 
as desired by increasing or decreasing the intensity of colours using the 
buttons (1-3-5). To return to the original state simply increase the intensity 
of all 3 colours to maximum using the buttons (1-3-5). 
The current colour setting can be stored by pressing and holding the button 
for 3 seconds. 


1

2

3

4

5

6

Содержание ARKEA

Страница 1: ...Instructions Manual Manuel d Instructions Bedienungsanleitung Manual de instrucciones Gebruiksaanwijzing...

Страница 2: ...GGESTIONS 18 CARACTERISTIQUES 19 INSTALLATION 20 UTILISATION 27 ENTRETIEN 29 INHALTSVERZEICHNIS EMPFEHLUNGEN UND HINWEISE 32 CHARAKTERISTIKEN 33 MONTAGE 34 BEDIENUNG 41 WARTUNG 43 INDICE CONSEJOS Y SU...

Страница 3: ...3 3 INHOUDSOPGAVE ADVIEZEN EN SUGGESTIES 88 EIGENSCHAPPEN 89 INSTALLATIE 90 GEBRUIK 97 ONDERHOUD 99...

Страница 4: ...lationforthegashobspecifyagreaterdistancespecifiedabove thishas tobetakenintoaccount Regulationsconcerningthedischargeofairhavetobefulfilled USE Theextractorhoodhasbeendesignedexclusivelyfordomesticus...

Страница 5: ...1300 400 Components Ref Q ty Product Components 1 1 Hood Canopy complete with Controls Light Filters Motor 2 1 Hood support plate Ref Q ty Installation Components 11 4 Wall plugs 10 12h 4 Screws 4 2...

Страница 6: ...n Sequence of operations Installation Preparing for installation Drilling the Ceiling Shelf and Fixing the support plate Connections Fitting the hood body Functional Check Disposal of Packaging Openin...

Страница 7: ...gs in hollow bricks with 20 mm resistance thickness Drill a hole 10 mm insert Plugs 11 supplied immediately Ceilings with Wood Beams As per Wood Screws used not supplied Wooden shelf with a resistant...

Страница 8: ...ake adjustments by turning the piece making sure that the screws do not come out of the adjustment slot The unit must be securely fastened both due to the weight of the Hood and the stress caused by o...

Страница 9: ...is must be done without the weight of the Hood bearing down on the structure The system used to fix the 4 Cables comprises 3 components Threaded pawl a already mounted on the ceiling Plate Cable locki...

Страница 10: ...ixed to the ceiling the plate limit pawl has a corresponding hole on the plate cover and on the hood canopy Insert the safety knobs c into the respective cables with the thread to the top Insert the c...

Страница 11: ...o the Plate Tension the Cables by pushing them upwards so that they slide inside the cable locking screw and out through the slot in the threaded pawl This is possible because the cable locking screw...

Страница 12: ...t aperture of at least 3 mm Remove the Grease filters see paragraph Maintenance and make sure that the Power cable connector has been properly inserted into the Suction fan socket At this point it is...

Страница 13: ...verload condition occurs the fault is signalled by LED T1 on the keyboard flashing once every 2 seconds Check that nothing is blocking normal hood movements The signal remains active until a new hood...

Страница 14: ...NTENSIVE This can only be activated with the hood lowered and when the delay or 24h functions are not active Activates Intensive speed from any other speed To disable it simply press the same button a...

Страница 15: ...handlefacingoutwards Replacethelightingunit ActivatedCharcoalFilter RecirculationVersion This cannot be washed or regenerated and must be changed approximately once every 4 months or more frequently i...

Страница 16: ...ications provided on the label C Procedure to be used in case of malfunction on the movement Check that the fuse is properly inserted and that it has not burned out for replacing the fuse open the lig...

Страница 17: ...u press The maximum and minimum intensity limits are marked by a brief flash of the selected colour on the lamp 4 Black Manages the 2 colour change programs Blended or Intermittent They are disabled b...

Страница 18: ...nantl vacuationd airdoivent treremplies UTILISATION Lahottea t con ueexclusivementpourl usagedomestique danslebutd liminerlesodeursdelacuisine Nejamaisutiliserabusivementlahotte Nepaslaisserlesflammes...

Страница 19: ...1300 400 Composants R f Q t Composants du produit 1 1 Corps de hotte quip de commandes lumi re filtres moteur 2 1 Plaque support hotte R f Q t Composants de l installation 11 4 Chevilles 10 12h 4 Vis...

Страница 20: ...ence op rations d installation Pr paration l installation Per age plafond tag re et fixation plaque de support Connexions Montage du corps de hotte Contr le fonctionnel limination des emballages Ouver...

Страница 21: ...et chambre air avec une paisseur r sistante de 20 mm percer 10 mm ins rer tout de suite les chevilles 11 fournies Plafond en poutres de bois selon les vis pour bois employ es non fournies tag re en bo...

Страница 22: ...ant la pi ce en faisant attention ce que les vis ne sortent pas du si ge du trou de r glage La fixation doit tre s re aussi bien par rapport au poids de la hotte qu aux contraintes provoqu es par des...

Страница 23: ...plafond il est imp ratif d viter que le poids de la hotte puisse peser sur la structure Le syst me de fixation des 4 c bles est form de 3 parties Cliquet filet a d j mont sur la plaque de plafond Vis...

Страница 24: ...e course de la plaque pr sente son trou correspondant sur le couvercle de la plaque et sur le corps de hotte Enfiler les pommeaux de s curit c dans leurs c bles correspondants en veillant ce que le fi...

Страница 25: ...us tension en les poussant vers le haut de mani re ce qu ils coulissent dans la vis serre c ble et hors du trou du cliquet filet Cela est possible car le syst me pr sent dans la vis serre c ble permet...

Страница 26: ...ouverture des contacts d au moins 3 mm Retirer les filtres graisse voir par Entretien et s assurer que le connecteur du c ble d alimentation est correctement branch dans la prise de l aspirateur ce p...

Страница 27: ...st signal e par le clignotement toutes les 2 secondes de la led T1 situ e sur le clavier V rifier l absence de tout emp chement durant le mouvement de la hotte Ce signalement demeure actif jusqu ce qu...

Страница 28: ...moteur INTENSIVE Activable seulement lorsque la hotte est descendue et lorsque le delay ou le 24h ne sont pas actifs Active la vitesse intensive partir de n importe quelle vitesse Pour la d brancher...

Страница 29: ...clairage Filtresanti odeur charbonactif versionfiltrante Il n est ni lavable ni r g n rable le remplacer apr s environ 4 mois d utilisation ou plus fr quemment en cas d utilisation particuli rement i...

Страница 30: ...C Proc dure d intervention en cas d anomalies sur le mouvement V rifier que le fusible est correctement ins r et qu il n est pas br l En cas de n cessit de remplacement ouvrir le groupe d clairage et...

Страница 31: ...mums de l intensit sont signal es par un clignotement bref de la couleur s lectionn e sur le lustre 4 Noir Elle g re les 2 programmes pour le changement des couleurs D grad ou intermittent Pour les d...

Страница 32: ...usschlie lichzumEinsatzimprivatenHaushaltundzurBeseitigungvonK chen ger chenvorgesehen Unsachgem erEinsatzderHaubeistzuunterlassen Gro eFlammenbeieingeschalteterHaubeniemalsunbedecktlassen DieIntensiv...

Страница 33: ...omponenten Bez Menge Produktkomponenten 1 1 Haubenk rper komplett mit Bedienelemente Beleuch tung Filter Motor 2 1 Platte der Haubenhalterung Bez Menge Installationskomponenten 11 4 D bel 10 mm 12h 4...

Страница 34: ...ten Vorbereitung zur Installation Bohren von Decke Konsole und Befestigung der Halteplatte Anschl sse Montage des Haubenk rpers Funktionskontrolle Entsorgung des Verpackungsmaterials ffnen der Platte...

Страница 35: ...hlziegeln mit 20 mm fester St rke Mit 10 mm bohren sofort die mitgelieferten D bel 11 einsetzen Decke aus Holztr gern je nach den verwendeten Holzschrauben nicht mitgeliefert Holzkonsole mit 15 mm fes...

Страница 36: ...Drehen des Teils reguliert werden wobei darauf zu achten ist dass die Schrauben nicht aus den Einstell sen fallen Die Befestigung muss entsprechend des Gewichts der Haube und den Belastungen durch se...

Страница 37: ...uktur lasten darf Das System zur Befestigung der 4 Kabel besteht aus 3 Teilen Sperrklinke mit Gewinde a die bereits an der Deckenplatte montiert ist Kabelklemmschraube b im Lieferumfang enthalten Sich...

Страница 38: ...echen des Loch der Sperrklinke des Endan schlags der Platte findet sich an der Ab deckung der Platte und am Haubenk r per Die Sicherheitskn ufe c mit nach oben zeigendem Gewinde auf die entsprechenden...

Страница 39: ...m sie nach oben geschoben werden so dass sie in der Kabelklemmschraube und aus dem Langloch der Sperrklinke mit Gewinde gleiten Dies ist m glich weil die Kabelklemmschraube ber ein System verf gt welc...

Страница 40: ...ns 3 mm zwischenschalten Die Fettfilter ausbauen siehe Absatz Wartung und sicherstellen dass der Verbinder des Stromkabels richtig in die Buchse des Abzugs eingesteckt ist Jetzt kann der Kabelbinder a...

Страница 41: ...tung wird die Anomalie mittels Blinken in Abst nden von 2 Sekunden der LED T1 an der Tastatur gemeldet Sicherstellen dass die Bewegung der Haube nicht durch Hindernisse behindert wird Diese Meldung bl...

Страница 42: ...HWINDIGKEIT Nur einschaltbar bei abgesenkter Haube und wenn Delay oder 24h aktiv Aktiviert von jeder Geschwindigkeitsstufe aus die Intensivgeschwindigkeit Um sie wieder auszuschalten dieselbe Taste er...

Страница 43: ...hsfilter Filterversion Der Aktivkohlefilter ist nicht wasch oder regenerierbar und muss mindestens alle4MonateoderbeisehrintensiverNutzungauchh ufigerersetztwerden AUSWECHSELN DieBeleuchtungseinheit f...

Страница 44: ...Anweisungen am Etikett C regulieren Prozedur f r den Fall von Anomalien der Bewegung 1 Sicherstellen dass die Sicherung korrekt eingesetzt und nicht durchgebrannt ist Zum Auswechseln die Beleuchtungse...

Страница 45: ...reichen des H chst oder Mindestwerts der Intensit t wird durch kurzes Blinken der an der Lampe selektierten Farbe angezeigt 4 Schwarz Steuert die beiden Programme f r den Wechsel der Farben Abget nt o...

Страница 46: ...sencuenta Esnecesariorespe tartodaslasnormativasrelativasalconductodedescargadelaire USO Lacampanahasidoconcebidaexclusivamenteparaunusodom stico paraeliminarlosoloresdela cocina Noutilizarlademanerai...

Страница 47: ...400 Componentes Ref Cant Componentes de producto 1 1 Cuerpo campana dotado de mandos luz filtros mo tor 2 1 Placa de soporte campana Ref Cant Componentes de instalaci n 11 4 Tacos 10 12h 4 Tornillos 4...

Страница 48: ...encia operaciones de instalaci n Preparaci n a la Instalaci n Perforaci n techo repisa y fijaci n placa de soporte Conexiones Montaje cuerpo campana Control funcional Eliminaci n embalajes Apertura de...

Страница 49: ...ire con espesor resistente de 20 mm perforar 10 mm insertar inmediatamente los tacos 11 en dotaci n Techo de armaz n de madera seg n tornillos para madera empleados no suministrados Repisa de madera c...

Страница 50: ...regulaciones girando la pieza cuidando que los tornillos no salgan del asiento del ojal de regulaci n La fijaci n debe ser segura considerando tanto el peso de la campana como los esfuerzos causados p...

Страница 51: ...l peso de la campana que se cargue sobre la estructura El sistema de fijaci n de los 4 cables est formado de 3 partes Pasador fin de carrera roscado a ya montado en la placa de techo Tornillo bloqueac...

Страница 52: ...in de carrera de la placa tiene su orificio co rrespondiente en la cubierta de la placa y en el cuerpo de la campana Introducir las perillas de seguridad c en los respectivos cables con el roscado hac...

Страница 53: ...ensi n los cables empuj ndolos hacia lo alto de manera que se desplacen dentro del tornillo bloqueacable y fuera del ojal del pasador roscado Esto es posible porque el tornillo bloqueacable tiene un s...

Страница 54: ...los contactos de por lo menos 3 mm Quitar los Filtros antigrasa ver p rr Mantenimiento y comprobar que el conector del cable de alimentaci n est correctamente insertado en la toma del aspirador Ahora...

Страница 55: ...obrecarga se se ala la anomal a mediante el parpadeo cada 2 segundos del led T1 en el teclado Verificar que no hayan impedimentos durante el movimiento de la campana Esta se alizaci n permanece activa...

Страница 56: ...Incrementa la velocidad del motor INTENSIVA Activable s lo con la campana abajo y cuando no est n activos el delay o el 24h Activa la velocidad intensiva desde cualquier velocidad Para desconectarla...

Страница 57: ...iluminaci n Filtros antiolor al carbonoactivo versi nfiltrante No se puede lavar y no es regenerable debe sustituirse cada 4 meses de uso o m s frecuentemente para un uso particularmente intenso SUST...

Страница 58: ...iqueta C Procedimiento de intervenci n en caso de anomal as en el movimiento 4 Verificar que el fusible est correctamente insertado y no est quemado para una eventual sustituci n abrir el grupo ilumin...

Страница 59: ...nuye cada vez que se presiona La m xima y m nima intensidad se indican con un breve destello del color seleccionado en la l mpara 4 Negro Gestiona los 2 programas para el cambio de colores matizado o...

Страница 60: ...GR 6 60 650mm I 120mm 0 04mBar 2...

Страница 61: ...GR 6 61 600 516 560 MAX 1300 400 1 1 2 1 11 4 10 12h 4 4 2 x 44 4 1 2...

Страница 62: ...GR 6 62 650 mm...

Страница 63: ...GR 6 63 20 mm 10 mm 11 15 mm 7 mm 10 mm 4 5 mm 20 mm 12h...

Страница 64: ...GR 6 64...

Страница 65: ...GR 6 65 650 mm 4 3 a b c 4 a b c...

Страница 66: ...GR 6 66 c b B C...

Страница 67: ...GR 6 67 a b 4 4...

Страница 68: ...GR 6 68 2 3 mm...

Страница 69: ...GR 6 69 L T1 L T1 2 Led T1 2 Led T1 Led T1 250ms Led T1...

Страница 70: ...GR 7 70 1 5 V LR03 AAA 2 2 2 delay 24h 10 10 Led 1 Delay 24h 30 Delay Led 0 5 2 24H Delay 24 10 24 Led 2...

Страница 71: ...GR 7 71 2 4 A B A B LED 1M EN 60825 1 1994 A1 2002 A2 2001 439nm 7 W...

Страница 72: ...GR 7 72 B C 1 A 2 3 A B C...

Страница 73: ...GR 7 73 1 2 4 6 3 4 2 6 5 6 On 1 3 5 3 1 3 5 3 1 2 3 4 5 6...

Страница 74: ...RU 7 74 650 I 120 0 04 2...

Страница 75: ...RU 7 75 600 516 560 MAX 1300 400 1 1 2 1 11 4 10 12h 4 4 2 x 44 4 1 2...

Страница 76: ...RU 7 76 650...

Страница 77: ...RU 7 77 20 10 11 15 7 10 4 5 20 12h...

Страница 78: ...RU 7 78...

Страница 79: ...RU 7 79 650 4 3 a b c 4 b c...

Страница 80: ...RU 8 80 c b B C...

Страница 81: ...RU 8 81 a b 4 4...

Страница 82: ...RU 8 82 2 3 e...

Страница 83: ...RU 8 83 L T1 L T1 2 T1 T1 2 T1 250 T1...

Страница 84: ...RU 8 84 1 5 LR03 AAA 2 2 2 24h 10 10 1 24h 30 0 5 2 24H 24 10 24 2...

Страница 85: ...RU 8 85 2 4 A B A B 1M EN 60825 1 1994 A1 2002 A2 2001 439nm 7...

Страница 86: ...RU 8 86 B C 7 A 8 9 A B C...

Страница 87: ...RU 8 87 1 2 4 6 3 4 2 6 5 6 1 3 5 3 1 3 5 3 1 2 3 4 5 6...

Страница 88: ...cht worden genomen GEBRUIK De wasemkap is uitsluitend ontworpen voor huishoudelijk gebruik voor het elimineren van kookgeuren Gebruik de kap nooit op oneigenlijke wijze Laat geen hoog brandende brande...

Страница 89: ...0 400 Onderdelen Model Zoom Ref Aantal Onderdelen van het apparaat 1 1 Afzuigkap met Bedieningen verlichting filters motor 2 1 Steunplaat afzuigkap Ref Installatieonderdelen 11 4 Pluggen 10 12h 4 Schr...

Страница 90: ...tiewerkzaamheden Voorbereiden van de installatie Gaten boren in het plafond de draagconsole en bevestiging steunplaat Aansluitingen Montage van de afzuigkap Controle van de werking Verwerking van het...

Страница 91: ...stenen plafond met luchtkamer met een stevige dikte van 20 mm boor een gat van 10 mm plaats onmiddellijk de bijgeleverde pluggen 11 Plafond met houten balken afhankelijk van de gebruikte houtschroeven...

Страница 92: ...het te draaien Let er daarbij op dat de schroeven niet uit de zitting van het stelgat raken Het onderdeel moet veilig worden bevestigd zowel met betrekking tot het gewicht van de kap als wat betreft d...

Страница 93: ...ijkerwijs moeten worden aangesloten zonder dat het gewicht van de afzuigkap de structuur belast Het bevestigingssysteem van de 4 kabels bestaat uit 3 delen Aanslagpen met schroefdraad a die al op de p...

Страница 94: ...het plafond is bevestigd de aanslagpen van de plaat moet samenvallen met een gat op de plaatafdekking en op de af zuigkap Breng de veiligheidsknoppen c op de kabels aan met het schroefdraad naar boven...

Страница 95: ...e kabels door ze omhoog te duwen zodat ze door de kabelklembout lopen en uit de gleuf van de aanslagpen met schroefdraad komen Dit is mogelijk omdat de kabelklembout een systeem heeft dat ervoor zorgt...

Страница 96: ...een opening tussen de contacten van minstens 3 mm Verwijder de vetfilters zie par Onderhoud en controleer of de stekker van het netsnoer correct in de aansluiting van de afzuiginrichting is ge stoken...

Страница 97: ...oring gesignaleerd doordat de led T1 op het toetsenbord om de 2 seconden gaat knipperen Controleer of de af zuigkap niet in zijn beweging gehinderd wordt Deze signalering blijft actief tot opnieuw de...

Страница 98: ...heid van de motor Verhoogt de snelheid van de motor HOGE SNELHEID Kan alleen bij ingeschakelde kap geactiveerd worden en als delay of 24h niet actief zijn Schakelt de hoge snelheid vanuit elke snelhei...

Страница 99: ...n de buitenkant Sluit de verlichtingsunit weer Geurfilters met actieve koolstof Model met luchtcirculatie Het filter kan niet worden gewassen of geregenereerd en moet ongeveer om de 4 maanden worden v...

Страница 100: ...ocedure bij storingen van de beweging 10 Controleer of de zekering correct ingeschakeld en niet doorgebrand is Open voor een eventuele vervanging de verlichtingsunit en draai de zekeringhouder los Ver...

Страница 101: ...e lamp geselecteerde kleur knippert kort om de maximale en minimale lichtsterkte aan te geven 4 Zwart Regelt de 2 programma s voor de kleurverandering In elkaar overlopend of Afwisselend De programma...

Страница 102: ......

Страница 103: ......

Страница 104: ...436006055_ver4...

Отзывы: