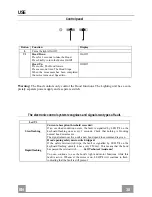
FABER S.p.A. ZOOM Скачать руководство пользователя страница 30


EN 

3

30 

USE


Control panel 

L

T1


Button Function 

Display 

Turns the lights On/Off. 

T1 Hood 

Down 

Press for 2 seconds to raise the Hood. 
Press briefly to turn the Motor On/Off. 

On/Off 


Hood Up 

Press once: The Hood lowers. 
Press a second time: The Hood Stops. 
When the movement has been completed 
the motor turns on at Speed two. 

Off/Off 


Warning: 

The Hood controls only control the Hood functions. The Lighting unit has a com-

pletely separate power supply and a separate switch.  


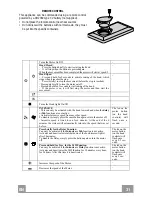
The electronic control system recognises and signals two types of fault. 


Led T1 


Slow flashing 

Current absorption threshold exceeded: 

If an overload condition occurs, the fault is signalled by LED 

T1 

on the 

keyboard flashing once every 2 seconds. Check that nothing is blocking 
normal hood movements. 
The signal remains active until a new hood open/close command is given. 

Rapid flashing 

Hood opening safety microswitch tripped:


If the safety microswitch trips, the fault is signalled by LED 

T1

 on the 

keyboard flashing quickly (once every 250 ms). This means that the hood 
has passed the microswitch…….. 

Call Technical Assistance! 

You can continue to use the hood’s light and motor functions while this 
fault is active. Whenever the motor is on, LED 

T1

 will continue to flash, 

indicating that the fault is still present. 


Содержание ZOOM

Страница 1: ...Instructions Manual...

Страница 2: ...2 2 INDEX SAFETY INFORMATION 3 CHARACTERISTICS 6 INSTALLATION 20 USE 30 CARE AND CLEANING 32 EN...

Страница 3: ...eight please refer to the paragraphs on working dimensions and installation If the instructions for installation for the gas hob specify a greater distance this must be respected Check that the mains...

Страница 4: ...to be adopted for fume discharging it is important to closely follow the regulations pro vided by the local authorities WARNING Before installing the Hood remove the protective films Use only screws a...

Страница 5: ...ls not applicable to appliances that only discharge the air back into the room The symbol on the product or on its packaging indicates that this product may not be treated as household waste Instead i...

Страница 6: ...ct Components 1 1 Hood Canopy complete with Controls Light Filters Motor 2 1 Hood support plate 4 1 Cable raceway 14 1 Pawl Ref Q ty Installation Components 11 4 Wall plugs 10 12h 4 Screws M5 x 70 12g...

Страница 7: ...EN 7 7 ZOOM 15 Kg 12h 11 2 4 1 12g 14...

Страница 8: ...ilters Motor 2 1 Hood support Plate with lamp holder 4 1 Cable raceway 5 3 Glass 6 3 Glass fixing plates 14 1 Pawl Ref Q ty Installation Components 11 4 Wall plugs 10 12h 4 Screws M5 x 70 12d 6 Screws...

Страница 9: ...EN 9 9 CHIC VANILLA 30 Kg 12h 11 2 4 22 5 12d 12e 22 22 6 12d 22 12e 22 12e 22 12d 12g 14 1 12d 6 22 12d 22 5 5 6 22 12e 22 12d 22 12e...

Страница 10: ...extension 4 1 Cable raceway 5 4 Glass Glass products manually 14 1 Pawl Ref Q ty Installation Components 7 1 8 Glass fixing brackets with bush 11 10 Wall plugs 10 12h 10 Screws M5 x 70 12d 24 M4 Nut...

Страница 11: ...NEST 39 Kg 12h 11 2 4 2 1 12h 11 12h 11 12f 12e 5 2 1 12d 7 1 12g 14 1 12f 12e 12f 12f 12f 12f 12f 12f 12e 12e 12e 12e 12e 12e 5 5 5 11 11 11 11 12h 12h 12h 12h 7 1 7 1 7 1 7 1 7 1 7 1 12h 12h 12h 12d...

Страница 12: ...ght Filters Motor 2 1 Hood support Plate with lamp holder 4 1 Cable raceway 5 1 Glass or Panels the other material 14 1 Pawl Ref Q ty Installation Components 11 4 Wall plugs 10 12h 4 Screws M5 x 70 12...

Страница 13: ...EN 1 13 VERTIGO 20 Kg 12h 11 2 4 5 12d 12g 14 1 12d 12d 12d...

Страница 14: ...ght Filters Motor 2 1 Hood support Plate with lamp holder 4 1 Cable raceway 5 1 Glass or Panels the other material 14 1 Pawl Ref Q ty Installation Components 11 4 Wall plugs 10 12h 4 Screws M5 x 70 12...

Страница 15: ...EN 1 15 KALEIDOS 18 Kg 2 12h 11 4 5 12d 12g 14 12d 12d 12d 1...

Страница 16: ...ntrols Light Filters Motor 2 1 Hood support Plate with lamp holder 3 1 Power supply cable lock 5 1 Glass 14 1 Pawl Ref Q ty Installation Components 11 4 Wall plugs 10 12h 4 Screws M5 x 70 12d 4 Chrome...

Страница 17: ...EN 1 17 LUXIA 30 Kg 2 12h 11 4 5 12d 12g 14 1 12d 12d 12d...

Страница 18: ...EN 1 18 Dimensions...

Страница 19: ...EN 1 19...

Страница 20: ...tion Drilling the Ceiling Shelf and Fixing the support plate Connections Fitting the hood body Functional Check Disposal of Packaging Fitting the Limiter pawl Unfasten the 3 screw that join the parts...

Страница 21: ...s Drill a hole 10 mm insert Plugs 11 supplied immediately Ceilings with Wood Beams As per Wood Screws used not supplied Wooden shelf with a resistant thickness of 15 mm drill a hole 7 mm Feeding the e...

Страница 22: ...the stress caused by occasional sideways pres sure on the Appliance when in position Once the unit has been fixed make sure that the plate is stable In all cases where the Ceiling is not sufficiently...

Страница 23: ...g without the weight of the hood bearing on the structure The cable fixing system is made up of 3 parts Threaded Pawls a already mounted on the ceiling plate Cable clamp screws b provided Safety knobs...

Страница 24: ...to the ceiling the limit pawl on the plate fastened to the ceiling has a corresponding hole on the plate cover and on the hood canopy Insert the cables into the safety knobs c with the thread at the t...

Страница 25: ...e cables under tension by push ing them upwards so that they slide in side the cable clamp screw and slide out of the slot in the threaded pawl This is possible because the cable clamp screw has a sys...

Страница 26: ...screw it is possible to make adju stments that allow the mobile hood body to be levelled Once the hood has been set level the safety knobs must be tightened again Warning Please check that all 4 cable...

Страница 27: ...cting version please refer to the instructions provided in the ducting kit specific to the hood AIR OUTLET RECIRCULATION VERSION Open the lighting unit by pulling on the notch provided Remove the grea...

Страница 28: ...ipolar switch with a contact aperture of at least 3 mm Remove the Grease filters see paragraph Maintenance and make sure that the Power cable has been properly inserted into the Suction fan socket At...

Страница 29: ...1 to the plate using the nuts 12d Insert the Seal 12f into the Knob 12e then insert the glass 5 and the other Seal 12h fixing the whole with a Nut 12d Insert the end of the Knob 12e into the slot in t...

Страница 30: ...lt Led T1 Slow flashing Current absorption threshold exceeded If an overload condition occurs the fault is signalled by LED T1 on the keyboard flashing once every 2 seconds Check that nothing is block...

Страница 31: ...d when the delay or 24h functions are not active Activates Intensive speed from any other speed To disable it simply press the same button again or turn the motor off Intensive speed is timed to run f...

Страница 32: ...sh ing it Before fitting it again into the hood make sure that it is completely dry When fitting the filter into the hood pay attention that they are mounted in correct position the handle facing outw...

Страница 33: ...support To purchase contact technical support Lighting Unit Lamps Chic G9 Energy Saving 9W Vanilla G9 Energy Saving 9W Luxia G9 High Power 40W Kaleidos G9 Energy Saving 9W Nest G9 High Power 40W Verti...

Страница 34: ...that the fuse is properly inserted and that it has not burned out for replacing the fuse open the lighting unit and unscrew the fuser holder and replace it with one having the same characteristics Rif...

Страница 35: ......

Страница 36: ...991 0557 382_ver1 180802 D005008_00...

Отзывы: