background image

Follow these instructions in case of installing this product on a car that did not 

come with an original manufacturer’s rear camera. If the vehicle already has an 

original manufacturer’s rear camera, proceed to the next page. 

Make sure the original radio is connected to the vehicle and the ignition is on 

before you do the following procedure.

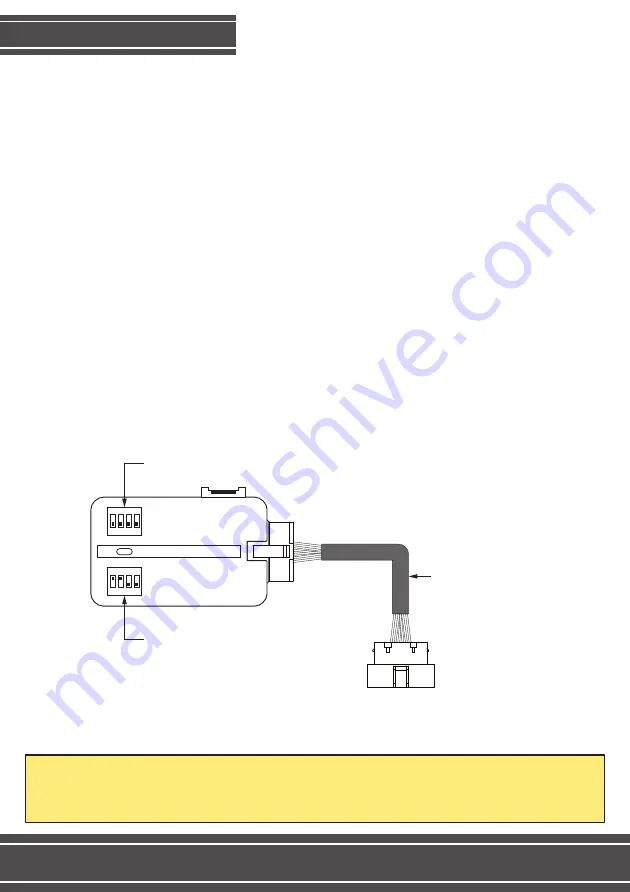
1. Connect the FT-VF-FRD3 interface to the OBD whip that comes with the 

installation kit;

2. Setup the interface’s DIP Switches according to the picture below;

3. Plug the OBD whip into the vehicle’s OBD connector in order to enable the 

multimedia camera input. During this activation, the interface’s LED will blink 

with a blue light, and the radio will reset, signaling that the multimedia has been 

set.

4. After the radio resets, close the vehicle doors and lock the car for 2 minutes to 

finish the activation process. After that, remove the whip and follow the 

instructions on the next page.

Important notice: once you activate the camera on a vehicle, the interface will record that vehicle’s chassis 

number. If you need to clean the interface’s memory to install it on another vehicle, you will have to deactivate 

the camera on the current vehicle. In order to do so, repeat the procedure shown on this page, only setting 

the DIP Switch 2 on the bottom of the interface to OFF.

CAMERA ACTIVATION

2

ON

1 2 3 4

ON

1 2 3 4

1-4: OFF

OBD Whip

Plug into the vehicle’s OBD connector, usually 

located under the dashboard, close to the gear 

and brake pedals.

1-2: ON

3-4: OFF

Содержание FT-VF-FRD3

Страница 1: ...REV 221217 INSTALLATION MANUAL FT VF FRD3...

Страница 2: ...1 front camera input TV and DVD controlled by the car commands See list of compatible vehicles on page 2 12V Post Key and camera output Plug and Play Connections 1 year warranty against manufacturer...

Страница 3: ...ll blink with a blue light and the radio will reset signaling that the multimedia has been set 4 After the radio resets close the vehicle doors and lock the car for 2 minutes to finish the activation...

Страница 4: ...DVD input DOWN disables AV1 input UP enables AV2 TV input DOWN disables AV2 input UP enables front camera input DOWN disables front camera input Configura o DIP 1 DIP 2 DIP 4 DIP 3 Up in case you are...

Страница 5: ...ont camera Use to power the accessories Use to power the accessories Connect to the TV and DVD IR input if they are compatible to the device ON 1 2 3 4 ON 1 2 3 4 Saida Audio Audio Output Saida 12V CA...

Страница 6: ...TV Entrada TV AV2 Entrada DVD AV1 Entrada Camera camera input MOBILE MULTI MEDIA PLAYER SD DVD Receptor de TV Digital ON 1 2 3 4 ON 1 2 3 4 CONNECTIONS 5 Entrada de c mera traseira caso o carro n o t...

Страница 7: ...in order to access the AV session of the interface 3rd Once in the AV session simply touch the POWER button to alter between the accessories installed on inputs AV1 and AV2 4th To go back to the origi...

Страница 8: ...h the interface Note the steering wheel commands are not compatible with the Ford Focus DVD Commands TV Commands Simple touch Channel Track Button 1 2 seconds touch Simple touch 2 seconds touch Button...

Страница 9: ...nd hold the BACK button on the steering wheel for two seconds in order to view your rear camera rear camera visualization is not compatible with Ford Ranger and Ford Ecosport Simply touch the BACK but...

Страница 10: ...gnition unplug the whip from the entertainment center wait for 1 minute and replug the whip on the entertainment center again 2 When I try to access AV1 or AV2 no sound will come out Make sure the RCA...

Страница 11: ...r as well as the attendance number that is generated by our Technical Support which can be reached from the numbers 55 0800 603 2330 landlines only or 55 62 3241 4600 From Mondays to Fridays from 8 a...

Страница 12: ...55 0800 603 2330 or 55 62 3241 4600 suporte faaftech com br www faaftech com br Available from Monday to Friday from 8 a m to 6 p m Brasilia time TECHNICAL SUPPORT Follow us on social media...

Отзывы: