background image

INSTALLING

2

Follow the steps below to install the FT-RC-BM12 interface:

1st Remove the original radio to install the interface;

2nd Setup the interface’s DIP Switches according to the chart on “DIP SWITCH-

ES” section;

3rd Connect the whips according to the “CONNECTIONS” section;

4th Install the rear camera(s) and/or front camera according to the chart on the 

“VIDEO CONNECTIONS” section.

Setup the interface’s DIP Switches while the device is disconnected from the 

whip and the car ignition is off.

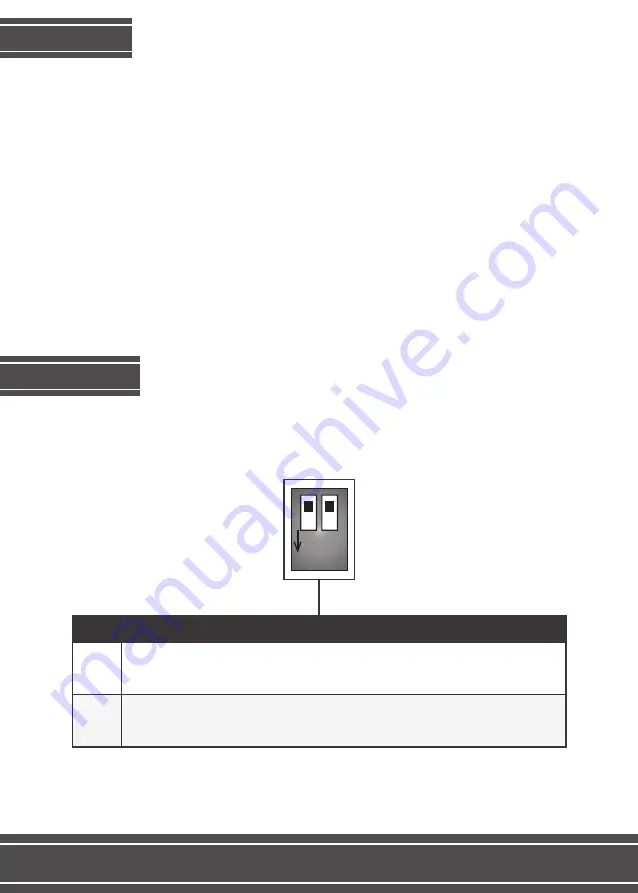
DIP SWITCHES

ON

1 2

DIP 1

DIP SWITCHES DE CONFIGURAÇÃO

UP for cars with an 8,8” or a 10,2” screen
DOWN for cars with a 6,5” screen

UP enables front camera
DOWN disables front camera

DIP 2

Содержание FT-RC-BM12

Страница 1: ...Installation Manual FT RC BM12 REV 130617 ...

Страница 2: ...e in the field of installation of vehicle devices is the one to install this interface The car ignition must be off during the entire installation process CHARACTERISTICS Enables 1 rear camera input Enables 1 front camera input Enables 1 auxiliary video input Dynamic parking lines 12V output to power the accessories Plug and Play Connections 1 year warranty against manufacturer defect Compatible v...

Страница 3: ...according to the CONNECTIONS section 4th Install the rear camera s and or front camera according to the chart on the VIDEO CONNECTIONS section Setup the interface s DIP Switches while the device is disconnected from the whip and the car ignition is off DIP SWITCHES ON 1 2 DIP 1 DIP SWITCHES DE CONFIGURAÇÃO UP for cars with an 8 8 or a 10 2 screen DOWN for cars with a 6 5 screen UP enables front ca...

Страница 4: ...riginal Quadlock connector if there is an Optic Fiber cable If there is you will need to remove it from the original connector and connect it to the interface s Quadlock which will then be connected to the radio Important Notice Modelo FT RC BM12 Versão xx S N xxxxxxxxxx VIDEO IN POWER LVDS IN OUT CAN POWER IN DIP SELECT UPDATE ...

Страница 5: ...ary entry Front Camera Rear Camera Modelo FT RC BM12 Versão xx S N xxxxxxxxxx VIDEO IN POWER LVDS IN OUT CAN POWER IN DIP SELECT UPDATE Camera Traseira Rear Camera Entrada de Vídeo Vídeo Input Camera Frontal Front Camera Saída GND GND Output Saída ACC ACC Output Use theACC output and the GND output to power the cameras and the TV or the mirroring if those are installed ...

Страница 6: ...ACK button on the iDrive see image of the BACK button on the next page The parking lines do not offer 100 precision on the track they show Use them only as an auxiliary resource as you park your vehicle Important Notice 5 REAR CAMERA Once you put your vehicle on reverse the rear camera will automatically show on the screen As you spin the steering wheel the parking lines will move showing the vehi...

Страница 7: ...imedia Press and hold the BACK button on the iDrive to gain access to the interface s AV mode If you have installed a front camera simply touch the BACK button to alter between the AV input view and the front camera Press and hold the BACK button on the iDrive to return to the original menu 6 FUNCTIONING BACK button on the iDrive ...

Страница 8: ... 55 0800 603 2330 or 55 62 3241 4600 suporte faaftech com br www faaftech com br Available from Monday to Friday from 8 a m to 6 p m Brasilia time TECHNICAL SUPPORT Follow us on social media ...

Отзывы: