background image

|   English

6

OS 150 EASY

Weight

kg

1,557

Sound emission values determined according to 

EN 60745-1

Typically the A-weighted noise levels of the product are:

Sound pressure level

dB(A) 

76

Sound power level

dB(A) 

87

Uncertainty K

dB

3

Vibration total values a

h

 (triax vector sum) 

and uncertainty K determined according to EN 

60745-1

Vibration level max:

a

h

m/s

2

4,83

K

m/s

2

1,5

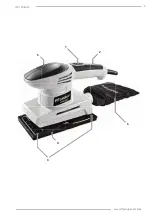
IDENTIFICATION

1. 

On/Off Switch

2.  Rear Handle 

3.  Paper Clamp

4.  Hook & loop sanding base

5.  Front Handle

6.  Dust Box

OPERATION INSTRUCTIONS 


f

Make sure that the power switch


is in the off-posi

-

tion, then plug in the tool.


f

Turn the switch to the ON position.


f

Do not use excess pressure while sanding and always 

sand in same direction as the grain of the wood. Let 

the  sandpaper  do  the  work.  Apply  even  pressure 

over the entire workpiece.


f

Check the wear on the sandpaper at regular intervals 

and replace as necessary. 

NOTE:

 Always turn the switch OFF and unplug 

the sander before changing sheets of sandpaper.


f

Empty dust box regularly for optimal dust pick-up 

performance. Press button downward and pull it 

open, then pour out the dust.

NOTE:

 Do not use dust box when sanding metal. 

Do not clean the dust box by water.


f

When  sanding  is  completed,  turn  off  the  power 

switch and remove the sander from the workpiece.


f

When  completely  finished  using  the  sander,  use  a 

vacuum to dislodge all sand shavings and dust. Wipe 

with a clean, soft cloth.


f

To prevent accidents, turn off the sander and unplug 

it after use. Clean, then store the sander indoors out 

of children’s reach.

SANDPAPER INSTALLATION


f

WARNING:

 To avoid injury from accidental startups, 

turn switch OFF and remove the plug from the power 

source outlet before making any adjustments.


f

Before installing sandpaper, make sure the hook 

and loop fastener base is free of dust and dirt and 

that the sander is unplugged.


f

The hook and loop fastener base will hold any 

hook and loop sandpaper without clamps or glue. 

Simply line up the sandpaper with the hook and 

loop fastener base and press together, making 

sure front edge of the sandpaper is aligned with 

the front edge of the hook and loop fastener base.


f

There  are  also  provided  clamps  to  fasten  non-

hook-and-loop sandpaper to the sander. Select 

a sandpaper with the correct grit corresponding 

to the work to be carried out. To take maximum 

advantage of the sander’s high removal rate and 

smooth  finishing.  It  is  essential  that  the  sandpa

-

per be properly and tightly secured. Tight paper 

also wears less and lasts longer. Insert end of new 

1/4  sheet  sandpaper  approximately  1.5cm  under 

the paper clamp. Lift up on paper clamp lever and 

lock into place. Apply downward pressure to con-

form sandpaper to sanding base. Wrap sandpa-

per around cushion. Lift lever on opposite end of 

sander and insert loose end of sandpaper under 

the paper clamp. Fit sandpaper against cushion 

tightly. Lift up on the lever and lock into place.


f

To  remove  used  sandpaper,  peel  one  edge  away 

from the hook and loop fastener base until the 

whole sheet is free.

CAUTION:

 Do not use torn or severely worn or 

damaged sandpaper. To do so could damage the 

surface of the hook and loop fastener base.

SELECTING THE SANDING SHEET

Depending on the material to be worked and the 

required rate of material removal, different sanding 

sheets are available:

For the working of all wooden materials

For coarse - sanding, e. 

g. of rough, unplaned 

beams and boards

coarse

40, 60

For face sanding and 

planing small irregu-

larities

medium

80, 100, 120

For finish and fine sand

-

ing of hard woods

fine

180, 240

For the working of paint/enamel coats or prim-

ers and fillers

For sanding off paint

coarse

40, 60

For sanding primer

medium

80, 100, 120

For final sanding of 

primers before coating

fine

180, 240

MODELS  FITTED  WITH  DUST  EXTRACTION  FA-

CILITY

Always check that the suction hole are not obstruct-

ed when fitting the sanding sheet and that the per

-

forations in the sand sheet align with the holes in 

the base.

CHIP OUTLET (PAGE 3)

An extraction hose (Ø 35 mm), can be attached on 

the chip ejector. If desired, attach the dust box by 

sliding the nozzle onto the chip extraction port. 

For efficient operation, empty the dust box when 

it is no more than half full, allowing better airflow 

through the bag.

Содержание 41524

Страница 1: ...OS 150 EASY ORIGINAL INSTRUCTIONS NOTICE ORIGINALE ISTRUZIONI ORIGINALI ORIGINALNO UPUTSTVO ZA RAD INSTRUC IUNI DE FOLOSIRE ORIGINALE EN FR IT EL SR RO BG...

Страница 2: ...2 OS 150 EASY EN FR IT EL SR RO BG PONCEUSE VIBRANTE 8 LEVIGATRICE ORBITALE 12 I 17 VIBRACIONA BRUSILICA 22 LEFUITOR CU VIBRA II 26 31 ORBITAL SANDER 4...

Страница 3: ...www ffgroup tools com 3 OS 150 EASY 2 1 3 6 5 4...

Страница 4: ...ch or energizing power tools that have the switch on invites accidents ENGLISH f f Remove any adjusting key or wrench before turning the power tool on A wrench or a key left attached to a rotating par...

Страница 5: ...physical injury particularly to the hands arms and shoulders TO REDUCE THE RISK OF ANY VIBRATION RE LATED INJURY First be examined by a doctor and then have regu lar medical check ups to ensure medica...

Страница 6: ...together making sure front edge of the sandpaper is aligned with the front edge of the hook and loop fastener base f f There are also provided clamps to fasten non hook and loop sandpaper to the sande...

Страница 7: ...d be sorted for environment friendly recycling The plastic components are labeled for categorized recycling EXPLANATION OF SYMBOLS Double insulation For indoor use only Do not expose to rain Wear eye...

Страница 8: ...des blessures graves des personnes f f Utiliser un quipement de s curit Toujours por ter une protection pour les yeux Les quipements de s curit tels que les masques contre les pous si res les chaussur...

Страница 9: ...arsenic et chrome provenant du bois trait chimi quement f f Utilisez la machine uniquement pour le pon age sec La p n tration d eau dans la machine augmente les risques de chocs lectriques ATTENTION...

Страница 10: ...et poncez toujours dans la m me direction que le grain du bois Laissez le papier de verre faire le travail Ap puyez de fa on uniforme sur toute la pi ce f f V rifiez r guli rement l usure du papier de...

Страница 11: ...e poussi re en faisant glisser la buse sur l orifice d extraction des copeaux Pour que la ponceuse fonctionne le mieux possible videz la bo te poussi re lorsqu elle est moiti pleine permettant ainsi l...

Страница 12: ...illuminata Il disordine oppure zone della postazio ne di lavoro non illuminate possono essere causa di incidenti f f Evitare d impiegare l elettroutensile in ambienti soggetti al rischio di esplosion...

Страница 13: ...la spina dalla presa del la corrente e o estrarre la batteria ricaricabile Tale precauzioneeviter chel elettroutensilepossaesse re messo in funzione involontariamente f f Quando gli elettroutensili n...

Страница 14: ...hio In caso di sintomi correlati alla vibrazione come formicolio intorpidimento e dita biancastre o bluastre con sultare il medico al pi presto possibile Quando possibile scegliere usare apparecchi co...

Страница 15: ...velcro sia priva di polvere e sporco e che la levigatrice sia scollegata dalla rete f f La base con velcro tratterr qualsiasi carta abrasiva con velcro senza bisogno di morse o colla Allineare sempli...

Страница 16: ...gnata da numeri alti da 100 a 600 La carta abrasiva a grana pi grossa contrassegnata da numeri bassi da 36 a 80 MANUTENZIONE Ispezioni e pulizia regolari riducono la necessit di operazioni di manutenz...

Страница 17: ...i relativi documenti EN 60745 1 EN 60745 2 4 EN 55014 1 EN 55014 2 EN 61000 3 2 EN 61000 3 3 in base alle prescri zioni delle direttive 2006 42 EC 2014 30 EU Fascicolo tecnico presso FF GROUP TOOL IND...

Страница 18: ...18 OS 150 EASY FI RCD f f f f f f f f f f f f f f f f f f f f f f f f f f f f SERVICE 1 2 3 4 5...

Страница 19: ...19 www ffgroup tools com OS 150 EASY 6 7 f f f f f f Raynaud II f f f f f f f f OFF...

Страница 20: ...S 150 EASY V Hz 220 240 50 60 W 150 min 1 12000 mm 182x90 kg 1 557 EN 60745 1 dB A 76 dB A 87 K dB 3 ah EN 60745 1 ah m s2 4 83 K m s2 1 5 1 ON OFF 2 3 4 velcro 5 6 f f f f f f f f f f f f f f f f f f...

Страница 21: ...21 www ffgroup tools com OS 150 EASY f f 40 60 80 100 120 180 240 40 60 80 100 120 180 240 3 35 mm 100 600 36 80...

Страница 22: ...e smanjuju rizik elektri nog udara f f Izbegavajte kontakt telom sa uzemljenim povr ina ma kao cevi grejanja poret i rashladni ormani Po stoji pove ani rizik od elektri nog udara ako je Va e telo uzem...

Страница 23: ...sa originalnim rezervnim delovi ma Tako se obezbedjuje da ostane sa uvana sigur nost aparata BEZBEDNOSNA UPUTSTVA ZA ELEKTRI NE BRUSILICE UPOZORENJE Ne rukujte ovim alatom ukoli ko nije u potpunosti s...

Страница 24: ...osoba pre kori enja f f Za titite produ ne kablove od o trih predmeta preko merne toplote i vla nih mokrih podru ja f f Koristite posebno elektri no kolo za va e alate Ovo kolo treba da bude za ti eno...

Страница 25: ...IRA U zavisnosti od materijala na kome treba da se radi i potrebne brzine uklanjanja materijala dostupni su ra zli iti listovi brusnog papira Za rad na svim drvenim materijalima Za grubo gla anje npr...

Страница 26: ...tare i la sculele electrice cu acumulator f r cablu de alimentare SIGURAN A LA LOCUL DE MUNC f f Men ine i v sectorul de lucru curat i bine iluminat Dezordinea sau sectoarele de lucru neluminate pot d...

Страница 27: ...lei electrice nainte de utilizare da i la reparat piesele deteriorate Cauza multor accidente a fost ntre inerea necorespunz toare a sculelor electrice f f Men ine i bine ascu ite i curate dispozitivel...

Страница 28: ...pament face parte din Clasa II i este proiectat s fie conectat la o surs de alimentare detaliat pe pl cu a de identificare i compatibil cu techerul livrat Dac este necesar un prelungitor folosi i un p...

Страница 29: ...ecvat opera iunii pe care o ve i executa Pentru a beneficia la maxim de rata mare de lefuire a mirghelului i de o finisare uniform Este esen ial ca mirghelul s fie bine i str ns fixat mir ghelul str n...

Страница 30: ...reciclarea pe categorii EXPLICAREA SIMBOLURILOR Izola ie dubl Doar pentru utilizare n spa ii nchise Nu expune i la ploaie Purta i protec ii pentru urechi Afectarea pl m nilor dac nu este purta t o ma...

Страница 31: ...31 www ffgroup tools com OS 150 EASY f f f f f f f f f f E f f F f f f f f f f f f f f f f f f f f f f f f f f f f f...

Страница 32: ...32 OS 150 EASY f f f f f f f f 1 2 3 4 5 6 7 f f f f f f...

Страница 33: ...tools com OS 150 EASY II f f f f f f f f 41524 OS 150 EASY V Hz 220 240 50 60 W 150 min 1 12000 mm 182x90 kg 1 557 EN 60745 1 dB A 76 dB A 87 K dB 3 ah K EN 60745 1 ah m s2 4 83 K m s2 1 5 1 2 3 4 5 6...

Страница 34: ...34 OS 150 EASY f f f f f f f f f f f f f f f f 1 4 1 5 f f 40 60 80 100 120 180 240 40 60 80 100 120 180 240 3 35...

Страница 35: ...60745 1 EN 60745 2 4 EN 55014 1 EN 55014 2 EN 61000 3 2 EN61000 3 3 2006 42 EC 2014 30 EU FF GROUP TOOL INDUSTRIES S A 19300 Aspropyrgos Greece Loudovikos Tsirigiotis Operations Engineering FF GROUP T...

Страница 36: ...www ffgroup tools com info ffgroup toolindustries com 30 210 55 98 400 19300 Athens Greece 9 5 Km Attiki Odos Aspropyrgos FF Group Tool Industries...

Отзывы: