background image

2

Key Name

Key Function Description

Smart Screen Mode

Display Mode

Without Menu

With Menu

Without Menu

With Menu

Switch Key

Bring up mode selection 

menu/press and hold for 

3s to switch Display Mode

Exit

Bring up mode selection 

menu/press and hold for 

3s to Smart Screen Mode

Exit

Left Set Key

Switch previous screen

Reduce parameter 

value/ the previous 

Nil

Reduce parameter 

value/ the previous 

Right Set Key

Switch next screen

Increase parameter 

value/ the next

Nil

Increase parameter 

value/ the next

Menu Key

Bring up image

adjustment menu

1.Enter selection/

exit selection

2.Confirm

Bring up image 

adjustment menu

1.Enter selection/exit 

selection

2.Confirm

Power Key

Device startup/shutdown

Smart Screen Mode: cameras can be added, managed and displayed on the device when used as smart screen, which supports 

multichannel preview and playback.

Display Mode: the device can be connected to computer via HDMI port to perform a normal display function.

Sleep Mode/Close Mode: press and hold the power key for 3s.

Mode Selection: 

Method One: press and hold the switch key for 3s to switch the mode direcxtly.

Method Two: press the switch key firstly, and then select the mode you want by pressing left/right set keys, and finally press the 

menu key to confirm your selection.
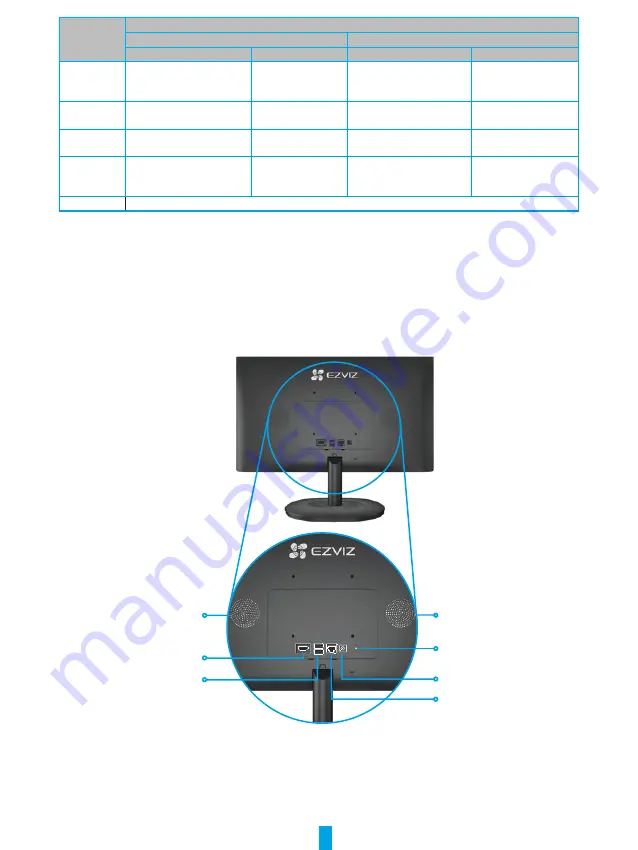
Speaker

Network 

Indicator

Power Port 
LAN Port 

Speaker

HDMI Port

USB Port

Содержание CS-SD3

Страница 1: ...FRINGEMENT OF THIRD PARTY IN NO EVENT WILL EZVIZ ITS DIRECTORS OFFICERS EMPLOYEES OR AGENTS BE LIABLE TO YOU FOR ANY SPECIAL CONSEQUENTIAL INCIDENTAL OR INDIRECT DAMAGES INCLUDING AMONG OTHERS DAMAGES...

Страница 2: ...Wireless Connection 4 Installation 5 1 Micro SD Card Installation Optional 5 2 Installation Location 5 3 Installation Procedure 5 4 Waterproof Kit Installation Optional 7 Operations on the EZVIZ App 8...

Страница 3: ...Adapter x1 Network Cable x1 Regulatory Information x1 Quick Start Guide x1 The power adapter s appearance is subject to the one you have bought 2 Basics Switch Key Left Set Key Right Set Key Menu Key...

Страница 4: ...ction 2 Confirm Bring up image adjustment menu 1 Enter selection exit selection 2 Confirm Power Key Device startup shutdown Smart Screen Mode cameras can be added managed and displayed on the device w...

Страница 5: ...the App Store or Google PlayTM 3 Launch the app and register an EZVIZ user account EZVIZ App If you have already used the app please make sure that it is the latest version To find out if an update i...

Страница 6: ...cord connect the smart screen with power adapter and plug the power adapter into an electrical outlet Outlet 2 Power the smart screen on complete the password settings according to the interface guid...

Страница 7: ...r router with the Ethernet cable The network indicator flashing solid green indicates that the smart screen is connected to the Internet Power Adapter DC12V 3 33A Outlet 5 Add your smart screen to EZV...

Страница 8: ...EZVIZ app On the Home screen tap on the upper right corner to go to the Scan QR Code interface Scan the QR code on the Quick Start Guide cover or on label of the smart screen body or on the screen of...

Страница 9: ...access your EZVIZ account so that Alexa can control your EZVIZ devices 6 You will see EZVIZ has been successfully linked then tap DISCOVER DEVICES to allow Alexa to discover all your EZVIZ devices 7 G...

Страница 10: ...go to the Set up interface 4 Tap Works with Google and search for EZVIZ where you will find EZVIZ skills 5 Enter your EZVIZ username and password and tap Sign in 6 Tap the Authorize button to authori...

Страница 11: ...ports a continuous work with 24 hours and 7 days Q Does the smart screen support Wi Fi access network A It supports both two access networks wireless network and wired network Q Can the smart screen b...

Страница 12: ...er legitimate rights 3 During the use of video products video image data derived from real scenes will continue to be generated including a large amount of biological data such as facial images and th...

Страница 13: ...nterference in a residential installation This equipment generates uses and can radiate radio frequency energy and if not installed and used in accordance with the instructions may cause harmful inter...

Страница 14: ...y for successful communication This equipment should be installed and operated with a minimum distance 20cm between the radiator and your body Le pr sent appareil est conforme aux CNR d Industrie Cana...

Отзывы: