background image


38 

Troubleshooting 

 
If you suspect a problem is being caused by incorrect configuration or some other minor 
problem, consult the troubleshooting guide below. 


Upgrading the Firmware 

Firmware is software that determines the functionality of the network camera. One of your 
first actions when troubleshooting a problem should be to check the current firmware. The 
latest version may contain a correction that fixes your particular problem. The current 
firmware version in your camera is displayed on the Basic Configuration or About. For the 
latest firmware of the camera, please contact with your product administrator.


Detailed instructions on how to perform the upgrade process are provided with each new 
release. See also the Maintenancen/ Upgrade for more information. 
 

Camera Reset 

When there is a failure in the network connection, please proceed in the following order. 

After opening the COVER, power on the camera while remaining to press Reset Button for 

about 10 seconds.


General Troubleshooting 

The following list covers some of the problems that may be encountered and suggests how 
to remedy them: 

Содержание D SERIES

Страница 1: ...1 IP CAMERA USER Manual ...

Страница 2: ...ser Add User Edit Network Date Time Video 17 Video Image Basic Image AE Image AWB Image Day Night Image WDR Image BLC Image DNR Image Corridor Privacy Mask Events 22 Motion Detection Trigger Alarm In Trigger System Trigger Manual Trigger Network Action Alarm Out Action E Mail Action FTP Video Rule Rule Add DIS Record 23 Record Storage Video Analytic 25 Tamper System 36 ...

Страница 3: ...ers Add User Edit Security HTTPS Security IP Filter Day Time Network TCP IP Network DDNS Network RTP Network UPnP Network Zeroconf Maintenance Logs Report Troubleshooting 38 Upgrading the Firmware General Troubleshooting ...

Страница 4: ... VariFocal 2 8 12mm VariFocal 3 6mm fixed 2 Sony Exmor CMOS Full HD Sensor Sony 1 2 8 3 23Megapixel RGB Bayer Array CMOS Sensor for 3Megapixels Sony 1 1 8 6 44Megapixel RGB Bayer Array CMOS Sensor for 5Megapixels 3 WDR True WDR for 2M 60fps model Digital WDR for 2M 3M 30fps model 2D 3D Noise Reduction Digital Image Stabilizer 4 H 264 Encoding MJPEG Encoding Up to 1920x1080 30fps 2048x1536 30fps Du...

Страница 5: ... 1920 1080 30ps 3 Memory 2 GB or more 4 Resolution 1280X1024 pixels or higher 32 bit color 5 Web Browser Microsoft Internet Explorer Ver 9 0 10 0 or Higher Safari Ver 4 0 Plug in free viewer only Google Chrome Ver 4 0 Plug in free viewer only Accessing the IP camera 1 Open Web browser 2 Type IP address Enter the camera s IP address in the Internet Explorer address bar The default IP address is 192...

Страница 6: ...ize to display in live view page Event Action Used to start or stop the event out manually according to event settings Snapshot Take a picture of the video image currently on display Supports the origin image size view print and save feature Zoom Supports a digital zoom in live video image Full screen Expand the current windows into maximum monitor size Information Shows the current major setting ...

Страница 7: ...hority depends upon user group automatically and shows the permission status to access the menus The default user name password are admin Name Shows the name which registered to access the camera Group Shows the assigned permission given to users Authority Shows the permission status to access the menus Click the Add Edit or Delete button for managing user account Users Add To add a new user 1 Cli...

Страница 8: ...onfiguration Protocol server has a feature that automatically assigns an IP address to the device if there is a device on the network Obtain IP address via DHCP Select the choice box if you want to assign the IP address from DHCP server automatically and then the remaining setting are read only text Use the following IP address Select the choice box if you want to assign the IP address manually IP...

Страница 9: ...ws you to manually enter the date and time Synchronize with NTP Server This option will obtain the correct time from an NTP server every 60 minutes The NTP server s IP address or host name is specified in the time server Time Zone Select the time zone where your camera is located Click the Automatically adjust for daylight saving changes checkbox to automatically update the time changes caused by ...

Страница 10: ...ed for transmissions Resolution Specified as the number of pixel columns width by the number of pixel rows height The Resolution can be adjusted in the range from 320x240 to 1920x1080 Frame rate Indicates the number of fps frame per second available for the video stream configuration GOP size Describes the composition of the video stream Please consult with your network administrator before changi...

Страница 11: ...c Appearance Control The image appearance allows you to adjust the camera setting parameters and change the camera orientation All of parameters are recommended to be modifying for good image quality suitable for installation place Brightness Controls the brightness of detail in a scene Contrast Controls the contrast of detail in a scene Saturation Controls the saturation of detail in a scene Hue ...

Страница 12: ...iate brightness The manual mode supports the manual exposure control function for manually adjusting the gain and shutter time Priority This function is used for controlling the exposure time and gain to adjust the luminance Under the dark conditions this camera automatically expands the frame rate and enters the long exposure mode in this normal AE mode Shutter Used to for controlling the gain wh...

Страница 13: ...igital WDR Control Enable defog mode Click the checkbox to enable defog mode Image BLC BLC Control Backlight Compensation Image DNR 2D NR 3D NR Control Mode The default setting is off Level Configure one of Level 1 Level2 Level3 and Level4 Image Corridor Corridor Control The corridor format allows you to get a vertically oriented video stream from the camera The video is adapted perfectly to the m...

Страница 14: ... the privacy mask 1 Check the Enable privacy mask checking box 2 Click your mouse right button on the screen and then specify the area 3 Enter the name and then click Save 4 If you want to delete an mask area in the list click the X icon ...

Страница 15: ...indows can be created and configured Sensitivity Configure the sensitivity for the motion detection Once motion detection windows are configured this camera can be configured to perform actions when motion is detected Possible actions include uploading images alarm out and E mailing Trigger Alarm In Alarm In Click the Enable alarm in checkbox to enable the Alarm In port ...

Страница 16: ...ing This is used to trigger the event every time the Network Camera is started Dwell time The default setting is 3 seconds Trigger Manual Manual Trigger The Manual Trigger features an alarm out signaling JPEG file transfer to FTP server and sends email to SMTP server whenever operator clicks Manual Trigger button in the Live View window NOTE Dwell time means how long time the alarm output signal h...

Страница 17: ...he default setting is NO Action E Mail E Mail SMTP Use the Simple Mail Transfer Protocol SMTP server to send an email notification when an event server is activated The camera can be configured to send event and email messages via SMTP Sender Click in the Sender box and enter the Email address as the sender Interval Enter the Email sending time interval after event occurred Aggregate events Enter ...

Страница 18: ...our network administrator Login method Select one for SMTP authentication method allowed NOTES If a PLAIN or LOGIN mechanism is negotiated the camera sends user name and password to the SMTP server The LOGIN mechanism is supported by Microsoft as well as by some other clients Most other clients support the PLAIN authentication mechanism Since the vast majority of Email clients support only PLAIN o...

Страница 19: ...k camera and the target FTP server Port Enter the port number used by the FTP server The Port number can be adjusted in the range 1 65535 The default setting is 21 Remote directory Specify the path to the directory where the uploaded images will be stored If this directory does not already exist on the FTP server there will be an error message when uploading User name Enter the User name as provid...

Страница 20: ... Setting When this camera detects an event according to event rule setting camera will boost the streaming performance dependent on each video stream setting Rule This page shows current configuration status when event is activated The common event actions will upload images to a specified destination or send an email or active an output port Event Rule List An event type is a set of parameters de...

Страница 21: ... event triggering such as Alarm In and Manual trigger General Enter the user favorite event name Name Click in the Name box and type a user favorite event name 1 to 31 alphanumeric characters Trigger Shows the Event source type to be configured Type Selects the Event source type Action The Event Out provides that the camera will perform certain actions Active output Click the Active output port ch...

Страница 22: ...sates the image automatically when it is seen to shake for stable image output Level The default setting is 8 NOTE Mitigate the degree of image vibration when the camera vibrates due to the external factors such as wind ...

Страница 23: ...ttached Device as a storage device Check the box to enable the service Click the checkbox to overwrite the storage device Stream source Set the recording stream source Frame rate Set the recording frame rate Bitrate Set the recording bitrate Pre event recording Set the pre event recording time Post event recording Set the post event recording time Schedule ...

Страница 24: ...device Format Click the Format button to format SD card Remove Remove or eject the storage device safely Check Check the validity of user ID Password for CIFS or NFS Storage Information Show current SD card information NOTES Common Internet File System CIFS is a remote file access protocol that forms the basis for Windows file sharing network printing and various other network services CIFS requir...

Страница 25: ...ime The default setting is 3 seconds NOTE The Dwell time that must elapse before an alarm is generated This can help prevent false alarms for known conditions that affect the image To configure the camera to send an alarm when tampering occurs 1 Go to Event Map Add 2 Select Event In Type 3 Set Event Out for notification of an image changing if the lens is repositioned or rendered severely out of f...

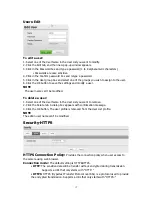
Страница 26: ...he menus Click the Add Edit or Delete button for managing user account Users Add To add a new user 1 Click the Add tab and then new pop up window appears 2 Click in the User name box and type a new user name 1 to 14 alphanumeric characters User names are not case sensitive 3 Click in the Password box and type a password 1 to 8 alphanumeric characters Passwords are case sensitive 4 Click in the Con...

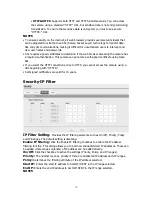
Страница 27: ... delete a user 1 Select one of the User Name in the User List you want to remove 2 Click the Delete tab A dialog box appears with confirmation message 3 Click the OK button The user profile is removed from the User List profile NOTE The admin user name can t be modified Security HTTPS HTTPS Connection Policy Provides the connection policy when user access to the camera using web browser Connection...

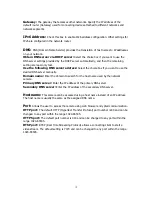
Страница 28: ...select the HTTP connection policy to HTTP you cannot access the camera using a URL beginning with HTTPS Self signed certificates are valid for 10 years Security IP Filter IP Filter Setting Provides the IP filtering elements such as On Off Priority Policy and IP Ranges The default setting is disabling Enable IP filtering Click the Enable IP filtering checkbox to enable the IP address filtering func...

Страница 29: ... an allowed address Day Time Current Time Shows the current date and time Date The default setting is 1970 01 01 Time The default setting is 00 00 00 New Time Select one of the server time Synchronize with computer time Sets the time according to the clock on your computer Set manually Using this option allows you to manually enter the date and time Synchronize with NTP Server This option will obt...

Страница 30: ...Obtain IP address via DHCP server Select the choice box if you want to assign the IP address from DHCP server automatically and then the remaining setting are read only text Use the following IP address Select the choice box if you want to assign the IP address manually IP address The address of the camera connected to the network Specify a unique IP address for this network camera Subnet mask The...

Страница 31: ...desired DNS server manually Domain name Enter the domain to search for the host name used by the network camera Primary DNS server Enter the IP address of the primary DNS server Secondary DNS server Enter the IP address of the secondary DNS server Hostname This camera can be accessed using a host name instead of an IP address The host name is usually the same as the assigned DNS name Port Allows t...

Страница 32: ...tes will always occur at the set interval with no regard to whether automatic updates have been configured or not Internet DDNS Dynamic Domain Naming Service Provides user with host name to access the camera Enable DDNS Click the Enable DDNS checkbox to active DDNS service DDNS server Enter the DDNS server name The default DDNS server is security device name Registered host Enter the registered ho...

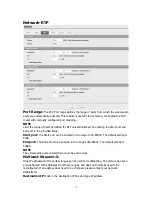
Страница 33: ...he Start port can be entered in the range 1024 65532 The default setting is 5008 End port The End port can be entered in the range 1024 65532 The default setting is 50999 NOTE The video audio ports entered here must be even values Multicast Stream1 3 Only IP addresses within certain ranges can be used for multicasting The camera has been pre configured with addresses from these ranges and does not...

Страница 34: ...before the packet arrives at its destination or is dropped Network UPnP UPnP is enabled by default and the network camera then is automatically detected by operating systems and clients that support this protocol UPnP Universal Plug Play Click the Enable UPnP checkbox to disable the UPnP The default setting is enabling Friendly name Click in the Friendly name box and type a description for the tex...

Страница 35: ...computers and printers to connect to a network automatically Without zeroconf a network administrator must set up services such as Dynamic Host Configuration Protocol DHCP and Domain Name System DNS or configure each computer s network settings manually which may be difficult and time consuming Zeroconf The default setting is enabling IP Address The default zeroconf ip is 169 254 xxx xxx Maintenan...

Страница 36: ...es the new firmware as following steps 1 Click Browse button 2 Browse to the desired firmware file on your computer 3 Click Upgrade button NOTE Do not disconnect power to the unit during the upgrade The unit restarts automatically after the upgrade has completed 2 3 minutes Setup Export Save all parameters and user defined scripts to a backup file Click the Backup button to take a backup of all th...

Страница 37: ...og Provides the system log information Event Log Provides the events log information Server Report Provides the information about the server status and should be included when requesting report Information be found here includes the camera s firmware version MAC address system information IP address and network connections ...

Страница 38: ...irmware version in your camera is displayed on the Basic Configuration or About For the latest firmware of the camera please contact with your product administrator Detailed instructions on how to perform the upgrade process are provided with each new release See also the Maintenancen Upgrade for more information Camera Reset When there is a failure in the network connection please proceed in the ...

Отзывы: