background image

XTP FT HD 4K Fiber Transmitter • Installation

5

Installation

This section contains the installation procedures and operation methods for the 
XTP FT HD 4K. Topics in this section include:

• 

Rear Panel Connectors

• 

Connection Details

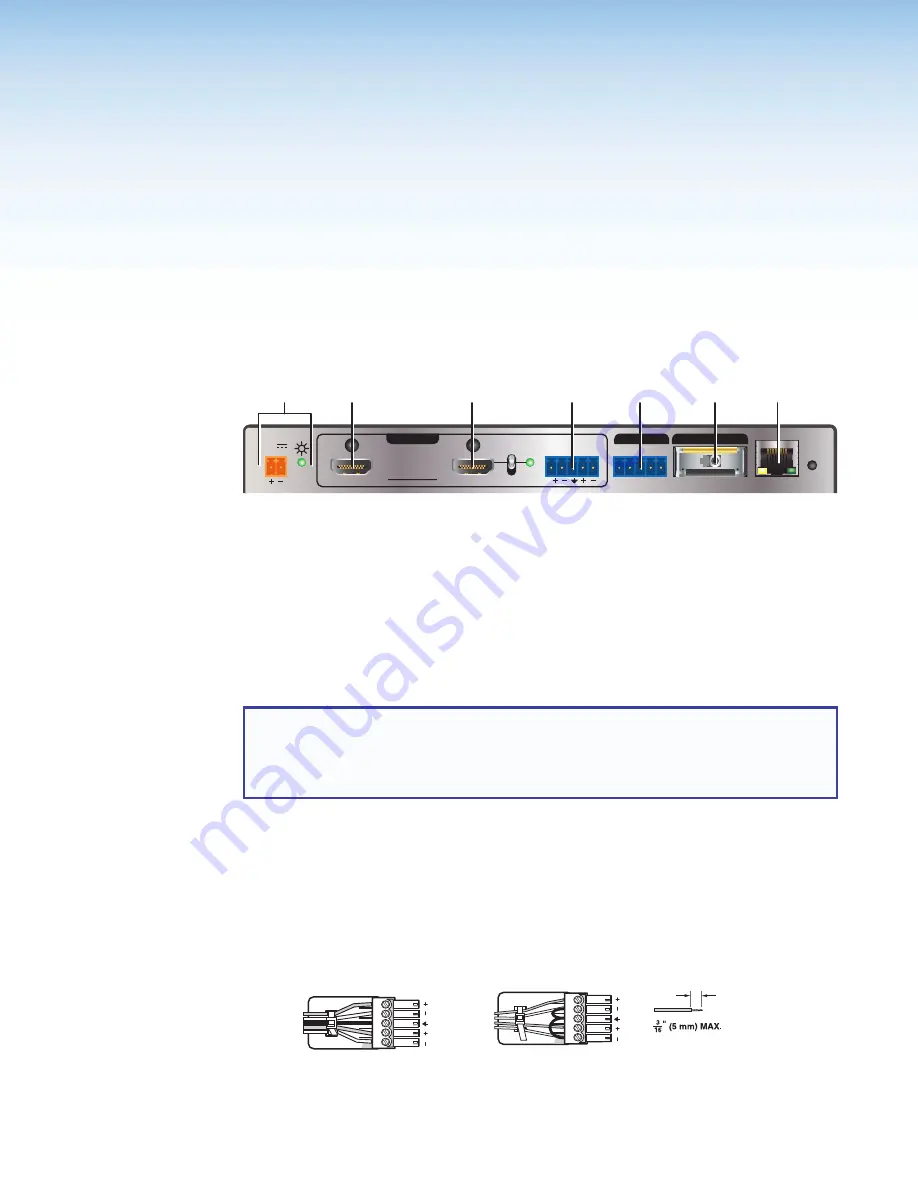
Rear Panel Connectors

A


HDMI input connector

B


HDMI loop-through connector


C


Analog audio input connector


D


RS-232 and IR Over XTP connector


(see next page)

E


XTP output connector

 (see next 

page)

F


LAN connector

 (see next page)

G


Power connector and LED

 (see next 

page)

Figure 2. 

XTP FT HD 4K Rear Panel Connectors

Transmitter inputs

NOTES:


• 

For HDMI cables, the maximum cable length is 15 feet (4.6 meters).

• 

Use Extron LockIt Cable Lacing Brackets to secure HDMI connectors to the device 
(see 

HDMI Connection

 on page 7).

A


HDMI input connector

 — Connect a digital video source device to the HDMI input 

connector. It accepts HDMI, DVI (with an appropriate adapter), or dual mode DisplayPort 
video sources.

B


HDMI loop-through connector

 — Connect a digital video display to the HDMI  

loop-through connector for a local display of the HDMI input (see 

HDMI Audio Switch


on page 11 to select local audio output options). A display that is not HDCP-compliant 
displays a green screen when HDCP encrypted content is sent to it.

C


Analog audio input connector

 — Connect an audio source to the 5-pole captive screw 

connectors. Wire the connector as shown in figure 3.

Unbalanced Audio Input

Balanced Audio Input

Tip

Ring

Tip

Ring

Sleeves

Tip

Sleeve

Sleeve

Tip

LR

LR

Do not tin the wires!

Figure 3. 

Audio Input Wiring

POWER
12V
1.0 A MAX

XTP FT HD 4K

HDMI

AUDIO

AUDIO

SIG

LINK

LAN

RS-232 IR

L

Tx Rx

Tx Rx

RESET

G

R

ON

OFF

LOOP THRU

XTP OUT

OVER XTP

INPUTS

A

B

C

D

E

F

G

Содержание XTP FT HD 4K

Страница 1: ...User Guide XTP FT HD 4K XTP Systems XTP Fiber Optic Transmitter 68 2201 01 Rev E 01 19 ...

Страница 2: ...nce importantes qui se trouvent dans la documentation fournie avec le matériel Pour en savoir plus sur les règles de sécurité la conformité à la réglementation la compatibilité EMI EMF l accessibilité et autres sujets connexes lisez les informations de sécurité et de conformité Extron réf 68 290 01 sur le site Extron www extron com Istruzioni di sicurezza Italiano AVVERTENZA Il simbolo se usato su...

Страница 3: ...RGB Systems Inc or Extron Electronics see the current list of trademarks on the Terms of Use page at www extron com Registered Trademarks Extron Cable Cubby ControlScript CrossPoint DTP eBUS EDID Manager EDID Minder Flat Field FlexOS Glitch Free Global Configurator Global Scripter GlobalViewer Hideaway HyperLane IP Intercom IP Link Key Minder LinkLicense LockIt MediaLink MediaPort NetPA PlenumVaul...

Страница 4: ...ing controls making adjustments or performing procedures in a manner other than what is specified herein may result in hazardous radiation exposure NOTE For more information on safety guidelines regulatory compliances EMI EMF compatibility accessibility and related topics see the Extron Safety and Regulatory Compliance Guide on the Extron website Produit laser de classe 1 Si ce produit a besoin d ...

Страница 5: ... X2 X2 CE NOTE For commands and examples of computer or device responses mentioned in this guide the character 0 is used for the number zero and O is the capital letter o Computer responses and directory paths that do not have variables are written in the font shown here Reply from 208 132 180 48 bytes 32 times 2ms TTL 32 C Program Files Extron Variables are written in slanted form as shown here p...

Страница 6: ...res 10 HDMI Audio Switch 11 EDID 11 Audio Output Overview 11 Reset Modes 12 SIS Configuration and Control 13 Host Device Connection 13 SIS Overview 13 Host and Device Communication 13 Error Responses 13 Using the Command and Response Tables for SIS Commands 14 Symbol Definitions 14 Command and Response Tables 15 Audio Configuration Commands 15 EDID Commands 16 Advanced Configuration Commands 16 De...

Страница 7: ...XTP FT HD 4K Fiber Transmitter Contents xiii ...

Страница 8: ...er optic cable It extends digital video signals up to 4096x2160 24 Hz with deep color support up to 700 m 2 297 feet using a multimode OM4 fiber cable or up to 10 km 6 2 mi with a singlemode fiber cable The following diagram shows one way the XTP FT HD 4K can be integrated in an XTP point to point application POWER 12V 1 0A MAX XTP FR HD 4K HDMI S PDIF AUDIO AUDIO SIG LINK LAN RS 232 IR L Tx Rx Tx...

Страница 9: ...he table below for maximum video resolutions and refresh rates for various inputs and outpus Maximum Resolution and Refresh Rates for XTP Systems Output Non 4K 4K Fiber 4K Twisted Pair 4K PLUS Input Analog 1920x1200 60 Hz 1920x1200 60 Hz 1920x1200 60 Hz 1920x1200 60 Hz Non 4K Digital 2048x1080 60 Hz 2048x1080 60 Hz 2048x1080 60 Hz 2048x1080 60 Hz 4K Fiber 2048x1080 60 Hz 4096x2160 24 Hz 4096x2160 ...

Страница 10: ...00 Ethernet communication Signal and link status LED indicators for XTP ports Provides a means for validating signal flow and operation from transmitter to receiver allowing quick identification of connectivity issues Video Features Computer and video resolutions Supports up to 4K 4096x2160 24 Hz at 4 4 4 color sampling over one fiber cable HDMI specification features Include data rates up to 10 2...

Страница 11: ...l when encrypted content is sent to a non compliant display providing immediate visual confirmation that protected content cannot be viewed on the display EDID and HDCP transmission support Actively buffers DDC channels allowing continuous communication between source and display Internal color bars test pattern Helps with setup and calibration User selectable HDCP authorization Allows individual ...

Страница 12: ...age 7 A HDMI input connector Connect a digital video source device to the HDMI input connector It accepts HDMI DVI with an appropriate adapter or dual mode DisplayPort video sources B HDMI loop through connector Connect a digital video display to the HDMI loop through connector for a local display of the HDMI input see HDMI Audio Switch on page 11 to select local audio output options A display tha...

Страница 13: ...rave ou de mort Le XTP FT HD 4K émet une lumière invisible en continu qui peut être dangereux pour les yeux à utiliser avec précaution Do not look into the rear panel fiber optic cable connectors or into the fiber optic cables themselves Ne regardez pas dans les connecteurs de câble fibre optique sur le panneau arrière ou dans les câbles fibre optique eux mêmes Plug the attached dust caps into the...

Страница 14: ...w the LockIt to be placed over it The screw does not have to be removed 3 Place the LockIt on the screw and against the HDMI connector 3 and then tighten the screw to secure the bracket 4 Loosely place the included tie wrap around the HDMI connector and the LockIt 4 5 While holding the connector securely against the cable lacing bracket use pliers or similar tools to tighten the tie wrap then remo...

Страница 15: ...Configuration ATTENTION The length of the exposed wires in the stripping process is important ATTENTION La longueur des câbles exposés est importante lorsque l on entreprend de les dénuder The ideal length is 3 16 inch 5 mm La longueur idéale est de 5 mm 3 16 inches Any longer and the exposed wires may touch causing a short circuit between them S ils sont un peu plus longs les câbles exposés pourr...

Страница 16: ...ional Electrical Code ANSI NFPA 70 article 725 and the Canadian Electrical Code part 1 section 16 The power supply shall not be permanently fixed to a building structure or similar structure Sauf mention contraire les adaptateurs AC DC ne sont pas appropriés pour une utilisation dans les espaces d aération ou dans les cavités murales Cette installation doit toujours être en accord avec les mesures...

Страница 17: ...7 XTP FT HD 4K Front Panel Features A Power LED indicator Lights when power is applied to the device from the power supply There are two Power LED indicators one on the front panel and one on the rear panel see figure 2 G on page 5 B Configuration connector Connect a host device to the female USB mini B connector to configure the connected transmitter or update firmware C Input LED indicators Sign...

Страница 18: ...e transmitter EDID can come from the loop through display on the transmitter For EDID management use the XTP System Configuration Software see EDID Minder on page 26 NOTE In matrix applications EDID on the transmitter is assigned by the matrix switcher using the XTP System Configuration Software Audio Output Overview By default the XTP FT HD 4K prioritizes embedded digital audio over analog audio ...

Страница 19: ...he device with the firmware version that results from this mode reset The device reverts to the factory default firmware for a single power cycle NOTE If this reset was performed by mistake or is no longer desired cycle power to the device again to restore the firmware version running prior to the reset Use this reset to return the firmware to the factory version temporarily if an incompatibility ...

Страница 20: ... Device Communication SIS commands consist of one or more characters per field No special characters are required to begin or end a command sequence When the XTP FT HD 4K determines that a command is valid it executes the command and sends a response to the host device All responses from the transmitter to the host device end with a carriage return and a line feed CR LF which signals the end of th...

Страница 21: ...ble below shows the hexadecimal equivalent of ASCII characters used in the command and response tables Hexadecimal values contain two digits The following symbols are commonly used throughout the command and response tables ASCII and Hexadecimal Conversion Table Second Hexadecimal Digit 0 1 2 3 4 5 6 7 8 9 A B C D E F First Hexadecimal Digit 0 LF 1 E 2 3 0 1 2 3 4 5 6 7 8 9 4 A B C D E F G H I J K...

Страница 22: ...ease the audio level by 1 dB Decrease audio level G or g AudX Decrease the audio level by 1 dB View audio level G or g AudX Black video signal NOTE The transmitter uses a black signal to simulate a 720p or 1080p 50 Hz or 60 Hz signal to pass audio without video Enable black video signal EB1AFMT AfmtB1 Enable the black video signal for audio only Disable black video signal EB0AFMT AfmtB0 Disable th...

Страница 23: ... HDCP Authorized is disabled for sources that require encryption for example a Blu ray Disc player the output is muted For source devices that encrypt their output even if the source material does not require HDCP encryption disable the HDCP Authorized feature to view the content on non HDCP compliant displays Enable the HDCP Authorized feature EE1HDCP HdcpE1 Report the input as an HDCP authorized...

Страница 24: ...s of the input View HDCP output status EO2HDCP HdcpO2 X1 View the HDCP status of the output View firmware version Q X XX View the current firmware version View full firmware version Q X XX XXXX View the current full firmware version View part number N XX XXXX XX View the transmitter part number KEY X1 Video signal status 0 video or TMDS signal not detected 1 video or TMDS signal detected X1 Input ...

Страница 25: ...soft Windows operating systems and available for download on the Extron website www extron com To download the software from the Extron website locate it on the Download Center page or go to the XTP System Configuration Software product page Software Download Center Page The software Download page contains the necessary files to install the XTP System Configuration Software Figure 9 Extron Website...

Страница 26: ...nstall the program Software Product Page The software product page contains information about the software Figure 11 XTP System Configuration Software Product Page To download and install the XTP System Configuration Software from this page perform the following 1 In the Search field see figure 11 1 type XTP System Configuration Software 2 Press Enter on the keyboard or select XTP System Configura...

Страница 27: ...ation connector see figure 7 B on page 10 Figure 12 Connections Screen To connect to a device 1 Open the XTP System Configuration Software The Connections screen opens 2 From the Connections screen select the USB radio button see figure 12 1 3 From the displayed list select the connected device 2 4 Click the Connect button 3 The Device Settings screen opens see Transmitter Configuration on page 24...

Страница 28: ...select Disconnect The Connections screen opens NOTE If the device is already disconnected the Disconnect option is disabled until a device is connected Exit This option disconnects the transmitter from the software and closes the application From the File menu select Exit to close the application Tools menu The Tools menu contains an option for updating firmware To access this menu click the Tools...

Страница 29: ...options Select file from computer Uploads a manually selected firmware file saved on the connected computer Check network for updates Checks the connected network for firmware updates If any are found click the Update X Devices button to update the firmware for the applicable connected devices or click Save File to Computer to save the firmware file to the connected computer 4 Click the Close butt...

Страница 30: ...e This option provides basic information about the XTP System Configuration Software including version number and copyright information Figure 19 About XTP System Configuration Software Dialog Box Example 1 From the Help menu select About the Software The About dialog box opens 2 Click the Details button for more information 3 Click the Ok button to close the dialog box Help This option opens the ...

Страница 31: ... Figure 20 Transmitter Device Settings Screen Video panel 2 Video input Select the HDCP Authorized check box to set the input as an HDCP authorized device or deselect it to indicate that the device is not an HDCP authorized device By default the check box is selected 3 Video output Select the Color Bars Test Pattern check box to transmit a test pattern to an XTP receiver or XTP matrix switcher or ...

Страница 32: ...check box is selected If selected also select the black signal resolution from the Signal Type drop down menu The default resolution is 720p 60 Hz Factory reset 7 Factory Reset Click the Factory Reset button to reset the transmitter to factory settings except for firmware see mode 5 in Reset Modes on page 12 NOTE This is the same as the EZXXX SIS command see Reset mode SIS command on page 17 Devic...

Страница 33: ...splayed in yellow Figure 21 EDID Minder Screen Assign EDID to the input 1 Select an available EDID setting represented by a blue green or yellow output display icon from the Favorites Connected Outputs or Available EDID panel 2 4 2 Select the check box of the connected input 5 3 Click the Assign button 6 or the Assign to All button 7 below the input area TIP Alternatively EDID can be assigned by d...

Страница 34: ...figure 22 can be used to easily locate a specific EDID setting 1 Resolution filter 2 Refresh Rate filter 3 Video Format filter 4 Audio Format filter 5 Clear button Figure 22 EDID Minder Filters To use a filter or combination of filters perform the following 1 Select an EDID setting from one of the drop down lists of the associated filter see figure 22 1 4 The available EDID options that match the ...

Страница 35: ...ing ambient temperature If installed in a closed or multi unit rack assembly the operating ambient temperature of the rack environment may be greater than room ambient temperature Therefore install the XTP FT HD 4K in an environment compatible with the maximum ambient temperature Tma 122 F 50 C specified by Extron 2 Reduced air flow Install the equipment in a rack so that the amount of air flow re...

Страница 36: ...ee figure 24 2 Figure 24 Downloading Firmware from the Extron Website 3 Ensure the available firmware version is a later version than the current one on the device and click the Download link 3 NOTE The firmware release notes are a PDF file that provides details about the changes between different firmware versions The file can be downloaded from the same page as the firmware 4 Submit any required...

Страница 37: ...ab Emirates Dubai This Limited Warranty does not apply if the fault has been caused by misuse improper handling care electrical or mechanical abuse abnormal operating conditions or if modifications were made to the product that were not authorized by Extron NOTE If a product is defective please call Extron and ask for an Application Engineer to receive an RA Return Authorization number This will b...

Отзывы: