background image

Operation, cont’d

TPX 88 Matrix Switchers • Operation

3-8

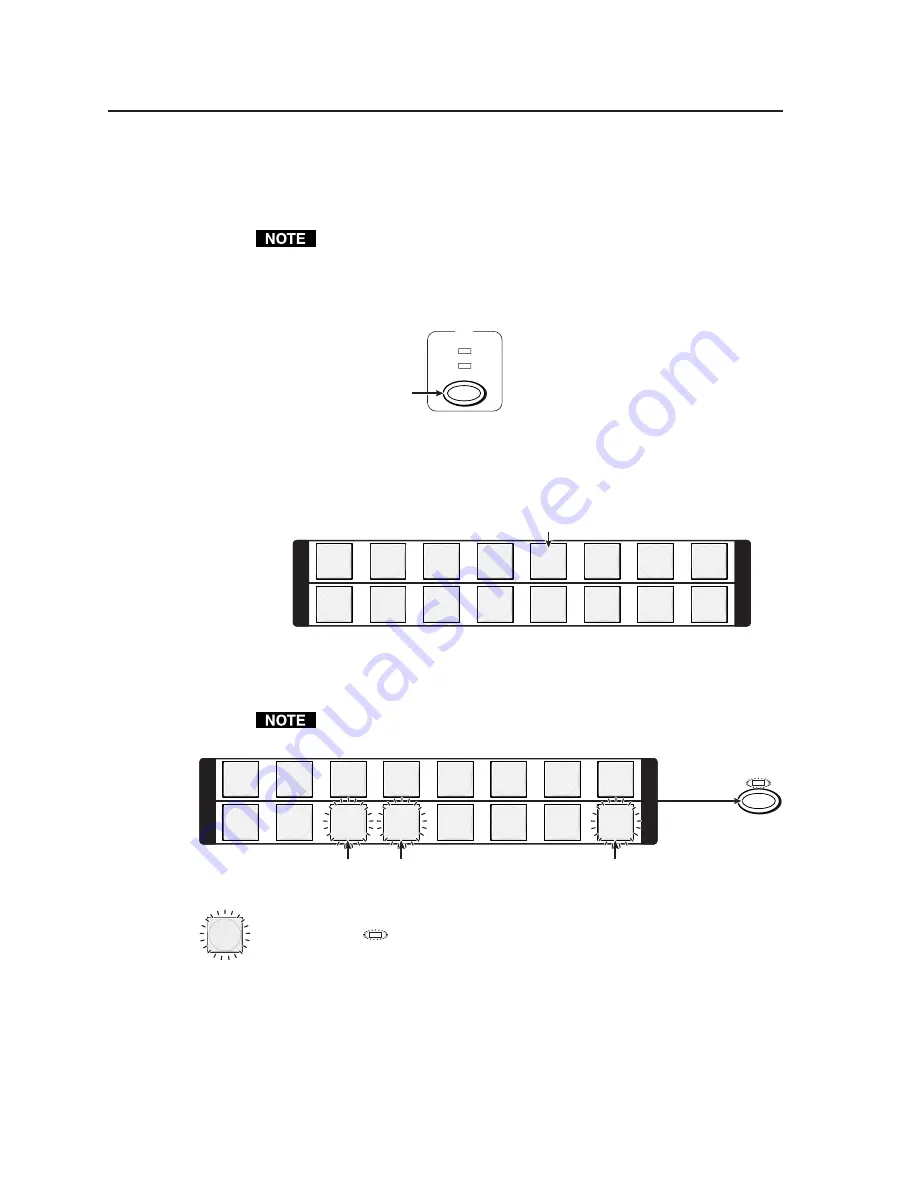
Example 1: Creating a set of video and audio ties

The following steps show an example in which input 5 is tied to outputs 3, 4, and 8.
Where an explanation is helpful, the steps show the front panel indications that
result from your action.

This example assumes that there are no ties in the current configuration.

1

.

Press and release the Esc button.

2

.

TPX 88 A only

 — To select video and audio for the tie, if necessary, press and

release the I/O button until the LEDs light (figure 3-5).

VIDEO

AUDIO

I/O

Press the button to cycle 

through the selections.

The video LED lights green when video is selected.

The audio LED lights red when audio is selected.

Figure 3-5 — Select video and audio

3

.

Press and release the input 5 button (figure 3-6).

1

2

3

4

5

6

7

8

1

2

3

4

5

6

7

8

I

N
P
U
T

O
U

T
P
U
T

I

N
P
U
T

O
U

T
P
U
T

Press and release the input 5 button.
The button lights amber to indicate that the video and audio inputs are selected (audio follow).

Figure 3-6 — Select an input

4

.

Press and release the output 3, output 4, and output 8 buttons (figure 3-7).

The entire set of ties can be canceled at this point by pressing and releasing the
Esc button.  The Esc button flashes once.

1

2

3

4

5

6

7

8

1

2

3

4

5

6

7

8

I

N
P
U
T

O
U

T
P
U
T

I

N
P
U
T

O
U

T
P
U
T

Press and release the output 3, 4, and 8 buttons.
The buttons blink amber to indicate that the selected video and audio input will 
be tied to these outputs.

= Blinking button

ENTER 

The Enter LED blinks to 
indicated the need to 
push the Enter button to 
create the potential tie.

= Blinking LED

Figure 3-7 — Select the outputs

Содержание TPX 88

Страница 1: ...TPX 88 and TPX 88 A Twisted Pair Matrix Switcher Twisted Pair Matrix Switcher with Local Audio Outputs 68 733 01 Rev C 12 05 ...

Страница 2: ...al verwenden sollten Sie alle Sicherheits und Bedienungsanleitungen genau durchlesen und verstehen Aufbewahren der Anleitungen Die Hinweise zur elektrischen Sicherheit des Produktes sollten Sie aufbewahren damit Sie im Bedarfsfall darauf zurückgreifen können Befolgen der Warnhinweise Befolgen Sie alle Warnhinweise und Anleitungen auf dem Gerät oder in der Benutzerdokumentation Keine Zusatzgeräte V...

Страница 3: ...t and output buttons and LEDs select and identify inputs and outputs Input buttons also select presets On the TPX 88 A the input and output LEDs also display the audio levels Enter button saves changes when you change the configuration Preset button saves a configuration as a preset or recalls a previously defined preset RS 232 Switches 1 2 down 3 up for RS 422 All switches up for RS 232 Default R...

Страница 4: ...or recall a preset 1 Save a preset Press and hold the Preset button for 2 seconds Recall a preset Press and release the Preset button 2 Press and release the desired input or output button 3 Press and release the Enter button VIDEO AUDIO I O Press the button to cycle through the selections Lights green when video is selected Lights red when audio is selected 5 Amber indicates video and audio audio...

Страница 5: ... Remote port configuration 2 8 Chapter 3 Operation 3 1 Front Panel Controls and Indicators 3 2 Definitions 3 2 Input and output buttons 3 2 Control buttons 3 3 I O controls TPX 88 A only 3 4 Audio controls TPX 88 A only 3 4 Button icons 3 5 Operations 3 5 Power 3 5 I O grouping 3 6 Creating a configuration 3 7 Example 1 Creating a set of video and audio ties 3 8 Example 2 Adding a tie to a set of ...

Страница 6: ...example 1 System equipment 3 27 Worksheet example 2 Daily configuration 3 28 Worksheet example 3 Test configuration 3 29 Configuration worksheet 3 31 Chapter 4 Programmer s Guide 4 1 Host to Switcher Instructions 4 2 Switcher Initiated Messages 4 2 Switcher Error Responses 4 3 Using the Command Response Table 4 4 Symbol definitions 4 4 Command Response Table for SIS Commands 4 5 Chapter 5 Matrix S...

Страница 7: ...Part Numbers A 4 Twisted Pair Matrix Switcher part numbers A 4 Optional accessories A 4 Cables A 4 Button Labels A 6 Installing labels in the matrix switcher s buttons A 6 Button label blanks A 7 68 733 01 Rev C 12 05 All trademarks mentioned in this manual are the properties of their respective owners ...

Страница 8: ...iv TPX 88 Matrix Switchers Table of Contents Table of Contents cont d ...

Страница 9: ...TPX 88 Twisted Pair Matrix Switchers 1 Chapter One Introduction About the TPX 88 Manual About the TP A V System About Both TPX Switcher Models About the TPX 88 A Switchers Features ...

Страница 10: ...he TP transmitter family s digital audio outputs switching the audio with the video audio follow or separate from the video audio breakaway The TPX 88 A can also process the audio adjusting the gain and attenuation and output the audio locally on the switcher s rear panel About the TP A V System The Extron twisted pair transmitters twisted pair receivers and TP matrix switchers provide a system fo...

Страница 11: ... t p O s e Y S R D H 5 1 T P T M s e Y l a n o i t p O l a n o i t p O l a n o i t p O o N V S T P T M o N o N s e Y o N o N A V S T P T M o N o N s e Y o N s e Y A C R A V S T P T M o N o N s e Y o N s e Y P A A A V S T P T M o N o N s e Y o N s e Y 5 4 A V S T P T M o N o N s e Y o N s e Y V C T P T M o N o N o N s e Y o N V A T P T M o N o N o N s e Y s e Y A C R V A T P T M o N o N o N s e Y s...

Страница 12: ... n o i t p O l a n o i t p O o N V S R P T M o N o N s e Y o N o N A V S R P T M o N o N s e Y o N s e Y A C R A V S R P T M o N o N s e Y o N s e Y V C R P T M o N o N o N s e Y o N V A R P T M o N o N o N s e Y s e Y A C R V A R P T M o N o N o N s e Y s e Y T T V R T V r e t t i m s n a r T M C 1 0 0 T T V s e Y o N o N o N o N P A A 1 0 0 T T V s e Y o N o N o N o N T X 4 0 4 1 N I s e Y o N o...

Страница 13: ...x 480 500 150 m 1000 300 m 800 x 600 400 120 m 800 245 m 1024 x 768 300 90 m 600 185 m 1280 x 1024 200 60 m 450 135 m 1600 x 1280 150 45 m 450 135 m It is possible to exceed the recommended distances however image quality may be reduced Extron recommends using the highest quality cable available and affordable with less than 8 nanoseconds 100 meters of skew see Termination of TP cable in chapter 2...

Страница 14: ... VIDEO N C L R AUDIO OUT PUT AV INPU T RGB POWE R 15V 34A MAX Extron TP R 15HD A Twisted Pair Receiver Stereo Audio LCD Projector 1 C SYNC SOG C VIDEO N C L R AUDIO OUT PUT AV INPU T RGB POWE R 15V 34A MAX Extron TP R 15HD A Twisted Pair Receiver Extron CPM101 Connector Plate 50 6 0Hz 100 240V 0 3A LIST ED 1T23 I T E AN AH EIM CA MA DE IN USA Figure 1 1 Typical TPX 88 A matrix switcher application...

Страница 15: ... of whether the audio follows the video or is broken away from the video in the routing of signals between twisted pair transmitters and receivers The TP transmitters and receivers distribute audio in a proprietary digital channel of the TP link The TPX 88 cannot switch this audio The TPX 88 A can switch this audio and extract it for the local connectors The audio distributed by certain VersaTools...

Страница 16: ...ge 1 3 and page 1 4 the TPX 88 A outputs 8 stereo audio outputs balanced or unbalanced on 3 5 mm 5 pole captive screw terminals Audio gain and attenuation TPX 88 A only Users can set the input level of audio gain or attenuation 18 dB to 24 dB for the signal that is output locally Gain and attenuation can be set via the RS 232 RS 422 link or from the front panel Individual input audio levels can be...

Страница 17: ...control system Front Panel Controller The TPX front panel controller feature supports touch of a button input and output selection preset creation and selection and TPX 88 A only audio output volume control The front panel features large positive touch illuminated input and output pushbuttons that can be labeled with text or graphics Windows based control program For RS 232 RS 422 remote control f...

Страница 18: ...y of twisted pair receivers with a specific signal format to be grouped together Switching between I O groups is not possible from the front panel Rack mount Rack mountable in any conventional 19 wide rack Front panel security lockout executive mode If a TPX switcher is installed in an open area where operation by unauthorized personnel may be a problem a security lock out feature can be implement...

Страница 19: ...TPX 88 Twisted Pair Matrix Switchers 2 Chapter Two Installation Mounting the Switcher Cabling and Rear Panel Views ...

Страница 20: ... were installed on the bottom of the switcher remove them 2 Attach the rack mount brackets to the switcher with eight 8 machine screws provided figure 2 1 PR ES ET EN TE R TPX 88 A TW ISTE D PA IR SW ITCH ER VIEW VIDE O AU DI O ES C I N P U T O U T P U T I N P U T O U T P U T I O AU DI O MUT E AL L VO LU ME 8 7 6 5 4 3 2 1 8 7 6 5 4 3 2 1 Figure 2 1 Rack mounting a TPX switcher 3 Insert the switch...

Страница 21: ...air transmitter See Termination of TP cable in this chapter 2 Outputs connectors Connect one end of a TP cable to each of these RJ 45 female connectors Connect the other end of each cable to a compatible twisted pair receiver See Termination of TP cable in this chapter Extron skew free A V cable is recommended for all applications CAT 5 and CAT 6 cable can be used for TP and VTT transmitters and r...

Страница 22: ...reen Reserved 5 White blue White blue Green Reserved 6 Orange Green Audio Audio Audio 7 White brown Blue H sync No signal 8 The TPX 88 A switches wire pair 3 and 6 The TPX 88 does not switch wire pair 3 and 6 Audio or serial data from an RGB video MTP is incompatible with both TPX models They cannot be switched Brown Blue H sync No signal MTP transmitters and receivers RJ 45 connector Twisted Pair...

Страница 23: ...switches and processes wire pair 3 and 6 The TPX 88 A switches and processes the proprietary digital audio link that is associated with the TP transmitter receiver family which is carried on wire pair 3 and 6 Cable testing Systems that use Extron s skew free UTP cable do not need to be tested for skew To ensure proper cable termination each transmission cable system that uses CAT 5 cable should be...

Страница 24: ...other two video images For best results when using CAT 5 cable in A V applications pair skew needs to be equalized Extron suggests several ways to equalized the pair skew as follows The design of Extron s Skew Free A V UTP cable minimizes pair skew to the point that equalization is not required If there are different cable types and or big differences in input cable length skew compensation will n...

Страница 25: ...ied line level audio The local audio outputs follow the RJ 45 outputs that is if input 6 is tied to output 1 then audio output 1 is the input 6 audio Connect audio devices such as an audio amplifier or powered speakers See figure 2 5 to properly wire an output connector Unbalanced Output Tip See caution Sleeve Tip See caution Balanced Output Tip Ring Sleeve s Tip Ring Figure 2 5 Captive screw conn...

Страница 26: ...ive data Gnd TX TX RX RX Signal ground Transmit data Transmit data Receive data Receive data RS 422 Function RS 232 RS 422 RS 232 RS 232 Settings RS 422 Settings RS 422 Figure 2 7 Remote connector RS 422 implementation may vary between computers or controls systems Connect the control cable as shown in figure 2 7 If the serial communications link with the TPX switcher does not work try reversing t...

Страница 27: ...TPX 88 Twisted Pair Matrix Switchers 3 Chapter Three Operation Front Panel Controls and Indicators Operations Troubleshooting Worksheets ...

Страница 28: ...ent configuration The configuration that is currently being used also called configuration 0 Global memory preset A configuration that has been stored Up to sixteen global memory presets can be stored in memory The input buttons select the desired preset memory location to load or retrieve a preset When a preset is retrieved from memory it becomes the current configuration One preset can be assign...

Страница 29: ... button selects a view only mode that allows the display of the current configurations The view only mode helps prevent changing configurations by accident When lit the View LED indicates that the switcher is in view only mode In view only mode pressing any input button 1 or output 2 button lights the buttons for the input and all outputs that are a part of that set of ties Pressing the button for...

Страница 30: ...efault Video audio Lit LED unlit LED Figure 3 2 Video and or audio selection cycle Audio controls TPX 88 A only 9 Mute All button and LED The Mute All button toggles the mute function on and off for all of the local audio outputs those on the rear panel 3 5 mm captive screw connectors 10 Volume knob The volume knob sets the audio gain or attenuation level for the selected input and the volume leve...

Страница 31: ...Information for blank labels and procedures for removing and replacing the translucent covers Operations The following paragraphs detail the power up process and provide sample procedures for creating ties sets of ties and configurations changing a configuration viewing ties sets of ties and configurations saving a preset recalling a preset and viewing and adjusting the audio level Power Power is ...

Страница 32: ...STMENTS CENTER SIZE BRT CONT COL TNT ZOOM DETAIL INPUTS RGB UNIVERSAL FREEZE COMPOSITE S VIDEO SDI USP 405 USP 405 UNIVERSAL SIGNAL PROCESSOR ADJUST MENU NEXT FREEZE 1 2 3 4 5 PICTURE ADJUSTMENTS CENTER SIZE BRT CONT COL TNT ZOOM DETAIL INPUTS RGB UNIVERSAL FREEZE COMPOSITE S VIDEO SDI Figure 3 4 I O grouping of compatible twisted pair transmitter receiver pairs The I O groups can be set up only b...

Страница 33: ...t ties the buttons for tied outputs light the appropriate color amber green or red when an input is selected To clear unwanted outputs press and release the associated lit output buttons 4 Press and release the Enter button 5 Repeat steps 1 through 4 to create additional ties until the desired configuration is complete Only one video input and one audio input can be tied to an output but multiple ...

Страница 34: ...re 3 5 Select video and audio 3 Press and release the input 5 button figure 3 6 1 2 3 4 5 6 7 8 1 2 3 4 5 6 7 8 I N P U T O U T P U T I N P U T O U T P U T Press and release the input 5 button The button lights amber to indicate that the video and audio inputs are selected audio follow Figure 3 6 Select an input 4 Press and release the output 3 output 4 and output 8 buttons figure 3 7 The entire s...

Страница 35: ...l the steps show the front panel indications that result from your action This example assumes that you have performed example 1 1 Press and release the Esc button 2 TPX 88 A only To select video only for the tie if necessary press and release the I O button until only the video LED lights figure 3 9 VIDEO AUDIO I O Press the button to cycle through the selections The video LED lights green when v...

Страница 36: ...8 1 2 3 4 5 6 7 8 I N P U T O U T P U T I N P U T O U T P U T All input and output buttons return to unlit or background illumination Press the Enter button to confirm the configuration change The Enter LED goes out Figure 3 12 Press the Enter button Example 3a Removing an audio tie from a set of ties TPX 88 A only This example can be performed on a TPX 88 A only The following steps show an exampl...

Страница 37: ...nd release the output 4 button figure 3 15 1 2 3 4 5 6 7 8 1 2 3 4 5 6 7 8 I N P U T O U T P U T I N P U T O U T P U T ENTER Press and release the output 4 button The button returns to unlit to indicate that the audio input will be untied The Enter LED blinks to indicated the need to push the Enter button to create the potential tie Blinking LED Figure 3 15 Deselect the output 5 Press and release ...

Страница 38: ...ons light green to indicate the ties created in example 1 and example 2 Figure 3 17 Select an input 3 Press and release the output 4 button figure 3 18 1 2 3 4 5 6 7 8 1 2 3 4 5 6 7 8 I N P U T O U T P U T I N P U T O U T P U T ENTER Press and release the output 4 button The button returns to unlit or background illumination to indicate that the input will be untied The Enter LED blinks to indicat...

Страница 39: ...n and off When you enter view only mode the output buttons light for all outputs without ties Likewise when an output button for which there are no ties is pushed the output buttons turn on for all outputs without ties TPX 88 A only The output buttons colors indicate audio breakaway for one or more of those outputs Example 4a Viewing ties TPX 88 A only The following steps show an example of viewin...

Страница 40: ...serve the indications shown in figure 3 20 VIDEO AUDIO I O Press the button to cycle through the selections The video LED lights green when video is selected The audio LED lights red when audio is selected Figure 3 21 Select video and audio 4 Press and release the input 5 button figure 3 22 The input 5 button lights amber 1 2 3 4 5 6 7 8 1 2 3 4 5 6 7 8 I N P U T O U T P U T I N P U T O U T P U T ...

Страница 41: ...ct audio figure 3 24 1 2 3 4 5 6 7 8 1 2 3 4 5 6 7 8 I N P U T O U T P U T I N P U T O U T P U T VIDEO AUDIO I O Press the button to deselect video and select audio The video LED is unlit when video is deselected The audio LED lights red when audio is selected The output buttons for outputs that do not have video ties to input 5 are either unlit or background illuminated The output buttons for out...

Страница 42: ...mple 1 example 2 and example 3b Press the button to select view mode The View LED lights when view mode is selected Figure 3 26 Select view mode A tie can also be viewed by selecting a tied output To demonstrate this note the number of an output button that is lit and then press and release the output button for an untied unlit or background illumination output Observe that all of the untied outpu...

Страница 43: ...ent configuration Presets can be viewed using Extron s Windows based control program See Chapter 5 Matrix Software for more details The current configuration and all presets are stored in non volatile memory When power is removed and restored the current configuration is still active and all presets are retained When a preset is recalled it replaces the current configuration which is lost unless i...

Страница 44: ...ackground illumination Press the Enter button to save the preset The Enter LED returns to unlit The Preset LED returns to unlit Figure 3 31 Press the Enter button Example 6 Recalling a preset The following steps show an example in which a preset is recalled to become the current configuration Where an explanation is helpful the steps show the front panel indications that result from your action 1 ...

Страница 45: ...t 3 Preset 4 Preset 5 Preset 6 Preset 7 Preset 8 Blinking LED The Enter button blinks to indicate the need to recall the preset Figure 3 33 Select the preset 4 Press and release the Enter button figure 3 34 The configuration stored in memory location 1 is now the current configuration and can be viewed in the view only mode see example 4 ENTER 1 2 3 4 5 6 7 8 1 2 3 4 5 6 7 8 I N P U T O U T P U T ...

Страница 46: ...level and red buttons indicate an attenuation level 3 Rotate the volume knob to increase and decrease the audio level 4 Press and release the I O button to save the setting and exit the audio display and adjustment mode The Audio LED returns to unlit There is one audio level setting per input The audio level setting is shared by the left and right audio inputs The audio level settings are stored i...

Страница 47: ...hanges that occur as you rotate the knob Turn the volume knob slowly The encoder will not reliably recognize the level change if you turn the knob too quickly Figure 3 37 shows the result of reducing the audio level a total of 9 dB Note that the level is now displayed in red to indicate a negative level 1 2 3 4 5 6 7 8 1 2 3 4 5 6 7 8 I N P U T O U T P U T I N P U T O U T P U T VOLUME Rotate the v...

Страница 48: ...hat may be lit 2 Press and hold the I O button until the Audio LED begins to blink then release the I O button 3 Press and release an output button to select an output The input buttons display the volume level for the selected output Each unlit or background illuminated input button indicates approximately 7 dB of volume attenuation whether there is an input associated with the button or not Ther...

Страница 49: ...igure 3 39 Select audio view and adjust mode 3 Press and release the output 7 button figure 3 40 1 2 3 4 5 6 7 8 1 2 3 4 5 6 7 8 I N P U T O U T P U T I N P U T O U T P U T The input buttons display the selected output s audio volume level Each lit input button indicates up to 14 percent of the total input volume is applied to the output Each unlit or background illuminated input button indicates ...

Страница 50: ...me is applied to the output Each unlit or background illuminated input button indicates 1 dB to 7 dB of attenuation is applied to the output In this example the green input buttons indicate that the switcher is outputting approximately 84 percent of the applied audio input The unlit input buttons indicate an audio volume attenuation of approximately 14 dB 14 28 42 56 70 84 Unlit up to 7 dB of atte...

Страница 51: ...its the operation of the TPX matrix switcher from the front panel When the switcher is locked all of the front panel functions are disabled except for the view only mode functions See Viewing a configuration on page 3 13 Other than in view only mode if the user pushes a front panel button when the switcher is locked the button blinks twice and the switcher does not otherwise respond to the user s ...

Страница 52: ...n to either unlit or to background illumination and the Video and Audio LEDs turn on Release the Esc button Figure 3 45 System reset Background illumination The buttons on the front panel can be set to provide amber background illumination at all times or the background illumination can be turned off To toggle the background illumination on or off press and hold the Input 1 and Input 2 buttons for...

Страница 53: ...io Worksheet example 1 System equipment Figure 3 47 shows a worksheet for a TPX 88 A in a fictional organization System hardware is annotated Input 6 has no connection so it has been crossed out Inputs include PCs a CD player cameras and a VTG 300 all connected through TP transmitters Output devices include monitors front and rear projectors a stereo and a VCR for recording presentations all conne...

Страница 54: ...t 6 The presenter has a presentation on her laptop computer input 4 that is scan converted and displayed in the main hall output 2 and locally on the podium output 3 The audio from her microphone input 3 is played in the hall output 1 in the conference room output 4 and sent to the VCR Classical music from the CD player input 5 is being played in the background in the main hall on sound system 2 o...

Страница 55: ...g a test pattern to all monitors outputs 1 2 3 4 and 8 Sound checks are run from the CD player input 5 to all audio systems outputs 1 2 4 5 and 8 Worksheet Example Main Hall PJ 1 Main Hall PJ 2 Podium monitor VCR USP405 Lobby monitor Conf room Sound system 2 Camera main podium Podium Mic VTG300 Classroom 2VCR DVS406 Audio CD Camera 2 1 2 3 4 5 6 7 8 Input sources Output destinations 1 2 3 4 5 6 7 ...

Страница 56: ...Operation cont d TPX 88 Matrix Switchers Operation 3 30 ...

Страница 57: ... 4 5 6 7 8 Input sources Output destinations Preset Title Video Audio Fill in the preset number and use colors or dashes etc to make connecting lines Indicate if the configuration is for Video Audio or both 1 2 3 4 5 6 7 8 Configuration worksheet ...

Страница 58: ...Operation cont d TPX 88 Matrix Switchers Operation 3 32 ...

Страница 59: ...ed Pair Matrix Switchers 4 Chapter Four Programmer s Guide Host to Switcher Instructions Switcher Initiated Messages Switcher Error Responses Using the Command Response Table Command Response Table for SIS Commands ...

Страница 60: ...le Instruction Set commands through the RS 232 RS 422 port SIS commands consist of one or more characters per command field They do not require any special characters to begin or end the command character sequence Each switcher response to an SIS command ends with a carriage return and a line feed CR LF which signals the end of the response character string A string is one or more characters Switc...

Страница 61: ...front panel n is the mute status 1 on muted 0 off unmuted Switcher Error Responses When the switcher receives an SIS command and determines that it is valid it performs the command and sends a response to the host device If the switcher is unable to perform the command because the command is invalid or contains invalid parameters the switcher returns an error response to the host The error respons...

Страница 62: ...tions Carriage return line feed Carriage return no line feed Space Input and output numbers in commands may be entered as either 1 digit 2 digit or 3 digit numbers All input and output numbers are reported as 2 digit numbers in the response X1 Input number 01 08 X2 Input number for tie 00 08 0 disconnected X3 Output number 01 08 X4 Numeric dB value 18 to 24 43 steps of gain or attenuation X5 Audio...

Страница 63: ...er Tie input X2 to output X3 audio only X2 X3 Out X3 In X2 Aud Audio breakaway Example 6 7 Out07 In06 Aud Tie input 6 audio to output 7 Quick multiple tie Esc Q X2 X3 X2 X3 Qik Example Esc Q3 4 3 5 3 6 Qik Tie input 3 to outputs 4 5 and 6 Tie input to all outputs V A X2 In X2 All Example 5 In05 All Tie input 5 video and audio to all outputs Tie input to all outputs video only X2 In X2 Vid Example ...

Страница 64: ...gain Audio output volume The adjustment range is between 0 and 100 audio output volume in 1 dB steps of attenuation Each 1 dB equals approximately a 2 reduction in audio output volume Set audio volume to of max value X3 X7 V Out X3 Vol X7 Example 1 50v Out01 Vol50 Set output 1 volume to 50 Odd numbered X7 values are rounded up to even numbered values Increase volume X3 V Out X3 Vol X7 Increase vol...

Страница 65: ... global presets If the user tries to recall a preset that is not saved the matrix switcher responds with the error code E11 Save current ties as a global preset X10 Spr X10 Command character is a comma Example 9 Spr09 Save current ties as preset 9 Recall a global preset X10 Rpr X10 Command character is a period Example 5 Rpr05 Recall preset 5 which becomes the current configuration Direct write a ...

Страница 66: ...guration Esc X10 VC X2 1 X2 2 X2 3 X2 4 X2 5 X2 6 X2 7 X2 8 Vid X2 1 X2 2 X2 3 X2 8 Aud Show preset X10 s configuration Show the video input tied to each output and then the audio input tied to each output Response description input I tied to output O 1 I tied to O 2 I tied to O 8 Vid I tied to O 1 I tied to O 8 Aud Example Esc 4VC 1 Output Response tied input input 6 video tied to output 2 2 3 4 ...

Страница 67: ...TPX 88 Twisted Pair Matrix Switchers 5 Chapter Five Matrix Software Matrix Switchers Control Program Button Label Generator ...

Страница 68: ...screen The program occupies approximately 1 MB megabyte of hard drive space By default the Windows installation creates a C MTRX50 directory and it places two icons MATRIX Switcher Control Program and MATRIX Switcher Help into a group or folder named Extron Electronics The program was designed to control most Extron matrix switchers but its operation is limited to the features and configuration of...

Страница 69: ...omplete 4 To make the control program easier to use assign a device icon to each input and output Click on a box that represents an input or output and drag the desired icon onto the box from the icon palette that appears 5 To create a tie drag an input box to one or more output boxes To remove a tie drag the output box to its tied input box ...

Страница 70: ... the PC to the TPX switcher via the switcher s RS 232 RS 422 port 3 Start the Matrix Switcher Control Program See Using the software steps 1 and 2 starting on page 5 2 4 Click the mouse on Tools Update Firmware An open file window figure 5 3 appears Figure 5 3 Open window 5 Navigate to the folder where you saved the firmware upgrade file Select the file Valid firmware upgrade files must have the f...

Страница 71: ...last active setting preset 0 to a file Saved settings include audio gain settings if specified assigned icons and icon captions Restore matrix settings from Loads and activates a previously saved setting file Save this session s settings Saves the current assigned icons and icon captions Restore last session s settings Loads the icons and icon captions that were saved during the last session If yo...

Страница 72: ...programming I O group settings Allows you to establish I O groups Initialize Initializes and clears any or all of the following ties presets groups audio configurations preset titles icon names and icons Audio config Displays the audio gain level settings for each input and allows you to change them Preferences menu Immediate changes Causes configuration changes to take effect immediately Hold ver...

Страница 73: ...hoose Emulate and click OK 3 Choose an emulation file to open and click OK The file DEMO MTX provides a sample of a completed matrix setup Selecting the file NEW INI or clicking Cancel provides a blank setup to get you started 4 Enter the file name under which you want to save any changes to the file and click OK 5 Select the number of video boards audio boards and matrix model for which you are p...

Страница 74: ...program double click on the Button Label Generator icon shown at right in the Extron Electronics group or folder and click OK when prompted The Extron s Button Label Generator window appears figure 5 5 Figure 5 5 Extron s Button Label Generator window 2 Under System selection choose SGS 408 this selection matches the button size of the TPX 88 3 Using normal Windows controls you can create and prin...

Страница 75: ...TPX 88 Twisted Pair Matrix Switchers A Appendix A Reference Information Specifications Part Numbers Button Labels ...

Страница 76: ... only Routing 8 x 8 stereo matrix Gain Unbalanced output 6 dB balanced output 0 dB Frequency response 20 Hz to 20 kHz 0 05 dB THD Noise 0 03 1 kHz at nominal level S N 90 dB output 21 dBu balanced unweighted Crosstalk 80 dB 1 kHz fully loaded Stereo channel separation 90 dB 1 kHz CMRR 75 dB 20 Hz to 20 kHz Audio input TPX 88 A only Number signal type 8 stereo balanced unbalanced Connectors 8 8 pin...

Страница 77: ... General Power 100 VAC to 240 VAC 50 60 Hz 25 watts internal autoswitchable Temperature humidity Storage 40 to 158 F 40 to 70 C 10 to 90 noncondensing Operating 32 to 122 F 0 to 50 C 10 to 90 noncondensing Rack mount Yes with optional brackets Enclosure type Metal Enclosure dimensions 1 75 H x 17 5 W x 9 5 D 1U high full rack wide 4 4 cm H x 44 5 cm W x 24 1 cm D Depth excludes connectors and knob...

Страница 78: ...ree A V cable Part 3 Skew Free A V UTP 26 569 01 6 Skew Free A V UTP 26 569 02 12 Skew Free A V UTP 26 569 03 25 Skew Free A V UTP 26 569 04 35 Skew Free A V UTP 26 569 05 50 Skew Free A V UTP 26 569 06 75 Skew Free A V UTP 26 569 07 100 Skew Free A V UTP 26 569 08 150 Skew Free A V UTP 26 569 09 200 Skew Free A V UTP 26 569 10 250 Skew Free A V UTP 26 569 11 300 Skew Free A V UTP 26 569 12 Skew F...

Страница 79: ...26 526 01 4 skew cable Red 26 524 02 Green 26 525 02 Blue 26 526 02 6 skew cable Red 26 524 03 Green 26 525 03 Blue 26 526 03 8 skew cable Red 26 524 04 Green 26 525 04 Blue 26 526 04 10 skew cable Red 26 524 05 Green 26 525 05 Blue 26 526 05 12 skew cable Red 26 524 06 Green 26 525 06 Blue 26 526 06 14 skew cable Red 26 524 07 Green 26 525 07 Blue 26 526 07 16 skew cable Red 26 524 08 Green 26 52...

Страница 80: ... panel buttons 1 Make new labels using either the blanks on page A 7 or the Button Label Generator software see chapter 5 Matrix Software Cut them out 2 Remove the button from the switcher by grasping the button firmly and pulling it away from the front panel There are different button models available Your buttons may appear different 3 Use an Extron Tweeker to gently lever the button cap off of ...

Страница 81: ...A 7 TPX 88 Matrix Switchers Reference Information Figure A 1 Button label blanks ...

Страница 82: ...Reference Information cont d TPX 88 Matrix Switchers Reference Information A 8 ...

Отзывы: