8
TLC Pro 526M, 726M, and 1026M Series • Setup Guide (Continued)
With a wall box
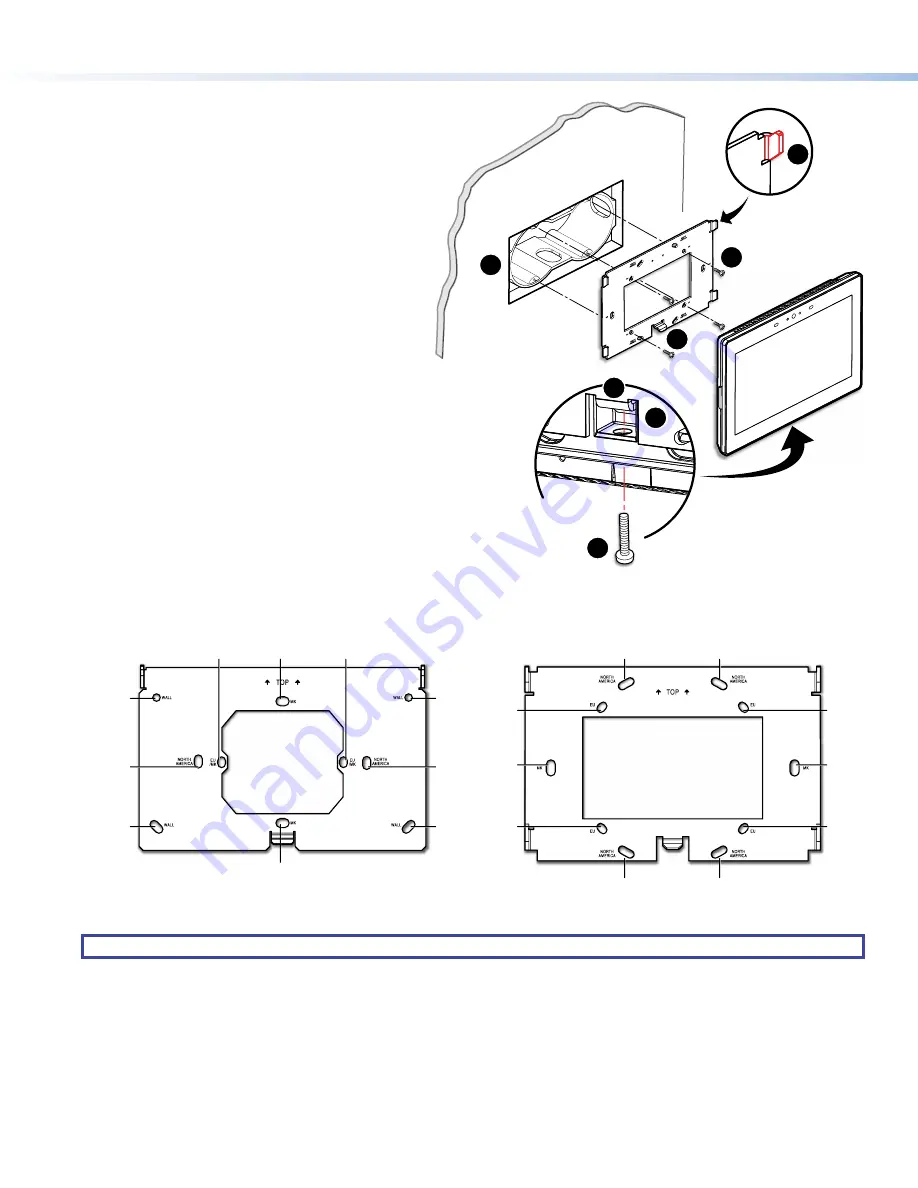
Figure 13 shows the TLC Pro 726M. Installation for the
TLC Pro 526M or TLC Pro 1026M is very similar.
1.
Install a junction box or wall box (see figure 13,
1
), following the instructions provided by the
manufacturer.
2.
Fasten the mounting plate to the wallbox (
2
) with
the provided screws. Use the mounting holes that
are appropriate to the junction box you are using
(see figure 14, below).
3.
Secure the USB adapter to the back of the
touchpanel (see
Attaching the USB Adapter to the
4.
Run and connect cables to the back of the
touchpanel (see
5.
The TLC Pro 526M mounting plate has two hooks
(one in each top corner). The TLC Pro 726M and
TLC Pro 1026M mounting plate has four hooks (
3
),
one in each corner (see figure 14, below).
Position the touch panel so that the mounting slots
(see
, on page 3) in the rear of the
touchpanel align with these hooks.
6.
Move the touchpanel inward and downward so
that touchpanel sits securely on the hooks and the
tongue at the bottom of the mounting plate (
4
) sits
in the groove in the bottom of the touchpanel (see
inset,
5
).
7.
Fasten the touchpanel to the mounting plate with
the lock screw (
6
).
figure 13
steps 3 through 7
figure 14
TOP
e
Back View
1
2
3
4
5
6
4
Figure 13.
Mounting the TLC Pro 726M with a Junction Box
NORTH
AMERICAN
NORTH
AMERICAN
MK
MK
EU/MK
EU/MK
WALL
WALL
WALL
WALL
NORTH
AMERICAN
NORTH
AMERICAN
NORTH
AMERICAN
NORTH
AMERICAN
EU
MK
EU
EU
EU
MK
Figure 14.
TLC Pro 526M Mounting Plate (left) and TLC Pro 726M and 1026M Mounting Plate (right)
NOTE:
The TLC Pro 726M and TLC Pro 1026M series touchpanels use the same mounting plate.


