


StudioStation 100 • Web-Based User Interface
56
System Settings
Controls within seven of the ten panels in the
System
Settings
page within
Configuration
are essential during initial setup of the unit. The three other panels contain
features that are used infrequently for updating the unit, restoring a configuration, or limiting
access to front panel controls. A user must be logged in as an administrator to see or
change these settings.
To open this page, click the
Configuration
tab (at the top of the StudioStation 100
embedded web pages) and then click the
System
Settings
tab on the second tier of tabs.
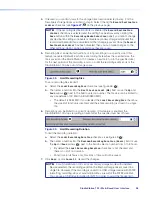
Figure 45.
Configuration Tab, System Settings Subtab
The
System
Settings
page opens (see figure 46).
1
2
3
4
5
6
7
8
9
10
EDID
Figure 46.
System Settings Page
The drop-down panels are:
1
Unit
Identification
— Set the system (unit) name and a descriptive name for its
location. This is also the location where you can read the model name and description,
part number, firmware version, overall unit temperature, remote panel connection, and
remote panel firmware.
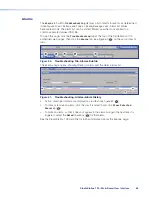
2
Date
and
Time
— Set the date, time, time zone, and settings for syncing with one or
more NTP (network time protocol) servers.
3
Networking
— Set the IP addresses for the unit, gateway, and DNS server, as well
as the subnet mask and port numbers for a variety of port types, or enable or disable
SNMP.
4
Recording
Media
Selection
— Set the recording parameters, such as recording size,
destination, and recording mode (see
Setting the Default Recording Media
on the
next page)
5
Default
Recording
File
Names
— Allows you to choose what type of information will
be used to compose names of recordings and file type (m4v or mp4).
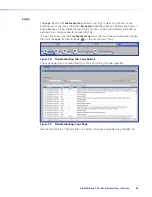
6
Marks
and
Thumbnails
— Choose whether to have the StudioStation 100 produce
normal (small) size thumbnail images of the recorded video or to make thumbnail
images the same size (resolution) as the recording encoder settings.
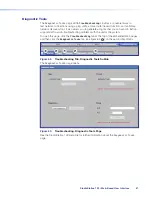
7
Serial
— Set the baud rate and protocol for the rear panel remote control serial port.
8
Firmware
Loader
— Firmware uploads can be initiated here.
figure 45
figure 46


