background image


ShareLink 200 • Operation Using a Mobile Device

21

Present the Document or Photo

1. 

Open MirrorOp and select 

Document

 or 

Photo

 on the main menu, depending on your 

file type. All recognized document and photo files (and folders containing these files) are 
displayed.

2. 

Select the folder containing the file you wish to present, and select the desired file. The 
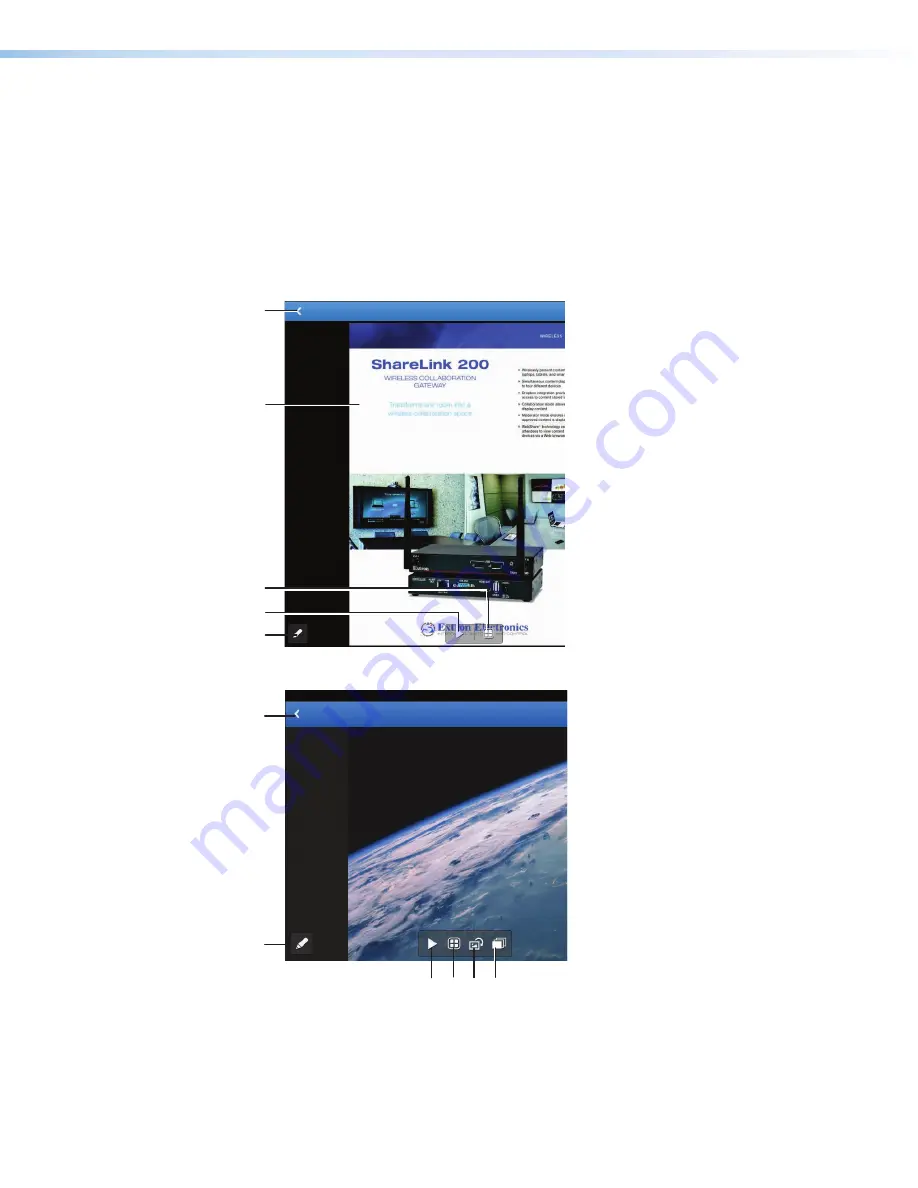
presentation screen appears as shown in figure 18 (for documents) and figure 19 (for 
photos).

3. 

Select the play button (

on figure 18, and 

on figure 19) to begin presenting. The 

play button becomes a pause button, which can be pressed to stop the presentation.

2

2

1

1

3

3
4

4
5

5

1

1

2

2

3

3 4

45

5 6

6

Figure 18. 

Document View Screen

2

2

1

1

3

3
4

4
5

5

1

1

2

2

3

3 4

4 5

5 6

6

Figure 19. 

Photo View Screen

1


Back

 – Exit document and return to 

the previous screen.

2


Document view screen

 – this 

section is displayed during 
presentation.

3


Quadrant view

 – choose whether 

to present the document  
full-screen (default) or on a quadrant 
(top left, top right, bottom left, 
or bottom right) for multiple user 
presentations.

4


Play

 – start or stop presentation

5


Annotation tool

 – allows the 

presenter to make annotations on 
the document during presentation 
(see 

Making Annotations

 on 

page 25).

1


Back

 – Exit document and return to 

the previous screen.

2


Annotation tool

 – allows the 

presenter to make annotations on 
the image during presentation (see 

Making Annotations

 on page 25).

3


Play

 – start or stop presentation

4


Quadrant view

 – choose whether 

to present the image full-screen 
(default) or on a quadrant (top left, 
top right, bottom left, or bottom 
right) for multiple user presentations.

5


Rotate

 – rotate the image 

clockwise.

6


Slideshow

 – tap this button to start 

a slideshow of all the images in the 
current folder.

Содержание ShareLink 200

Страница 1: ...User Guide ShareLink 200 Wireless Collaboration Systems Wireless Collaboration Gateway 68 2687 01 Rev A 01 15 HYDE 116...

Страница 2: ...ultiple Screens 15 Creating a USB Thumb drive App 15 Creating a Room File 16 Operation Using a Mobile Device 17 Downloading MirrorOp for Extron ShareLink 17 Using MirrorOp for Extron ShareLink 17 Conn...

Страница 3: ...ice or computer onto a display device The ShareLink 200 is compatible with Windows and OS X computers as well as AndroidTM and Apple smartphones and tablets ShareLink 200 AUDIO OUT LAN PoE VGA OUT HDM...

Страница 4: ...ons below for your preferred connection method Connecting through the ShareLink 200 s Internal WAP 1 Ensure that the ShareLink 200 is powered and that wireless network capability is enabled on your co...

Страница 5: ...browser 3 Click Windows or Mac depending on your operating system to launch the software installer on your computer 4 Follow the instructions on the web browser to run the the executable ShareLink 20...

Страница 6: ...e Receiver Name section and click Connect NOTE The receiver name is shown on the standby screen If your ShareLink 200 unit is not listed click the refresh button If the device still does not appear cl...

Страница 7: ...display device 1 1 2 2 3 3 Figure 10 Share my Screen Tab 1 Mute Click to mute or unmute the source device audio 2 Drop down menu Click to see the presentation options shown in figure 11 One computer...

Страница 8: ...osoft MPEG 4 v1 3 is not supported Motion JPEG WMV9 only WMV3 WVC1 is supported Audio LPCM AAC MP3 WMA 1 1 2 2 3 3 4 4 5 5 6 6 Figure 12 Share a Video Tab 1 File folder icon Click to browse for and se...

Страница 9: ...secondary monitor select Secondary Monitor prior to sharing in order to keep the software window on the primary monitor Image Quality This option adjusts the image encoding level Best provides better...

Страница 10: ...ckbox to share content to that receiver Content is only shared to the selected receivers 4 Click the Audio button 4 to share audio to a receiver Audio can only be shared to one receiver Creating a USB...

Страница 11: ...steps to download the app 1 Open the Google Play app store on your Android device or the App Store on your Apple mobile device 2 Search for MirrorOp for Extron ShareLink 3 Install the app on your mobi...

Страница 12: ...green and the main menu appears when the device is connected to a receiver Main Menu Overview NOTE The images in this section show the mobile app layout for tablets The layout is arranged differently...

Страница 13: ...d to the app and listed under Document See the instructions below for your preferred method Option 1 Transferring a file from your computer to your device storage Android devices 1 Connect the mobile...

Страница 14: ...pp NOTE Options may vary depending on the email app used Then proceed to step 3 of the next section Present the Document or Photo on the next page For iOS devices NOTE The following steps apply to the...

Страница 15: ...it document and return to the previous screen 2 Document view screen this section is displayed during presentation 3 Quadrant view choose whether to present the document full screen default or on a qu...

Страница 16: ...ropbox account log in information Figure 20 Dropbox Log In Window Once logged in the folders and files in the Dropbox account appear on the screen 3 Browse to and select the document or photo you wish...

Страница 17: ...play 5 button to begin presenting the web page The play button becomes a pause button which can be clicked to stop the presentation 4 4 1 1 5 5 2 2 3 3 Figure 22 MirrorOp Browser 1 Navigation buttons...

Страница 18: ...p presentation Presenting Device Screenshots 1 Choose Shot Show on the main menu and press play 1 in the Shot Show instruction screen figure 24 The instruction screen appears on the display 1 1 2 2 Fi...

Страница 19: ...8 Save Save current image with annotations The file is saved as an image file in the mobile device storage 9 Eraser Erase selected portions of the drawing Settings Press the Settings button to access...

Страница 20: ...e the list You may also search for the receiver by entering the SSID in the search bar The login screen appears after a receiver is selected 5 If the login code is activated enter the login code shown...

Страница 21: ...Configuring ShareLink 200 Settings Opening the Embedded Web Pages To access the embedded web pages enter the ShareLink 200 IP address shown on the Standby Screen into the web browser The landing page...

Страница 22: ...to an Ethernet network or bridged to a router for best performance Audience members must follow these steps to watch a presentation 1 Open a web browser on the mobile device or computer and connect t...

Страница 23: ...to allow control to the moderator only NOTE Individual users may choose to stop showing their screen by selecting the stop button from the client software on their device 2 Connected User This column...

Отзывы: