background image


FOXBOX Tx/Rx HDMI • Installation

12

Making Connections

HDMI connector

HDMI signals run at a very high frequency and are especially prone to errors caused by bad 
video connections, too many adapters, or excessive cable length. To avoid the loss of an 
image or jitter, follow these guidelines:

• 

Do not exceed 16.4 feet (5 meters) on the input or buffered loop-through of the 
FOXBOX HDMI transmitter or the output of the FOXBOX HDMI receiver.

• 

Use only the cable designed for HDMI signals that is supplied by Extron.

• 

Limit or avoid the use of adapters.

• 

Use only cables specifically intended for HDMI or DVI signals. Use of non-HDMI or 
non-DVI cables or modified cables can result in a missing video output.

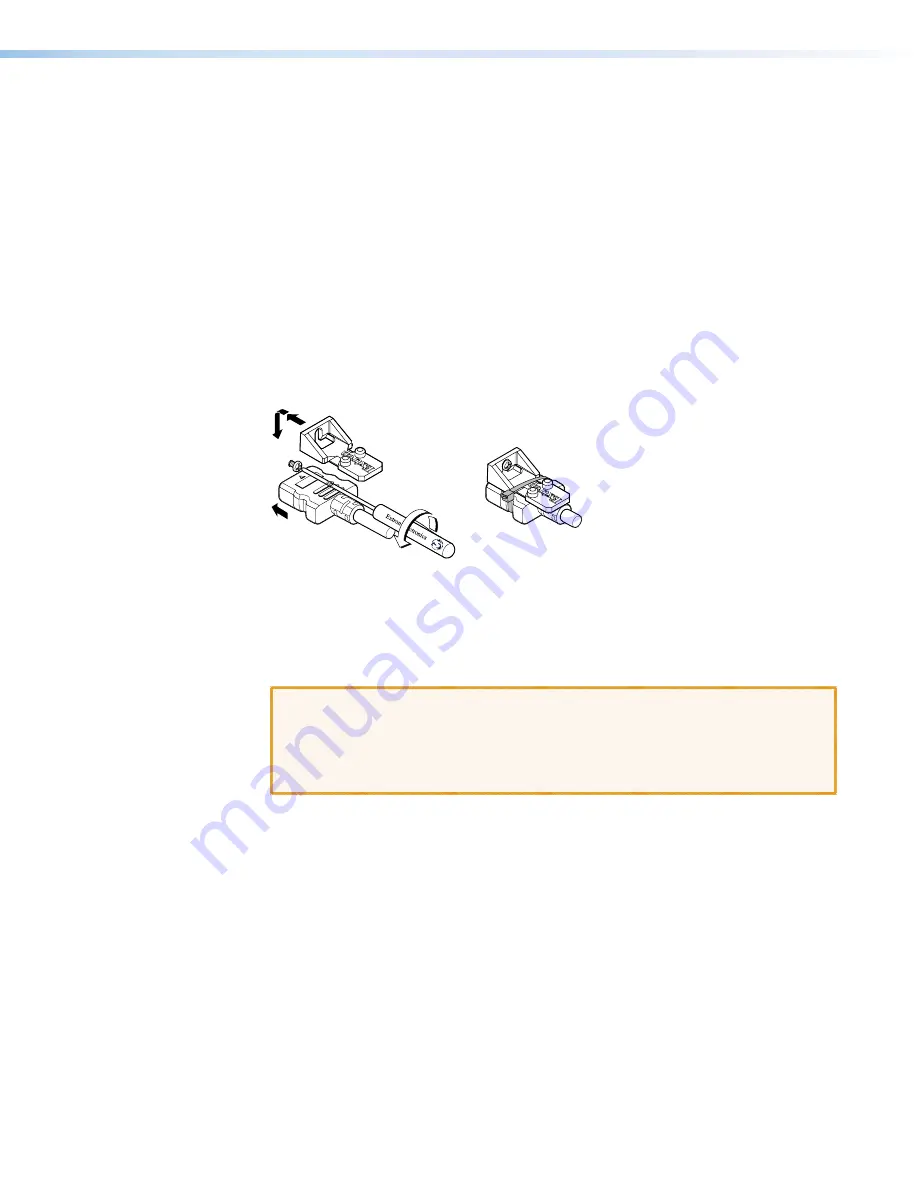
To securely fasten an HDMI cable to a device:

1. 

Plug the HDMI cable into the panel connection (see figure 8, 

1

).

3

1

1

3

3

2

2

5

5

4

4

Figure 8. 

Installing the LockIt Lacing Bracket

2. 

Loosen the HDMI connection mounting screw from the panel enough to allow the 
LockIt lacing bracket to be placed over it (

2

). The screw does not have to be removed.

3. 

Place the LockIt lacing bracket on the screw and against the HDMI connector, then 
tighten the screw to secure the bracket (

3

).

ATTENTION

:

• 

Do not overtighten the HDMI connector mounting screw. The shield to which it 
fastens is very thin and can easily be stripped.

• 

Ne serrez pas trop la vis de montage du connecteur HDMI. Le blindage auquel 
elle est attachée est très fin et peut facilement être dénudé.

4. 

Loosely place the included tie wrap around the HDMI connector and the LockIt lacing 
bracket as shown (

4

).

5. 

While holding the connector securely against the lacing bracket, use pliers or similar 
tools to tighten the tie wrap, then remove any excess length (

5

).

Содержание FOXBOX Rx HDMI

Страница 1: ...User Guide FOXBOX Tx Rx HDMI Fiber Optic Extenders High Resolution Fiber Optic Transmitters and Receivers 68 1984 01 Rev B 01 18...

Страница 2: ...encia 68 290 01 en el sitio Web de Extron www extron com Instructions de s curit Fran ais AVERTISSEMENT Ce pictogramme lorsqu il est utilis sur le produit signale l utilisateur la pr sence l int rieur...

Страница 3: ...com IP Link Key Minder LinkLicense LockIt MediaLink MediaPort NetPA PlenumVault PoleVault PowerCage PURE3 Quantum Show Me SoundField SpeedMount SpeedSwitch System INTEGRATOR TeamWork TouchLink V Lock...

Страница 4: ...STP Connectors are required La technologie extension paires torsad es fonctionne avec les c bles paires torsad es blind es UTP ou non blind es STP Afin de s assurer de la compatibilit entre FCC Class...

Страница 5: ...re written in the font shown here Reply from 208 132 180 48 bytes 32 times 2ms TTL 32 C Program Files Extron Variables are written in slanted form as shown here ping xxx xxx xxx xxx t SOH R Data STX C...

Страница 6: ......

Страница 7: ...eceiver Connections Controls and Indicators 9 Making Connections 12 Operation 16 Troubleshooting If No Image Appears 17 Remote Control 18 Simple Instruction Set Control 18 Host to Unit Communications...

Страница 8: ...FOXBOX Tx Rx HDMI Contents viii...

Страница 9: ...optique est d branch About this Guide About the FOXBOX Tx Rx HDMI Features About this Guide This guide contains information about the ultra high performance Extron FOXBOX Tx Rx HDMI fiber optic transm...

Страница 10: ...uchLink Control System Figure 1 Typical FOXBOX Tx Rx HDMI Application Transmitter The FOXBOX Tx HDMI transmitter accepts HDMI video or DVI D video with an applicable adapter at resolutions up to 1920...

Страница 11: ...lor bars and grayscale test patterns to assist in setting up the display equipment Both Units The transmitter and receiver have many controls including image and audio adjustments that are available u...

Страница 12: ...d digital audio embedded in the HDMI output Links monitoring The panels of the transmitter and receiver have indicators for monitoring image and audio transmission and both fiber optic links Loss of l...

Страница 13: ...OX Tx HDMI Rear Panel Front Panel 12V 1 0A MAX POWER FOXBOX Tx HDMI AUDIO INPUT RS 232 OVER FIBER ALARM Tx Rx 1 2 HDMI INPUT LINK OPTICAL Rx Tx LINK FOXBOX Tx HDMI AUDIO HDCP HDMI CONFIG HDMI LOOP THR...

Страница 14: ...ransmitter via the first three leftmost poles Tx Rx and _ of this 5 pole captive screw connector see RS 232 connections on page 13 to wire this connector NOTES If you connect only one fiber optic cabl...

Страница 15: ...transmission But if you connect only one fiber optic cable or if your receiver is configured to daisy chain the optical signal The HDMI signal output by the receiver is not HDCP compliant You will no...

Страница 16: ...50 Hz rate and down selects the 60 Hz refresh rate Audio switch This switch selects which audio input the audio embedded in the HDMI input or the analog audio is sent to the receiver Up selects the d...

Страница 17: ...connector for the appropriate output type and impedance level O RS 232 Over Fiber port If you want the FOXBOX to pass serial ALARM Tx Rx 1 2 RS 232 OVER FIBER command signals to a slave device for ser...

Страница 18: ...chain receiver to receiver Connect fiber cable 3 from a fiber optic source and cable 4 to the next receiver in the daisy chain See figure 6 Set each receiver in the daisy chain to daisy chain mode Up...

Страница 19: ...See Power supply wiring on page 15 to wire the connector Front panel AUDIO HDCP HDMI CONFIG FOXBOX Rx HDMI T T V V U U Figure 7 FOXBOX Rx Receiver Front Panel Features T Power LED This LED lights to i...

Страница 20: ...ug the HDMI cable into the panel connection see figure 8 1 3 1 1 3 3 2 2 5 5 4 4 Figure 8 Installing the LockIt Lacing Bracket 2 Loosen the HDMI connection mounting screw from the panel enough to allo...

Страница 21: ...n TX RX Gnd Transmit data Receive data Signal ground ALARM Tx Rx 1 2 RS 232 OVER FIBER Tx Rx REMOTE RS 232 NOTE Cross the Tx and Rx lines once between the source and the target Figure 9 RS 232 Over Fi...

Страница 22: ...information Front panel Configuration ports NOTE These ports are for remote control of the unit not for the over fiber RS 232 link The Configuration ports on the transmitter and receiver are 2 5 mm mi...

Страница 23: ...wer Connector Wiring CAUTION ATTENTION The wires must be kept separate while the power supply is plugged in Remove power before wiring Les deux cordons d alimentation doivent tre tenus l cart l un de...

Страница 24: ...ode ANSI NFPA 70 article 725 et au Canadian Electrical Code partie 1 section 16 La source d alimentation ne devra pas tre fix e de fa on permanente une structure de b timent ou une structure similaire...

Страница 25: ...r power LEDs are lit 2 Ensure an active input is applied to the transmitter The tranmsitter is receiving an active input if the HDMI LED is lit 3 Ensure that the proper signal format is supplied 4 Che...

Страница 26: ...is as follows 9600 baud No parity 8 bit No flow control 1 stop bit NOTE RS 232 commands and FOX Extenders Control Program functions are transmitter or receiver specific or may have different response...

Страница 27: ...dio attenuation adjustment range 00 to 18 X1 Switch position and enable or disable status 0 off down or disable 1 on up or enable X1 HDCP authorized device 0 off 1 on X1 Link and input status 0 link o...

Страница 28: ...reset number E13 Invalid parameter E14 Invalid command for this configuration Timeout Pauses of 10 seconds or longer between command ASCII characters result in a timeout The command operation is abort...

Страница 29: ...z 14 1360x768 60 Hz 20 1440x900 60 Hz 26 1680x1050 60 Hz 03 1024x768 50 Hz 09 1280X 00 50 Hz 15 1366x768 50 Hz 21 1600x900 50 Hz 27 1920x1080 50 Hz 04 1024x768 60 Hz 10 1280X 00 60 Hz 16 1366x768 60 H...

Страница 30: ...Example 2G Aud 02 0 Set the input level to 2 dB gain Set input audio attenuation to a dB value X g AudX Set the input level to X dB attenuation Increment input level G AudX Increase the audio level b...

Страница 31: ...in degrees Fahrenheit and Celsius Information requests Information request I 1LnkX1 2LnkX1 VidX1 AudX1 X1 Tx The unit responds with the current status signal detected of optical link 1 optical link 2...

Страница 32: ...rn link enable X2 Video delay 0 plus six steps at 0 25 seconds per step 0 0 second 1 0 25 second 4 1 0 second 2 0 5 second default 5 1 25 second 3 0 75 second 6 1 5 second X2 Video bit depth 0 auto 1...

Страница 33: ...t alternating pixels 3J Tst3 Set the receiver to output the alternating pixels test pattern Turn test pattern off 0J Tst0 Set the receiver to output the input video no test pattern is selected Show te...

Страница 34: ...at EmbedAudX1 Show if audio is embedded in the video stream 0 not detected or 1 detected View link 1 Tx to Rx status 1S X1 View link 2 Rx to Tx status 2S X1 View input video status 3S X1 View input au...

Страница 35: ...and the device type Rx Show firmware version Q X1 Example Q 1 23 The factory installed firmware version is 1 23 sample value only Request part number N 60 nnnn nn Input sync detection 1LS X1 horizont...

Страница 36: ...using Internet Explorer Depending on the browser you use some steps or indications may be different Steps 1 through 7 below are also used to download firmware update packages 1 Visit the Extron websit...

Страница 37: ...urity settings 8 For a firmware download exit this procedure and return to Updating the Firmware on page 38 9 Follow the instructions that appear on the screen By default the installation creates a C...

Страница 38: ...ied in the descriptions that follow Only one fiber optic cable transmitter Tx to receiver Rx is required for serial command transmission But if you connect only one fiber optic cable the transmitter w...

Страница 39: ...ver Tx to transmitter Rx cable is not connected in your system or the receiver is in the daisy chain mode the Link 1 indicator in the control program does not show green detected whether the receiver...

Страница 40: ...are available only if you are connected to the transmitter Audio Gain Attenuation fader Click and drag the Audio Gain Attenuation fader control to select the input audio gain or attenuation value fro...

Страница 41: ...ailable only if you are connected to the transmitter The HDCP Notification controls are available only if you are connected to the receiver Both sets of radio buttons cannot be available for selection...

Страница 42: ...Bit Depth panel radio buttons are available only if you are connected to the receiver The Video Bit Depth radio buttons allow you to force the bit depth to 8 bits or to set it to auto Advanced tab fu...

Страница 43: ...able connected and the receiver must not be in daisy chain mode for the receiver to output a selected test pattern The test pattern turns off if the input signal rate is changed or disconnected or if...

Страница 44: ...anel EDID Minder hex switch Save EDID panel The Save EDID button lets you save the EDID resolution and refresh rate from the transmitter HDMI Loop Thru monitor The data is saved to the user captured E...

Страница 45: ...during configuration or operation of an AV system Export an EDID as follows 1 Select the desired EDID to export from the drop down list see figure 25 1 2 2 2 2 2 2 2 2 2 2 1 1 1 1 1 1 1 1 1 1 Figure...

Страница 46: ...Extron website and starts the Extron Installation Program to extract the firmware file 4 Click Next 3 The program extracts the firmware files and places them in a folder that is identified in the Ins...

Страница 47: ...FOXBOX Tx Rx HDMI Remote Control 39 Folder where firmware is saved 1 1 1 1 1 1 1 1 1 1 2 2 2 2 2 2 2 2 2 2 3 3 3 3 3 3 3 3 3 3 4 4 4 4 4 4 4 4 4 4 Figure 27 Extracting Firmware Upgrade Files...

Страница 48: ...o open it f Follow the instructions on the Installation Wizard screens to install the Firmware Loader on your computer Unless you specify otherwise the installer program places the Firmware Loader fil...

Страница 49: ...oose Firmware File window closes NOTE When downloaded from the Extron website the firmware is placed in a subfolder of C Program Files Extron Firmware 15 In the Firmware Loader window click Begin see...

Страница 50: ...lation of the unit into a rack Elevated operating ambient temperature If installed in a closed or multi unit rack assembly the operating ambient temperature of the rack environment may be greater than...

Страница 51: ...lt has been caused by misuse improper handling care electrical or mechanical abuse abnormal operating conditions or if modifications were made to the product that were not authorized by Extron NOTE If...

Отзывы: