background image

Installation and Operation, cont’d

DVS 304  • Installation and Operation

2-6

Rear Panel Features

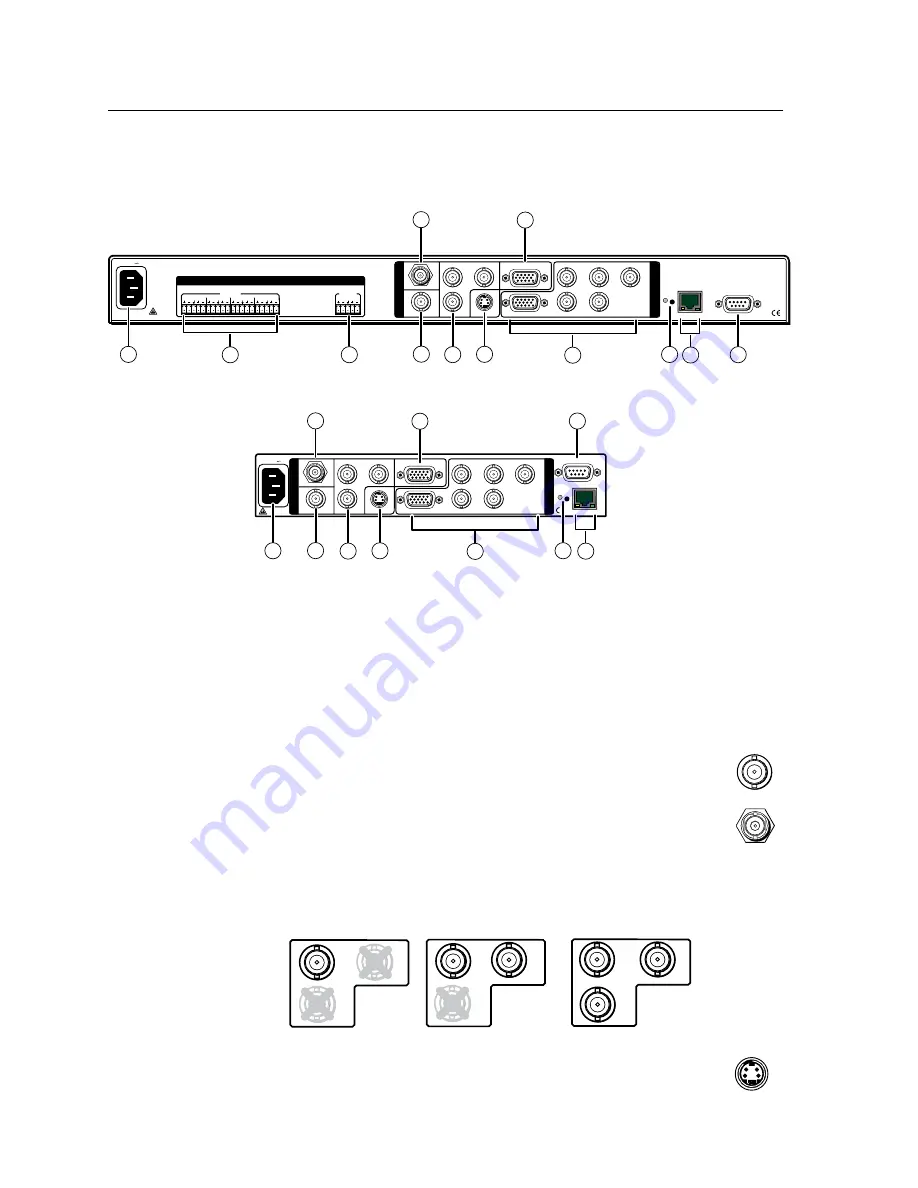
The rear panels of the DVS 304 D and DVS 304 AD models (figures 2-4 and 2-5) 

contain all of the possible connectors available on the DVS 304 series of scalers.

Figure 2-4 — DVS 304 AD rear panel connectors

VID

50/60 Hz

1

2

3

4

Y
/VID

R-Y

H/
HV

R
/R-Y

V

G
/Y

B
/B-Y

RS-232

LAN

RESET

ACT

LINK

RGB/R-Y,Y,B-Y

YC

SDI

B-Y

/C

RGB/R-Y,Y,B-Y/YC/VID

100-240V      .3A

I

N
P
U
T

O
U

T
P
U
T

4

4a

5

6

9

1

8

11

10

7

Figure 2-5 — DVS 304 D rear panel power connector

a


AC power connector

 — Plug a standard IEC power cord into this connector 

to connect the scaler to a 100 to 240 V AC, 50 Hz or 60 Hz power source.  

The front panel control and input selection buttons light in sequence during 

power-up.

b


Audio input 

— Plug up to four, 3.5 mm, female, five-pole, captive screw 

connectors for balanced/unbalanced variable audio input.

c


Audio output 

— Plug one, 3.5 mm, female, five-pole captive screw connector 

for balanced/unbalanced variable audio output.

d

  Video input 1: Composite video 

— Connect a composite video 

signal to this female, BNC connector.

Ü


Optional SDI (serial digital interface) input connector — 

Connect 

an SDI signal to this female BNC connector.  During setup, the SDI 

input can be assigned to one of the other unused inputs.

e


Video input 2: Composite/S-video/Component

 — Connect composite video, 

S-video, and component video signals.  Connect cables for the appropriate 

signal type, as shown here.


Composite Video 


/VID 

B-Y 
/C 

R-Y 
 

R-Y 

/VID 

B-Y

/C

Component Video (Y, R-Y, B-Y) 

B-Y 
/

S-video (YC) 

/VID 

R-Y 
 

f


Video input 3: S-video —

 Connect an S-video signal to this 

4-pin, mini-DIN female connector.

INPUTS

OUTPUT

VID

1

2

3

4

Y
/VID

R-Y

H/
HV

R
/R-Y

V

G
/Y

B
/B-Y

RS-232

LAN

RESET

ACT

LINK

RGB/R-Y,Y,B-Y

YC

SDI

B-Y

/C

RGB/R-Y,Y,B-Y/YC/VID

I

N
P
U
T

O
U

T
P
U
T

50/60 Hz

100-240V      .3A

2

1

3

4

L

R

L

R

L

R

L

R

L

R

I

N
P
U
T

O
U

T
P
U
T

AUDIO

4

3

7

5

6

9

1

2

11

8

4a

10

1

VID

SDI

3

YC

Содержание Digital Video Scaler Series DVS 304 AD

Страница 1: ...DVS 304 68 1039 01 Rev B 11 08 Digital Video Scaler Series DVS 304 DVS 304 D DVS 304 A DVS 304 AD ...

Страница 2: ...sollten Sie alle Sicherheits und Bedienungsanleitungen genau durchlesen und verstehen Aufbewahren der Anleitungen Die Hinweise zur elektrischen Sicherheit des Produktes sollten Sie aufbewahren damit Sie im Bedarfsfall darauf zurückgreifen können Befolgen der Warnhinweise Befolgen Sie alle Warnhinweise und Anleitungen auf dem Gerät oder in der Benutzerdokumentation Keine Zusatzgeräte Verwenden Sie ...

Страница 3: ... panel video inputs SDI input DVS 304 D or AD models only SDI Attach an SDI source to this optional BNC Input 1 Composite video 1 VID Input 2 Composite S video YUVi YUVp Composite Video 2 Y VID B Y C R Y 2 R Y Y VID B Y C Component Video Y R Y B Y 2 B Y C S video YC Y VID R Y Input 3 S video 3 YC Input 4 Composite S video YUVi YUVp RGBcvS RGB scaled RGB pass through RGB R Y Y B Y YC VID 4 Step 4 A...

Страница 4: ... H HV R R Y V G Y B B Y RS 232 LAN RESET ACT LINK RGB R Y Y B Y YC SDI R Y C RGB R Y Y B Y YC VID 100 240V 3A I N P U T O U T P U T RS 232 Control VCR DVD Player Document Camera LCD Projector Plasma Display Laptop Computer DVS 304 Application example INPUTS OUTPUT VID 1 2 3 4 Y VID B Y H HV R R Y V G Y B B Y RS 232 LAN RESET ACT LINK RGB R Y Y B Y YC SDI R Y C RGB R Y Y B Y YC VID I N P U T O U T ...

Страница 5: ... Menu navigation buttons 2 9 LCD menu display and controls 2 9 Menus Configuration and Adjustments 2 10 Moving through menus by using front panel controls 2 10 Menu overview 2 10 Start auto image 2 12 Input configuration 2 12 Input 1 video type 2 13 Input 2 video type 2 13 Input 3 video type 2 13 Input 4 video type 2 13 SDI input SDI IN 2 13 SDI de interlacer options 2 13 Picture control 2 14 Outp...

Страница 6: ...tcher 2 27 Removing the Sync to Matrix Script 2 28 Minimize synchronization problems without using the Sync to Matrix feature 2 28 Chapter Three Serial Communication 3 1 SIS Programmer s Guide 3 2 Host to scaler and scaler to host communications 3 2 Scaler initiated messages 3 2 Using the command response tables 3 2 Copyright information 3 3 Password information 3 3 Error responses 3 4 References ...

Страница 7: ...put 4 only 4 11 PIP Setup page 4 12 Audio DVS 304 A only 4 12 Appendix A Menu System A 1 DVS 304 Menu System A 2 Default cycle menu A 2 Main menu A 2 Start Auto Image menu A 3 Input Configuration menu A 3 Picture Control menu A 3 Output Configuration menu A 4 Audio Configuration menu A 4 Memory Preset menu A 4 IP Configuration menu A 5 Advanced Configuration menu A 5 Exit menu A 5 Executive Mode m...

Страница 8: ...Table of Contents cont d DVS 304 Table of Contents TOC iv PRELIMINARY ...

Страница 9: ...DVS 304 1 Chapter One Introduction About this Manual About the DVS 304 DVS 304 D DVS 304 A DVS 304 AD ...

Страница 10: ...mponent Y R Y B Y video and RGB video to computer video RGBHV RGBS RGsB or HD component It can also output to two separate display devices via individually buffered BNC and 15 pin HD connectors Controlling the DVS 304 video and RGB scaler The DVS 304 can be controlled using one or more of the following methods The front panel controls A computer a touch screen panel or any other device that can se...

Страница 11: ...ont panel via a computer or other RS 232 control device using the optional IR 902 remote control or via Signal Enhancements Windows Control Program Scaled outputs The DVS 304 offers 62 different output rates RS 232 configuration The DVS 304 can be configured by using the Extron control software for Windows or by using a third party control system Front panel security lockout executive mode To prev...

Страница 12: ...02 remote control Extron s IR 902 part 70 495 01 is an infrared remote control which replicates most of the front panel controls of the DVS 304 except the Menu and Next buttons SDI input card Serial digital interface SDI input can be added to the DVS 304 model by the installation of an SDI input card part 70 168 01 ...

Страница 13: ...ng the Scaler Rear Panel Features Front Panel Features Menus Configuration and Adjustments Resetting an Input Resetting the Unit System Reset Front Panel Lockout Executive Mode IR 902 Infrared Remote Control Setting up the DVS to work with a Matrix Switcher ...

Страница 14: ...i unit rack assembly the operating ambient temperature of the rack environment may be greater than room ambient temperature Therefore install the DVS 304 in an environment compatible with the maximum ambient temperature Tma 122 F 50 C specified by Extron 2 Reduced air flow Install the equipment in a rack so that the amount of air flow required for safe operation of the equipment is not compromised...

Страница 15: ...achine screws Insert the screws from the underside of the shelf and securely fasten them into diagonally opposite corners figure 2 1 2 4 40 x 3 16 Screws Use 2 mounting holes on opposite corners False front panel uses 2 front holes Figure 2 1 Rack mounting a half rack device 4 Attach the false front panel provided with the universal rack shelf to the unoccupied side of the rack as shown above or i...

Страница 16: ... 304 remove them 2 Attach the included rack through desk mounting brackets part 70 077 03 to the unit using eight machine screws supplied with the mounting kit Rack Mount Bracket Figure 2 2 Attach the mounting brackets and install in rack 3 Insert the unit into the rack and align the holes in the mounting brackets with the holes in the rack Use four machine screws to attach the brackets to the rac...

Страница 17: ...P UT 50 60 Hz 100 24 0V 3A 2 1 3 4 L R L R L R L R L R AU DI O VID 1 2 3 4 Y VID B Y H HV R R Y V G Y B B Y RS 23 2 LA N RE SE T AC T LIN K RG B R Y Y B Y YC SD I R Y C RG B R Y Y B Y YC VI D I N P U T O U T P U T I N P U T O U T P U T VCR Video Audio Projector RGB RS 232 Control DSS Receiver S video Laptop RGB Digital Tape Deck w SDI Output TCP IP Network DVD Component Figure 2 3 Application diag...

Страница 18: ...ced variable audio input c Audio output Plug one 3 5 mm female five pole captive screw connector for balanced unbalanced variable audio output d Video input 1 Composite video Connect a composite video signal to this female BNC connector Ü Optional SDI serial digital interface input connector Connect an SDI signal to this female BNC connector During setup the SDI input can be assigned to one of the...

Страница 19: ...V R R Y V G Y RGBS H HV B B Y B B Y Component Video Y R Y B Y R R Y G Y H HV V RGB or HD component R Y Y B Y 15 pin HD video output Connect an RGB video display or HD component video display to this HD 15 pin connector N Both h outputs are buffered and can be connected simultaneously to two different displays The sync and video formats will be the same for both outputs i Reset button and LED A rec...

Страница 20: ...act closure 9 pin port This connector provides for two way RS 232 communication See chapter 3 Serial Communication for information on how to install and use the control software and SIS commands The default protocol is 9600 baud 1 stop bit no parity and no flow control The rear panel RS 232 9 pin D female connector has the following pin assignments Pin RS 232 function Description 1 Input 1 Contact...

Страница 21: ...RGBS RGsB RGB pass through YUVi YUVp S video and composite video Menu navigation buttons b Menu button Use this button to enter and move through the main menu system in the DVS 304 See the Menus Configuration and Adjustments section in this chapter for details c Next button Use this button to step through the submenus in the DVS 304 menu system See the Menus Configuration and Adjustments section i...

Страница 22: ... In configuration mode rotate the Adjust horizontal knob and Adjust vertical knob to scroll through submenu options and to make adjustment selections Refer to the flowcharts in this chapter and to specific sections for explanations on knob adjustments Menu overview The default menus appear on the LCD when no adjustments are actively being made They cycle between the screen showing the model of the...

Страница 23: ... 60 Default Cycle 2 sec IP CONFIG MENU MENU ADVANCED CONFIG MENU TO EXIT MENU PRESS NEXT Audio models only Figure 2 9 Main menus N To return to the default screens allow the DVS 304 to time out after 20 seconds Alternatively press the Menu button repeatedly until the Exit menu appears then press the Next button N Submenus are accessed from a main menu by pressing the Next button When in a submenu ...

Страница 24: ...2 YUVi INPUT 4 RGB SCALED NEXT NEXT ASPECT RATIO 4x3 TTLPIX PHASE XXXX 08 NEXT NEXT NEXT H START V 50 33 H ACTIVE V XXX XXX NEXT FILM MODE OFF ON SDI INPUT 1 2 3 4 NEXT NEXT Displays only when applicable Displays only when applicable Displays only when applicable SDI DE INTER FIELD STNDRD NEXT Displays only when applicable Select video format Composite S video YUVi YUVp YUV Auto Assign SDI to Inpu...

Страница 25: ...tion menu Input 4 video type Rotate the Adjust horizontal knob while in the Input 4 submenu to select the appropriate video format Composite S video RGBcvS YUV YUVp RGB scaled RGB pass through Auto detect When input 4 is set as auto detect the scaler will switch to the new configuration whenever it detects an input type change The default is RGB scaled SDI input SDI IN Rotate either the Adjust hor...

Страница 26: ... while the aspect ratio remains unchanged Pan Move the zoomed image horizontally or vertically Available only when zoom is set over 100 Horizontal sizing Adjust horizontal image sizing Vertical sizing Adjust vertical image sizing Brightness Adjust image brightness Contrast Adjust image contrast Color Adjust color of image Tint Adjust tint of image Figure 2 12 Picture control menu Output configurat...

Страница 27: ...X X 1280 x 768 X X X X 1280 x 1024 X X X 1360 x 765 X X X 1365 x 768 X X X 1365 x 1024 X X 1366 x 768 X X X 1400 x1050 X X 1600 x 1200 X X 480p X 576p X X 720p X X 1080i X X 1080p X X X 1440 x 900 X X 1680 x 1050 X 1280 x 800 X X Output Signal Using either the Adjust horizontal or Adjust vertical knob select the output video format required by the display RGBHV default RGBS RGsB Y R Y B Y Sync Pol...

Страница 28: ... horizontal position vertical position horizontal size vertical size and zoom The following flowchart provides an overview of the Memory Preset submenus and the options for each setting Figure 2 15 Memory present menu N The presets will only save the sizing centering and picture control information Save memory preset From this submenu the picture control information for the currently selected inpu...

Страница 29: ...output However if the original output rate is later restored for a saved preset the preset will re apply to that output rate Input preset Input preset saves current values for parameters such as input type color tint contrast brightness detail aspect ratio horizontal start vertical start horizontal active vertical active phase total pixels horizontal position vertical position horizontal size vert...

Страница 30: ...uto Memory for the signal if Auto Memory is enabled or if no entry exists will perform an automatic Auto Image on the new signal With Auto Image disabled the DVS 304 will apply default values to a new input if no Auto Memory exists if Auto Memory is enabled Default is off Please see the table in the Auto Memory section for a full description of the interaction between the Auto Image and Auto Memor...

Страница 31: ... or stutters associated with frame conversion This mode should only be activated when excessive stuttering and or tearing is being experienced with an input signal N The output refresh rate must be set equal to or greater than the incoming video s refresh rate or no video output will be displayed If the incoming video s vertical rate differs significantly from the set output refresh rate no video ...

Страница 32: ...ndow input is ON The parameters of the PIP window are adjustable from the front panel or by SIS commands only Any change in configuration except positioning of the PIP window is saved to that input even after the PIP mode is not longer active The PIP window input is listed under the default cycle on front panel menu as shown below Default Cycle INPUT 1 COMPOSITE 2 sec 2 sec PIP WINDOW INPUT 2 OUTP...

Страница 33: ...indow or the PIP window Exit menu From this submenu press the Menu button to return to the Start Auto Image menu cycle or press the Next button to return to the default sequence START AUTO IMAGE ON IN1 MENU MENU INPUT CONFIG MEMORY PRESETS 2 sec INPUT 1 COMPOSITE OUTPUT 1024 x 768 60 Default Cycle 2 sec IP CONFIG MENU MENU ADVANCED CONFIG MENU MENU TO EXIT MENU PRESS NEXT MENU PICTURE CONTROL MENU...

Страница 34: ...following Enables ARP capability Sets the IP address back to factory default Sets the subnet back to factory default Sets the default gateway address back to the factory default Sets port mapping back to factory default Turns DHCP off Turns all events off The Reset LED flashes 4 times in quick succession during reset Mode 5 performs a complete reset to factory defaults except the firmware Does eve...

Страница 35: ...recall The menu system returns to the default menu within 10 seconds The DVS 304 s front panel is affected by executive mode but the IR 902 remote is not See IR 902 Infrared Remote Control later in this chapter for information When executive mode is active all functions and adjustments can still be made through RS 232 control For details on RS 232 control see chapter 3 Serial Communication To disa...

Страница 36: ...2 3 4 The middle portion of the IR 902 features muting freeze control auto imaging the on screen display OSD on off button and basic navigation The bottom portion contains the adjustment controls for size position brightness contrast zoom pan color tint detail phase adjustment and aspect ratio The approximate range for the IR 902 is 30 feet DVS 304 REMO TE MEMORY PRESET S PIP ON OFF AUDIO MUTE VID...

Страница 37: ...4 INP UT S RE SE T H SYN C V SYN C OU TP UT S R G B H V R G B H V DVD VCR AV Tuner Extron RGB 109xi Interface PC Extron CrossPoint 300 84 HV Matrix Switcher 1 DVS 304 DIGIT AL VIDE O SCA LER 2 3 4 BRT CON T COL TNT SIZE CEN TER MEN U NEXT ADJ UST IR 1 DVS 304 DIGIT AL VIDE O SCA LER 2 3 4 BRT CON T COL TNT SIZE CEN TER MEN U NEXT ADJ UST IR Figure 2 23 DVS 304 devices connected to a Matrix switche...

Страница 38: ...contrast and detail d Save the adjusted settings as input preset 1 Refer to chapter 3 Serial Communication for the SIS commands to save the preset N Each input preset must be saved with the same number as the input on the matrix switcher For Example input 24 on the matrix will be associated with the input preset 24 on the DVS e Repeat steps 2 and 3 for each input on the matrix that is to be used o...

Страница 39: ... synchronized to the matrix switcher After completing step 4 above ensure the following is done when using the DVS with the matrix Perform all input switching using the matrix switcher A 1 second RGB delay on the matrix is recommended to minimize the appearance of a glitch in the output while the DVS locks onto the new signal The DVS senses when the matrix switcher changes input ties and recalls t...

Страница 40: ...control system When operating the system using a manually configured control system for which Sync to matrix has not been setup you can avoid synchronization problems that cause unwanted image blanking or scrambling during input switches by doing the following N If the Sync to Matrix feature has been previously used first see Removing the Sync to Matrix Script section above 1 While setting up the ...

Страница 41: ...DVS 304 3 Chapter Three Serial Communication SIS Programmer s Guide Control Software for Windows ...

Страница 42: ...ring A string is one or more characters Scaler initiated messages When a local event such as a front panel selection or adjustment takes place the DVS 304 scaler responds by sending a message to the host No response is required from the host The scaler initiated messages are listed here C Copyright 2008 Extron Electronics DVS 304 series Vx xx The DVS 304 sends the copyright message when it first p...

Страница 43: ...chapter lists the commands that the DVS 304 scaler recognizes as valid the responses that are returned to the host a description of the command s function or the results of executing the command and an example of each command in ASCII Telnet and URL Encoded Web N Upper and lower case text can be used interchangeably except where noted ASCII to HEX Conversion Table ASCII to hexadecimal character co...

Страница 44: ... parameter E14 Not valid for this configuration E17 Invalid command for signal type E22 Busy E24 Privilege violation E25 Device not present E26 Maximum number of connections exceeded E27 Invalid Event number E28 Bad Filename File not found References to errors at command descriptions on the following pages 14 Commands that give E14 Invalid Command for this configuration if sent to Extron product w...

Страница 45: ...X1 Time in tens of milliseconds to wait for characters coming into a serial port before terminating the connection min 0 max 32767 and default 10 100 ms The response is returned with leading zeros In RS 232 commands X1 is optional X1 Hardware MAC address xx xx xx xx xxxx X1 Subnet mask xxx xxx xxx xxx Leading zeros are optional in setting values in each of four fields and are suppressed in returne...

Страница 46: ... output rate X8 Zoom 100 to 200 X8 Pan values depend on current output rate and zoom X3 Event buffer offset range 0 to MaxBufferSize X3 Event data size b bit B byte 8 bits S short 16 bits L long 32 bits N This parameter is case sensitive X3 Event data to write X4 Reading Password RS 232 connections responds with password IP connections responds with 4 asterisk if password exists and empty if not i...

Страница 47: ... V 2 H V 3 H V X9 Output sync format 0 RGBHV default 1 RGBS 2 RGsB 3 Y R Y B Y X9 Memory presets 1 to 3 X9 Input 4 presets 1 to 128 X9 Test pattern 0 to 3 X9 OSD display setup 0 to 5 seconds in 1 second steps X9 Auto image 0 to 2 X10 PIP window input selection 0 to 4 X10 Audio level adjustment range 15 to 9 dB X10 Audio gain adjustment range 0 to 9 dB X10 Audio attenuation adjustment range 15 to 0...

Страница 48: ...irst active pixel in active window Vertical Start Specify a value X7 Vst X7 Set vertical location of first active line in active window Increment value Vst X7 Increment to a higher vertical start position Decrement value Vst X7 Decrement to a lower vertical start position View X7 Show vertical location of first active line in active window Pixel Phase Available only for RGB and YUVp input signals ...

Страница 49: ...w 18 X8 View the currently displayed film mode setting 0 disabled 1 enabled Input Aspect Ratio 16 9 9 1 Asp 1 Set input aspect ratio to 16 9 4 3 9 0 Asp 0 Set input aspect ratio to 4 3 View 9 X8 View the current input aspect ratio 0 16 9 1 4 3 Video mute Enable Blanking 1B Vmt1 Blanks selected input Disable Blanking 0B Vmt0 Displays selected input View B X8 View the blanking status 0 disabled 1 en...

Страница 50: ... value D X8 Show the detail setting Horizontal Shift Specific value X8 H Hph X8 Set horizontal centering to X8 Increment up H Hph X8 Shift window right Increment down H Hph X8 Shift window left View H X8 Horizontal centering value is X8 Vertical Shift Specific value X8 Vph X8 Set vertical centering to X8 Increment up Vph X8 Shift window down Increment down Vph X8 Shift window up View X8 Vertical c...

Страница 51: ...reset X9 for selected input Save preset 1 X9 1SprX9 Saves memory preset X9 for selected input Input Presets for input 4 only Recall preset 2 X9 2RprX9 Recalls input 4 preset X9 Save preset 2 X9 2SprX9 Saves input 4 parameters to X9 Write Read input preset name Write preset name Esc X9 X8 NG NmgX9 X8 Name preset X9 as X8 Read preset name 2 X9 2SprX9 Save preset X9 as X8 N If a preset has not been s...

Страница 52: ... volume X10 V Vol X10 Set volume to X10 Increment V Vol X10 Increase volume Decrement V Vol X10 Decrease volume View V X10 View current volume setting Test Pattern N These commands are not case sensitive Both J and j can be used interchangeably Crop 1J Tst 1 Set crop test pattern on Alternating pixels 2j Tst 2 Set alternate pixels on Color bars 3J Tst 3 Set color bars on Off 0J Tst 0 Set test patt...

Страница 53: ...isplay time Text label OSD Input 4 only Write Name Esc X8 NI Nam 4 Writes text X8 for input 4 Read Name Esc NI X8 View text label for input 4 PIP size PIP size 16 X10 Pmd X10 Select size of PIP window View 16 X10 View PIP window size PIP mode PIP on 17 X10 Pip X10 Turn PIP mode on with PIP window from input X10 PIP off 17 0 Pip 0 Turn PIP mode off View 17 X10 View selection status on or off N When...

Страница 54: ... Panel Security Lockout Executive Mode N These commands are not case sensitive Both X and x can be used interchangeably Enable 1X x Exe1 Limited front panel adjustments only Disable 0x Exe0 Adjustments selections can be made from front panel View status X X8 Show mode status 0 disabled 1 enabled SDI Field Flip Standard 73 0 Flp 0 Flip Fields 73 1 Flp 1 View 73 Flp X8 0 Standard 1 Flipped Enhanced ...

Страница 55: ...n 0Q 0Q All responses from 2Q 3Q 4Q Show bootstrap factory installed and updated firmware versions See 2Q 3Q and 4Q below Example 1Q 1Q 1 01 Query bootstrap version 2Q 2Q X1 The bootstrap firmware is not user replaceable but you may need this information for troubleshooting Example 2Q 2Q 0 06 Query factory firmware version 3Q 3Q X1 plus web ver desc UL date time Factory installed firmware is not u...

Страница 56: ...4I Bytes used out of Kbytes Show amount of user memory used and total vailable user memory Event Control Read event memory buffer 27 E X3 X3 X3 X3 E W X3 X3 X3 X3 E X5 Read the contents of a specific section of a memory buffer for event number X5 Write event to memory buffer 24 27 E X3 X3 X3 X3 X3 E W X3 X3 X3 X3 X3 E Ewr X3 X3 Write event X3 to buffer X3 offset by X3 Include data X3 size X3 Read ...

Страница 57: ...X4 2C X7 2C X4 SM Eml X4 Set mail server IP address unit domain name 24 E X1 X1 CM W X1 2C X1 CM Ipm X1 X1 Read mail server IP address unit domain name 24 28 E CM W X1 2C X1 CM X1 X1 N X1 IP address xxx xxx xxx xxx leading zeros in each of 4 fields are optional in setting values and are suppressed in returned values X1 Mail domain name e g Extron com X4 E mail event number 1 64 max The response is...

Страница 58: ...VS304 00 02 3d Read unit name E CN WCN X1 X1 is the processor s current unit name Set time date 24 E X1 CT W X1 CT Ipt X1 X1 is local date and time format The set format is MM DD YY HH MM SS Example 11 18 03 10 54 00 Read time date E CT WCT X1 The Read format is day of week DD month year HH MM SS Example Tue 18 Nov 2008 18 19 33 Command response table for IP control port commands continued N X1 Na...

Страница 59: ... 1DH W1DH Idh1 Set DHCP off 24 E 0DH W0DH Idh0 View DHCP mode E DH WDH Idh X X 0 off or 1 on Set IP address 24 E X1 CI W X1 CI Ipi X1 X1 IP address xxx xxx xxx xxx Leading zeros in each of the four fields are optional in setting values Read IP address 24 E CI WCI X1 Leading zeros in each of the four fields are suppressed in returned values Read hardware address MAC E CH WCH X1 X1 hardware media ac...

Страница 60: ...e DVS 304 has not been configured yields an E14 response from the processor If the administrator password is cleared removed the user password is also removed Read administrator password E CA WCA X3 Set user password 14 24 E X3 CU W X3 CU Ipu X3 Set the user access password X3 is 4 12 alphanumeric characters The password is case sensitive Special characters spaces or symbols are not allowed N A us...

Страница 61: ...tion s security level E CK WCK X5 Re map port designations Set Telnet port map 24 E port MT W port MT Pmt port Reset Telnet port map 24 E 23MT W23MT Pmt00023 Disable Telnet port map 24 E 0MT W0MT Pmt00000 Read Telnet port map E MT WMT port Set Web port map 24 E port MH W port MH Pmh port Reset Web port map 24 E 80MH W80MH Pmh00080 Disable Web port map 24 E 0MH W0MH Pmh00000 Read Web port map 24 E ...

Страница 62: ...var connections new Array connections 1 Client IP1 timedate 1 uptime 1 connections 2 Client IP2 timedate 2 uptime 2 connections 3 Client IP3 timedate 3 uptime 3 connections n Client IPn timedate n uptime n connections n 1 total clients connections available File commands Read Direct Access port map E MD WMD port Get listing E DF WDF See below Retrieve a list of files stored in the DVS 304 Each lin...

Страница 63: ... filesize filename Raw unprocessed data in file up to filesize Upl Retrieve file from user flash memory E filename SF 1B filename 52 46 0D Responds with raw unprocessed data in file 1 byte checksum Directory commands Change create directory E path directory CJ W path directory CJ Dir path directory N A directory does not actually exist until a file has been copied into the path Move back to root d...

Страница 64: ... Zpf Reset all device settings to factory default 24 E zXXX WzXXX Zpx No IP related settings are reset Absolute system reset E ZQQQ WZQQQ Zpq Reset all settings memories The ZQQQ command resets all settings adjustments the IP address and subnet mask to the fac Set audio DVS 304 A and DVS 304 A D only E ZA WZA Zpa Reset all audio settings Image setting reset E ZI WZI ZapI Clears current working mem...

Страница 65: ...opens Installing the software from a CD N The configuration program require approximately 32 MB of hard disk space To install the software on the hard drive 1 Insert the CD Rom into your CD drive The disk starts automatically 2 If the disk does not start automatically run LAUNCH EXE from the CD 3 Follow the instructions that appear on the screen By default the installation creates a C Program File...

Страница 66: ...d button for advanced input parameters as shown below 5 Adjust Input Timing Pixel Phasing and Start location to desired parameters Click on Exit Config to exit the Advanced Input Configuration window 6 When configuration is complete or to completely exit the program click on the X in the top right corner of the DVS 304 Windows Control Program window that was opened in step 2 above ...

Страница 67: ...thin the DVS 304 Control Program or double click on the DVS 304 Help icon in the Extron Electronics group or folder For explanations of buttons or functions click on the tabs in the help screen to reach the desired screen Use a mouse or the Tab and Enter keys to select a button function A description and tips on using the program will appear on screen ...

Страница 68: ...Serial Communication cont d DVS 304 Serial Communication 3 28 ...

Страница 69: ...DVS 304 4 Chapter Four Ethernet Control Accessing and Using the Web Server Navigating the Default Web Pages ...

Страница 70: ... field N If the local system administrators have not changed the value the factory specified default 192 168 254 254 is the correct value for this field 4 If you want the browser to display a page other than the default page such as a custom page that you have created and uploaded enter a slash and the file name to open N The browser s Address field should display the address in the following form...

Страница 71: ...e_index html figure 4 2 shown below also known as the System Status page Navigating the Default Web Pages The DVS 304 default Web pages include four tabs Status Configuration File Management and Control for easy navigation of several administrative options including system status password control file management and scaler settings Status The Status tab displays the System Status page for the DVS ...

Страница 72: ...alid name up to 12 alphanumeric characters N The following characters are invalid in the name space and DHCP The Dynamic Host Configuration Protocol DHCP is an Internet protocol for automating the configuration of computers that use TCP IP DHCP can be used to automatically assign IP addresses deliver TCP IP stack configuration parameters such as the subnet mask and default router and provide other...

Страница 73: ...te Time Settings fields The Date Time Settings fields figure 4 3 provide a location for viewing and setting the time functions The adjustable variables are month day year hours minutes AM PM and time zone Change the date and time settings as follows 1 Click the desired variable s drop box A drop down scroll box appears 2 Click the desired value N For quick setting of the date and time click the Lo...

Страница 74: ...o allows you to set video input signals for inputs 2 and 4 only define output resolutions and remotely define advanced configurations Note that resolutions in the Resolution drop down menu are linked to refresh rates as shown in the Available Scaler Output Resolutions and Rates table in chapter 2 Installation and Operation Figure 4 4 Scaler Settings page 4 6 ...

Страница 75: ...mit button As shown in figure 4 5 below password protected connections allow two levels of protection administrator and user Administrators have full access to all DVS 304 switching capabilities and editing functions Figure 4 5 Passwords page Please keep in mind that Connecting via an Ethernet connection entering SIS commands see chapter 3 Serial Communication or using the Windows based control pr...

Страница 76: ...om the Product Shortcut drop down box and select the latest firmware file for download 3 Note the folder to which you save the firmware file 4 Connect the PC to the DVS 304 scaler via the scaler s Ethernet port 5 Access the DVS 304 scaler using the on board Web server 6 Click the Configuration tab 7 Click the Firmware Upgrade link 8 Click the Browse button An open file window appears 9 Navigate to...

Страница 77: ...le index html 3 Click the Upload File button to upload the file The file will be added to the list of files under the Files column After ten files have been loaded additional file management pages will appear in the page navigation area on the right side of the screen To add a directory 1 Enter the directory name in the Dir field 2 Click the Add Dir button 3 Click the browse button and locate your...

Страница 78: ...ratio and front panel lockout executive mode Figure 4 8 User Control page The aspects of each input 1 4 can be controlled independently Click on the appropriate input number to immediately change its onscreen attributes Video Audio breakaway DVS 304 A or DVS 304 AD only Use the check boxes shown below to select whether video audio or both are switched to the new selected input When only one box is...

Страница 79: ...From the Configuration tab click the Scaler Setting link at the left of the page 2 Select the desired input format for input 4 3 Click the User Control link on the left side of the page The User Control page appears figure 4 8 4 Click the button for the input 4 5 Make changes to the picture control settings e g aspect ratio zoom brightness etc You can also create OSD text that is saved as part of ...

Страница 80: ... the drop down menu to set the size of the subordinate PIP picture 5 Use the drop down menu to choose the appropriate PIP input See chapter 2 Installation and Operation for information on PIP window selection The attributes window for the PIP appears as shown below Figure 4 11 PIP On 6 Once the PIP window is selected its picture control settings are available on the PIP Setup page figure 4 10 N Wh...

Страница 81: ...DVS 304 A Appendix Menu System DVS 304 Menu System ...

Страница 82: ...8 60 Default Cycle 2 sec Main menu START AUTO IMAGE ON IN1 MENU MENU INPUT CONFIG MENU PICTURE CONTROL MENU OUTPUT CONFIG MENU AUDIO CONFIG MENU NEXT MENU MEMORY PRESETS Power on EXTRON DVS 304 2 sec INPUT 1 COMPOSITE 60 736 01 FW ver 1 xx 2 sec 2 sec OUTPUT 1024 x 768 60 Default Cycle 2 sec IP CONFIG MENU MENU ADVANCED CONFIG MENU TO EXIT MENU PRESS NEXT Audio models only ...

Страница 83: ...Specify the width in pixels of the total image area sampled Pixel phase Adjust the pixel sampling point for a selected input Horizontal start Select for the left edge of the active video Vertical start Select for the top edge of the active video Horizontal active pixels Specify the width in pixels of the active image area sampled Vertical active lines Specify the height in lines of the active imag...

Страница 84: ...n menu NEXT IN1 LEVEL 0dB NEXT Input level Adjust the input gain attenuation from 15dB to 9dB of the selected input MENU audio models only AUDIO CONFIG OUTPUT CONFIG Memory Preset menu NEXT IN1 SAVE N A 1 2 3 IN1 CLEAR N A 1 2 3 NEXT NEXT Saving SAVE memory presets Save the currently selected input s picture control information Up to 3 presets per input can be selected and saved N A is the default...

Страница 85: ...nd steps IP CONFIG ADVANCED CONFIG MENU NEXT AUTO IMAGE OFF ON AUTO SWITCH OFF ON NEXT NEXT NEXT RGB DELAY 0 0 sec NEXT OSD LABEL 2 sec BLUE MODE OFF ON Test patterns Off Crop Alternating pixels Color bars NEXT TEST PATTERN OFF Enhance Mode When set to on the automatic gain control of the input signal is enabled NEXT ENHANCE MODE OFF ON Refresh Lock When set to on the vertical ouptut rate will loc...

Страница 86: ...seconds Next EXE MODE ENABLED Enable Executive Mode 10 sec timeout EXE MODE DISABLED Disable Executive Mode 2 sec INPUT 1 COMPOSITE OUTPUT 1024 x 768 60 Default Cycle 2 sec Menu Press for 2 seconds Next 10 sec timeout 2 sec INPUT 1 COMPOSITE OUTPUT 1024 x 768 60 Default Cycle 2 sec ...

Страница 87: ...DVS 304 B Appendix Reference Material Specifications Part Numbers and Accessories Serial Digital Interface SDI Card Installation ...

Страница 88: ...duced blanking version of the 1920x1200 resolution is sampled at full bit rate Return loss 30 dB 5 MHz DC offset max allowable 1 5 V Video processing Decoder 9 bit digital Digital sampling 24 bit 8 bits per color 13 5 MHz standard Colors 16 78 million Video output Number signal type 2 scaled or pass through RGBHV RGBS RGsB or scaled component video Y R Y B Y Connectors 5 female BNC 1 female 15 pin...

Страница 89: ... at 1 THD N Input gain adjustment 15 dB to 9 dB adjustable per input N 0 dBu 0 775 Vrms 0 dBV 1 Vrms 0 dBV 2 dBu Audio output DVS 304 A DVS 304 AD Number signal type 1 stereo balanced unbalanced Connectors 1 3 5 mm captive screw connector 5 pole Impedance 50 ohms unbalanced 100 ohms balanced Gain error 0 1 dB channel to channel Maximum level Hi Z 21 dBu balanced or unbalanced at 1 THD N Maximum le...

Страница 90: ...04AD Yes with included brackets Furniture mount DVS 304 DVS 304D Yes with optional MBU 125 Under desk Mounting Kit 70 077 01 or MBD 129 Through desk Mounting kit 70 077 02 Enclosure type Metal Enclosure dimensions DVS 304 DVS 304D 1 75 H x 8 75 W x 10 5 D 1U high half rack wide 4 4 cm H x 22 2 cm W x 26 7 cm D Depth excludes connectors and knobs DVS 304A DVS 304AD 1 75 H x 17 5 W x 10 5 D 1U high ...

Страница 91: ...er s Manual DVS 304 Windows based control program Included parts Part number DVS 304 A or DVS 304 AD 60 736 02 04 Rubber feet self adhesive 4 Rack and through desk mounting kit 70 077 03 IEC power cord Tweeker small screwdriver User s Manual DVS 304 Windows based control program Accessories These items can be ordered separately Accessories Part number IR 902 remote control 70 495 01 SDI video inpu...

Страница 92: ...g the DVS 304 scaler from the AC power source before opening the enclosure 2 Remove the scaler from the rack or furniture 3 Remove the cover of the scaler the top half of the enclosure by removing the screws then slide the cover back to clear the connectors and lift it straight up figure B 1 VID 50 60 Hz 1 2 3 4 Y VID B Y H HV R R Y V G Y B B Y RS 232 RE SE T AC T LINK RGB R Y Y B Y YC SDI R Y C R...

Страница 93: ...ard at an angle with the SDI connector protruding from the rear SDI connector opening 6 The SDI card has a 20 pin socket on the underside which should align with the 20 pins on the main circuit board Be sure to align the pins properly in order to prevent bending the pins before pressing the SDI card firmly in place against the standoff The mounting hole on the SDI card should now be directly over ...

Страница 94: ...Reference Material cont d DVS 304 Reference Material B 8 ...

Страница 95: ...y misuse improper handling care electrical or mechanical abuse abnormal operating conditions or non Extron authorized modification to the product If it has been determined that the product is defective please call Extron and ask for an Applications Engineer at 714 491 1500 USA 31 33 453 4040 Europe 65 6383 4400 Asia or 81 3 3511 7655 Japan to receive an RA Return Authorization number This will beg...

Страница 96: ...97 FAX Extron EMEA 800 3987 6673 Inside Europe Only 31 33 453 4040 31 33 453 4050 FAX Extron Asia 800 7339 8766 Inside Asia Only 65 6383 4400 65 6383 4664 FAX Extron Japan 81 3 3511 7655 81 3 3511 7656 FAX Extron China 400 883 1568 Inside China Only 86 21 3760 1568 86 21 3760 1566 FAX Extron Middle East 971 4 2991800 971 4 2991880 FAX 2008 Extron Electronics All rights reserved ...

Отзывы: