


Before beginning the mounting procedure, insert the four M5 bolts into the holes on the rear of the
access point and torque the bolts to 16 in-lbs.
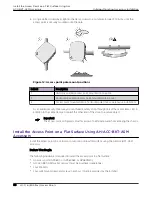
Figure 13: Wall mounting accessory M5 bolt holes
Callout
Description
1
M5 bolt attachment holes
Note
If you are mounting the access point horizontally, ensure that the ports are facing down to
reduce the chance of water entering the chassis.
Procedure
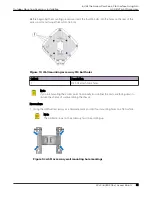
1. Using the ASM wall accessory as a template, mark and drill four mounting holes on a flat surface.
Note
The printed arrows on the accessory must be pointing up.
Figure 14: ASM accessory wall mounting hole markings
Outdoor Mounting Accessory Installation
Install the Access Point on a Flat Surface Using AH-
ACC-BKT-ASM Accessory
Wi-Fi 6 (802.11ax) Access Points
31