background image

DIVINA-DIVINA STEEL-DIVINA PLUS

AVVERTENZE

Prima di ogni accensione della macchina verifi care sempre che il braciere sia completamente libero 
e pulito.
E’ assolutamente vietato introdurre manualmente pellet all’interno del braciere.
All’interno della stufa si trovano 3 confezioni di sali disidratanti da rimuovere defi nitivamente prima 
di accendere la stufa: 1 all’interno della camera di combustione, 2 all’esterno della stufa.
Per un ottimale funzionamento del prodotto, l’azienda invita l’utilizzatore a regolare l’affl

  usso del 

pellet in base al tipo di combustibile utilizzato. Vedi sezione “Regolazione carico pellet” del libretto 
istruzioni.
L’apparecchio deve funzionare alla potenza 4 o 5 per 2 o 3 giorni in modo tale che le parti meccaniche 
abbiano la possibilità di assestarsi.

WARNING

Always check before lighting the stove that the burning pot is completely free and clean.
Do not insert pellet manually into the combustion pot.
3 packagings dehydrating salts will be found in the stove to be removed completely before starting 
the heater: 1 inside the burning chamber, 2 on the outside.
For a correct functioning of this product, the manufacturer kindly asks the fi nal user to set the pellet 
feeding according to the type of combustible. Please read the chapter “Pellet Feeding Adjustment” 
in “Use and Maintenance Manual”.
This stove must function at middle power (power 4 or 5) for 2 or 3 days in order to allow a better 
settlement of the mechanical components.

ACHTUNG

Vor jeder Anzündung immer kontrollieren, dass die Brennschale frei und sauber ist.
Es ist verboten die Pellet in die Schale mit Händen zu werfen.
Im Pelletsofen sind 3 Packungen Trockensalz zu fi nden die anlässlich der Inbetriebnahme entfernt 
werden müssen:1 in der Brennkamer und 2 sind ausserhalb des Ofens.
Zum dem optimalen Betrieb dieses Produktes bittet Der Hersteller den Benutzer darum, die 
Pelletszufuhr gëmaβ dem verwendeten brennstoff  einzustellen.  Lesen Sie bitte den Paragraph 
„Reglung der Pellets-Zufuhr“ in der „Bedienungs- und Aufstellungsanleitung“.
Das Gerät soll 2 oder 3 Tage auf Mittelleistung funktionieren (Stufe 4 oder 5) so dass die 
mechanischeTeile sich einlaufen können.

ATTENTION

Avant d’allumer le poêle toujours contrôler que le brasier soit complètement libre et propre.
N’introduisez pas pellet manuellement dans le brasier.
A l’intérieur du poêle Vous retrouverez 3 paquets de sels déshydratants à enlever complètement , 
S.V.P., lors de la mise à feu : 1 dans le chambre de combustion, 2 à l’extérieur du poêle.
Pour un emploi optimal du produit, le producteur prie l’usager de bien vouloir régler le chargement 
du pellet selon le type de combustible. Veuillez lire le paragraphe « Réglage charge Pellet » dans le 
« Manuel d’instructions et entretien ».
L’appareil doit fonctionner à puissance 4 ou 5 pour 2 ou 3 jours, de façon que les parties mécaniques 
puissent se tasser.

Содержание DIVINA

Страница 1: ...e must function at middle power power 4 or 5 for 2 or 3 days in order to allow a better settlement of the mechanical components ACHTUNG Vor jeder Anzündung immer kontrollieren dass die Brennschale frei und sauber ist Es ist verboten die Pellet in die Schale mit Händen zu werfen Im Pelletsofen sind 3 Packungen Trockensalz zu finden die anlässlich der Inbetriebnahme entfernt werden müssen 1 in der B...

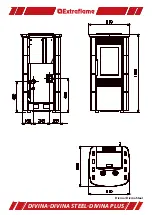
Страница 2: ...DIVINA DIVINA STEEL DIVINA PLUS Divina Divina Steel ...

Страница 3: ...DIVINA DIVINA STEEL DIVINA PLUS Divina Plusl ...

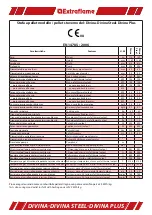
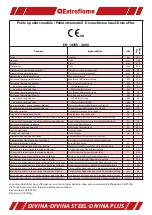
Страница 4: ...utput W 300 300 Potenza elettrica apparecchio Appliance electric output W 400 400 Tensione nominale Rated voltage Vac 230 230 Frequenza nominale Rated frequency Hz 50 50 Diametro tubo entrata uscita acqua Water intake outlet pipe diameter Diametro tubo scarico automatico Automatic discharge pipe diameter Prevalenza pompa Pump head m Max pressione idrica di esercizio ammessa Max admitted operating ...

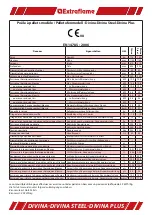
Страница 5: ...uissance électrique appareil Elektrische Geräteleistung W 400 400 Tension nominale Nennspannung Vac 230 230 Fréquence nominale Nennfrequenz Hz 50 50 Diamètre tuyau entrée sortie eau Rohrdurchmesser Wassereinlass auslass Diamètre tuyau évacuation automatique Durchmesser automatisches Rauchabzugsrohr Hauteur d élévation pompe Förderhöhe Pumpe m Pression hydrique de service max admise Maximaler zugel...

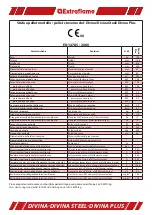
Страница 6: ...00 Potenza elettrica apparecchio Appliance electric output W 300 Tensione nominale Rated voltage Vac 230 Frequenza nominale Rated frequency Hz 50 Diametro tubo entrata uscita acqua Water intake outlet pipe diameter Diametro tubo scarico automatico Automatic discharge pipe diameter Prevalenza pompa Pump head m Max pressione idrica di esercizio ammessa Max admitted operating water pressure bar CO mi...

Страница 7: ...ctrique appareil Elektrische Geräteleistung W 300 Tension nominale Nennspannung Vac 230 Fréquence nominale Nennfrequenz Hz 50 Diamètre tuyau entrée sortie eau Rohrdurchmesser Wassereinlass auslass Diamètre tuyau évacuation automatique Durchmesser automatisches Rauchabzugsrohr Hauteur d élévation pompe Förderhöhe Pumpe m Pression hydrique de service max admise Maximaler zugelassener Wasserdruck bei...

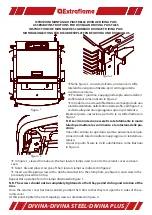
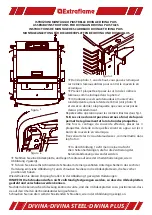
Страница 8: ...evono essere fissate totalmente in modo tale da permettere lo scorrimento e la rotazione delle pia strine Una volta centrata la copertura ceramica posizionare le 4 pia strine in modo tale da risultare in appoggio sui 4 lati della ce ramica A questo punto fissare le 4 viti autofilettanti come illustrato in figura 4 In figure 1 viewed from above the four lateral clamps used to centre the ceramic cov...

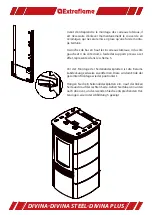
Страница 9: ...astrelle laterali 4 lato sinistro e 4 lato de stro procedendo dal basso verso l alto utilizzando gli appo siti supporti indicati in figura 5 Before assembling the lateral tiles it is necessary to tempo rarily remove the ceramic cover which will be repositioned at the end of the procedure Fasten the 8 lateral tiles 4 on the left side and 4 on the right proceeding from bottom to top using the specia...

Страница 10: ...rcle effectué placez les 4 plaquettes de telle sorte qu elles soient en appui sur les 4 bords du couvercle en céramique Fixez ensuite les 4 vis autotaraudeuses comme illustré dans la photo 4 In der Abbildung 1 sieht man in einer Aufsicht die 4 Seitenhalterungen die für die Zentrierung der Keramikabdeckung verwendet werden Nehmen Sie eine Abdeckplatte und legen Sie diese auf eine der 4 Seitenhalter...

Страница 11: ...du côté gauche et 4 du côté droit à l aide des supports prévus à cet effet représentés dans le schéma 5 Vor der Montage der Seitenabdeckplatten ist die Kerami kabdeckung zeitweise zu entfernen Diese wird am Ende der gesamten Montage wieder positioniert Hängen Sie die 8 Seitenabdeckplatten ein 4 auf der linken Seite und 4 auf der rechten Seite Gehen Sie dabei von unten nach oben vor und verwenden S...

Страница 12: ...DIVINA DIVINA STEEL DIVINA PLUS 004275140 Fascicolo istruzioni Divina Divina Steel Divina Plus ...

Отзывы: