background image

100

Manuale per l’utente

3. opzioni

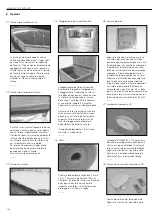
3.1  Telone impermeabile estivo


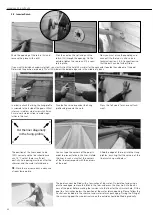
La piscina può essere coperta con un 

telone impermeabile estivo . I raggi solari 

possono far aumentare la temperatura 

dell’acqua . Il telone viene semplicemente 

appoggiato sull’acqua, per cui quando si 

utilizza la piscina viene rimosso e rigirato 

per essere fatto asciugare . Per prevenire 

eventuali strappi, è sempre meglio  

arrotolarlo .  Non camminare sopra al 

telone .

 _____

3.2  Telone impermeabile invernale


Durante i mesi invernali quando la piscina 

non viene utilizzata, può essere coperta 

con un telone impermeabile invernale . 

Distribuire i ganci in maniera equidistante 

intorno all’esterno della piscina . Avvitarli 

sui lati della vasca e fissare il telone ad 

essi mediante le chiusure rapide .


Per prevenire eventuali strappi, anche 

questo telone deve essere arrotolato 

quando non viene utilizzato .  

Non camminare sopra ad esso .

 _____

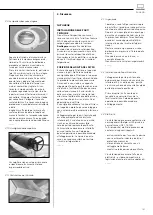
3.3  Telone di sicurezza


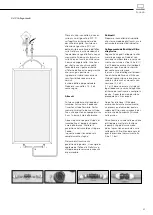
3.4  Alloggiamento delle parti tecniche


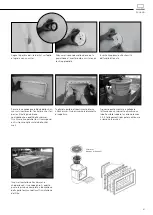
L’alloggiamento per le parti tecniche 

può essere integrato o indipendente . 

L’alloggiamento integrato è fissato sul 

lato della piscina dove si trovano anche 

lo skimmer e il dispositivo di ritorno 

dell’acqua . L’unità del filtro è collocata  

al suo interno (vedere 4 Sicurezza) .


Seguire le istruzioni sul disegno incluso .


Avvitare un lato alla piscina e montare 

alcune tavole sulla parte frontale per 

ottenere una struttura perfettamente 

angolata . Quindi avvitare gli altri lati . 

Questo alloggiamento integrato è  

disponibile in tre diverse misure .


Il modello indipendente a 4 lati viene 

montato in modo simile .

 _____

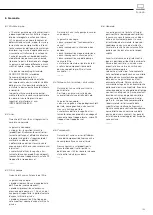
3.5  Feltro  


Il feltro è disponibile in rotoli da 25 m alti 

1,3 m . Il tessuto in poliestere 100% di 

200 gr/m² è adatto per l’uso sia all’interno 

della piscina per fornire una parete 

imbottita e morbida, sia all’esterno per 

proteggere la struttura in legno .

 _____

3.6  Scatola elettrica


Seguire le istruzioni nel manuale incluso .


La scatola elettrica è adatta per il colle-

gamento elettrico della pompa e massimo 

tre lampade per l’illuminazione subacquea . 

È dotata di un differenziale ad alta sensi-

bilità e di un trasformatore per la lampada 

subacquea . È possibile programmare il 

funzionamento della pompa con un timer 

integrato . L’installazione deve essere fatta 

da un elettricista e si devono rispettare  

la legislazione locale e le norme applicabili . 

La scatola impermeabile IP65 deve es-

sere collocata a non  meno di 3,5 m dalla 

piscina . L’alimentazione del quadro elettrico 

deve essere resa sicura a monte da un dif-

ferenziale ad alta sensibilità (max 30 mA) .

 _____

3.7  Lampada subacquea LED


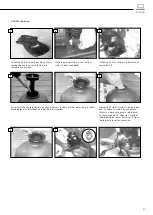
Lampada LED 35W/12V - 16 colori, con 

elemento di collegamento adatto per la 

struttura in legno Gardipool, trasforma-

tore necessario per la armadio elettrico .


Seguire le istruzioni nel manuale incluso .


Posizionare la lampada subacquea prefe-

ribilmente 70 cm al di sotto del bordo .


_____

3.8  Comando a distan per lampada a LED


Comando a distan per lampada a led .


Seguire le istruzioni nel manuale incluso .

 _____

Содержание Gardipool OCTOO 400

Страница 1: ...Montagehandleiding Notice de montage Manual Montage Anleitung Manuale per l utente OCTOO...

Страница 2: ......

Страница 3: ...Montage handleiding 4 Notice de montage 24 Manual 44 Montage Anleitung 64 Manuale per l utente 84 ENGLISH FRAN AIS NEDERLANDS DEUTSCH Italiano OCTOO...

Страница 4: ...aag plastiekfolie aan onder het beton voor optimale droging Bij half ingegraven plaatsing voorziet u rondom uw zwembad een extra rand van 50 cm In dit geval moet u het ondergrondse houten gedeelte bed...

Страница 5: ...ekfolie anti bacterie vilt meegeleverd 15 cm Plastiekfolie anti bacterie vilt 50 cm 15 cm beschermend vilt niet meegeleverd aarde aarde gestabiliseerd zand Bovengrondse plaatsing ondergrondse plaatsin...

Страница 6: ...ank steeds van binnen in het zwembad De planken van het zwembad zijn voor zien van groef en of tand Op die manier passen de verschillende lagen goed op elkaar De uiteinden van de planken zijn bewerkt...

Страница 7: ...4 5 6 2 2 2 Montage 1 2 3 4 1 2 3 4 anti bacterie vilt tip Na het uitdrogen van het plateau wordt het anti bacterievilt keurig opengespreid Vermijd oneffenheden in het vilt 7x110mm M12 Niet van toepas...

Страница 8: ...kimmer Vooraleer de laatste laag te plaatsen moet de skimmer tussen de planken geplaatst worden Deze wordt aan de planken bevestigd met 4 stuks inox schroeven 3 5 x 20 mm in de hoeken van de skimmer g...

Страница 9: ...rondom het zwembad 4x30mm De afdekplanken worden ondersteund door L hechtingen Verdeel het aantal L hechtingen gelijkmatig rondom het zwembad Schroef op 12 mm van de bovenkant van de eindplank de L he...

Страница 10: ...pt worden voor de skimmer en de terugvoer TIP Enkele dagen vooraf de liner op kamer temperatuur bewaren De hoeken van het zwembad kan men afplakken met plakband dit om de folie plooivrij te houden Plo...

Страница 11: ...de schroefgaten in de afdichtingsring overeenkomen met deze van de skim mer Schroef nu de afwerkingskap erop bijhorende vijzen in doos van skimmer Snij nu het stuk liner uit in de skimmer mond Klik d...

Страница 12: ...e belangrijkste onderdelen van de filtereenheid zijn de filter de pomp zesweg wisselklep leegdop netspanning skabel verbindingsleiding De pomp mag nooit meer dan 4 meter hoger dan de filterin gang en...

Страница 13: ...et mondstuk van het spruitstuk komt Vul nu de filter eerst met grind 3 5mm en daarna met zand 0 4 0 8mm Het zand heeft een onbeperkte levensduur en dient alleen aangevuld te worden als er zand verlore...

Страница 14: ...ng Breng de inleg stukken terug in het verbindingsstuk en draai uiteindelijk de fittingen vast zie technisch gedeelte 2 4 3 Aansluit ingen 11 8 Breng nu teflon aan op de buitendraad van de manometer D...

Страница 15: ...luiting van de filtereenheid op het zwembad Volg hierbij de tekening Sluit de 2 skimmers met de half buigzame verbindingsleiding aan op het T stuk 4 en 9 lijmen Lijm op het andere uiteinde van het T s...

Страница 16: ...t u dus niets meer doen om de filter te ontluchten De lucht zal reeds verwijderd zijn door de stroming Wanneer het filter niet op de juiste mani er ontlucht wordt vermindert de circulatie van het wate...

Страница 17: ...roble men vermeld die zich kunnen voordoen met daarnaast ook hun oplossing Indien u het pro bleem zelf niet kunt oplossen neem dan telefonisch contact op met de verkoper van uw zwembad Functie 4 GESLO...

Страница 18: ...en 4x40 4 5x50 mm vastgeschroefd Aan de trap wordt een houder bevestigd met hoekijzers 50x50x25 vijzen 4x40 4x40 mm Aan de kant van het zwembad waar de houten trap zal geplaatst worden moet ook een la...

Страница 19: ...nnenkant van de afdekplank 2 U boort twee gaten voor de houders met klokboor diameter 50 mm 80 mm 50 mm 3 Plaats de twee houders en schroef ze vast met de bijgeleverde bouten en moeren 4 Plaats de rub...

Страница 20: ...de kant waar de skimmer en de terugvoer zich bevinden Hierin wordt nu ook de filtereenheid geplaatst zie 4 Veiligheidsvoorschriften Volg de instructies op de bijgeleverde tekening Schroef 1 zijkant aa...

Страница 21: ...mstig de te overbruggen afstand naar de electrische koffer zie tabel in de bijgeleverde handleiding De onderwaterlamp mag enkel volledig ondergedompeld in het water aange schakeld worden _____ 3 6 LED...

Страница 22: ...tsing dient te gebeuren door een elektricien De lokale wetgeving en toepasbare voorschriften moeten gerespecteerd worden _____ 5 Onderhoud 5 1 Houten structuur Om het hout een lange levensduur te gara...

Страница 23: ...ar gebruik van een te sterke pomp ten opzichte van het m water in het zwembad Problemen ten gevolge van het gebruik van een te kleine filterton ten opzichte van het m water in het zwembad Garantie van...

Страница 24: ...la partie inf rieure de l ossature en bois avec un feutre de protection afin de pr venir tout contact entre la terre et l ossature Ce feutre constitue en fait la s paration entre la structure et le s...

Страница 25: ...an ais plastique feutre anti bact rie inclus 15 cm plastique feutre anti bact rie 50 cm 15 cm feutre de protection non inclus terre terre sable stabilis position hors sol position enterr drainage sabl...

Страница 26: ...la planche doit se trouver l int rieure de la piscine Les planches sont pourvues d une encoche et ou d une languette Ce qui permet d embo ter avec pr cision toutes les rang es les unes dans les autres...

Страница 27: ...6 2 2 2 Montage 1 2 3 4 1 2 3 4 feutre anti bact rie Apr s que la dalle soit s che d ployez soigneusement le feutre anti bact rien vitez que le feutre fasse des plis 2 3 4 7x110mm M12 Pas applicable...

Страница 28: ...on seront alors plus facilement limin es par le skimmer Avant de monter la derni re rang e ins rez le skimmer Le skimmer se fixe aux quatre coins l aide de 4 vis inox 3 5x20 mm pas de trous pr usin s...

Страница 29: ...gelles uniform ment de la piscine 4x30mm Les margelles sont soutenues par des querres R partissez les querres gale distance sur le pourtour de la piscine Forez les querres 12 mm du bord sup rieur de l...

Страница 30: ...che La mise en place du liner doit s effectuer correctement Celui ci doit avoir au mini mum une temp rature de 18 C afin de parvenir l lasticit n cessaire Il faudra en effet par la suite effectuer la...

Страница 31: ...s en sorte que les trous dans le joint correspon dent avec ceux du skimmer Vissez y le couvercle de finition vis cor respondants dans la boite du skimmer D coupez pr sent le contour du skimmer Cliquez...

Страница 32: ...Demandez l avis du fabricant pour toute modification d un ou plusieurs l ments du syst me de filtration Suivez les instructions du mode d emploi de l unit de filtration Le groupe monobloc filtre assur...

Страница 33: ...ne rentre dans la bouche du collecteur Versez le gravier dans le filtre 3 5mm et en suite le sable 0 4 0 8mm Le sable a une du r e de vie illimit e N ajoutez du sable qu en cas de perte Marquez le ni...

Страница 34: ...nne et placez y le manom tre La pompe et le filtre sont raccord s l aide d un tuyau semi rigide 9 10 Vissez les raccords dans le filtre et la pompe Glissez les manchons puis les rallonges sur les deux...

Страница 35: ...ans les deux sens Raccordement de l unit de filtrati on la piscine Suivez le plan Raccordez les 2 skim mers la pi ce T 4 et 9 coller l aide du tuyau semi rigide Collez un tuyau semi rigide au 3i me bo...

Страница 36: ...kimmer suite un niveau d eau insuffisant dans la piscine apr s un usage inappropri de l appareil bouchon l aspiration ou bouchon au skimmer Si des bulles d air apparaissent dans le refoulement le filt...

Страница 37: ...e vous m me prenez contact par t l phone avec le vendeur de la piscine Fonction 4 FERMEE Le clapet est plac en position ferm e closed pour viter que l eau circule via les flexibles et le filtre Ne d m...

Страница 38: ...la structure et se vissent de part et d autre de chaque marche 2 vis 4x40 4 5x50 mm La main courante se fixe l aide d querres 50x50x25 vis 4x40 4x40 mm A l endroit o l escalier viendra fixez une latte...

Страница 39: ...ord de l embout jusque celui de la margelle 2 forez 2 trous pour les tuis gr ce la foreuse de 50 mm de diam tre 80 mm 50 mm 3 placez les 2 tuis et vissez les avec les boulons et crou fournis 4 placez...

Страница 40: ...e ou le d tacher Vous accolez le local technique la piscine en le vissant du c t du skimmer et du refoulement Vous y placez ensuite l unit de filtration voir 4 S curit Suivez les instructions du plan...

Страница 41: ...ableau dans la notice fournie Le projecteur immerg ne peut tre branch que lorsqu il se trouve compl te ment sous eau _____ 3 6 Projecteur sous marin LED Projecteur sous marin LED 35W 12V 16 couleurs r...

Страница 42: ...st main tenant mont e Afin de prolonger la dur e de vie du bois vous pouvez le traiter avec un vernis sp cial consultez votre revendeur Si vous pr f rez l aspect naturel nul besoin de traiter le bois...

Страница 43: ...nts Probl mes li s une pression sup rieure la pression maximum d utilisation de 1 2 bars ou li s l utilisation d une pompe trop puissante par rapport au dimen sionnement des l ments du circuit hydraul...

Страница 44: ...en structure with a protective felt layer to ensure that the structure never touches the ground directly This forms the division between the structure and the stabilized sand with which you filled the...

Страница 45: ...45 ENGLISH plastique anti bacterial felt included 15 cm plastic foil anti bacterial felt 50 cm 15 cm protective felt not included ground ground stabilized sand above ground inground drainage sand 1 2...

Страница 46: ...e the correct planks in the correct order Identification of the plank always on the inside of the swimming pool The swimming pool planks are provided with tongue and or grooves This ensures a perfect...

Страница 47: ...ssembly 1 2 3 4 1 2 3 4 anti bacterial felt Once the foundation has dried completely the anti bacterial felt is carefully spread across the surface Avoid unevenness in the felt 2 3 4 7x110mm M12 Not a...

Страница 48: ...placing the last layer the skimmer must be fitted between the planks The skimmer is fixed to the planks in the corners of the skimmer no pre made drill holes with four 3 5x20mm stainless steel screws...

Страница 49: ...order planks equally around the circumference of the pool 4x30mm The borders are supported by L brackets Distribute theses equally around the circumference of the pool Screw the L brackets into place...

Страница 50: ...sticity An opening must be cut for the skimmer and the water return device TIP Store the liner some days in advance at room temperature You can tape the corners of the pool in order to prevent folds i...

Страница 51: ...sure that the screw holes in the seal ring match those of the skimmer Now screw on the finishing cap corresponding screws in the skimmer box Now cut out the piece of liner in the skim mer mouth Then...

Страница 52: ...t be equipped with 12V low voltage current Every electrical device of 220V must be placed at a minimum of 3 50 m from the swimming pool For each change to one or more elements of the filter kit ask th...

Страница 53: ...ng into the mouthpiece of the branch pipe Fill the filter first with gravel 3 5mm and then with sand 0 4 0 8mm The sand has an unlimited lifetime and only need to be topped up in case sand is lost Mar...

Страница 54: ...fit the manometer The pump and filter are interlinked by a semi flexible tube 9 10 Screw the connector pieces into the filter and the pump Slide the fittings and the inserts over both ends of the hos...

Страница 55: ...ng without a rub ber packing you are advised to apply Teflon to the thread or nipple in order to maintain it s waterproof capacity Taps Prepare the connectors to the tap in the same way as the couplin...

Страница 56: ...ition Function 1 FILTER Place the valve in the filter position The water comes out of the pump and is filtered by streaming downwards through the sand and then returning the pool Do not filter for mor...

Страница 57: ...of problems are mentioned that can occur along with the suggested remedies In case you can t solve the problem yourself please contact the sales representative for your pool _____ 2 5 Finishing touche...

Страница 58: ...ide of the coping 2 Bore out two holes for the holders with a brace diameter 50 mm 80 mm 50 mm 3 Place the two holders and screw them with the screws which were also supplied 4 Place the rubber pieces...

Страница 59: ...de of the pool where the skimmer and water return device are situated The filter unit is also placed inside this See 4 Safety Follow the instructions in the enclosed drawing Screw one side to the pool...

Страница 60: ...le in the manual provided The underwater lamp must not be switched on unless it is completely submersed under water _____ 3 6 Underwater light LED Underwater light LED 35W 12V 16 colours adjustable wi...

Страница 61: ...before opening the tech nical room Only then can you access the area Plugs are not accessible in this case due to the danger of electrocution _____ 4 1 General The borders are not intended to run on n...

Страница 62: ...he bottom of the pool the vacuum cleaner is attached to the brush telescopic stick and is connected to the skimmer _____ 5 3 Technical installation Check the pump once a year to ensure good performanc...

Страница 63: ...erioration due to dry use of the pump Deterioration due to abrasion or corrosion Deterioration due to a wrong connection Materials dismantled or repaired by a third party Breakage of pieces base of th...

Страница 64: ...damit die Struktur die Erde nirgendwo direkt ber hrt die unterirdischen Holzteile mit einem Schutzfilz bedecken Der Filz trennt die Struktur vom stabilisierten Sand mit dem Sie nach der Montage des S...

Страница 65: ...DEUTSCH Plastikfolie antibakterielle Filz enthalten 15 cm Plastikfolie antibakterielle Filz 50 cm 15 cm Schutzfilz nicht enthalten Erde Erde stabilisierten Sand Auf dem boden eingegraben Abfluss Sand...

Страница 66: ...ifikation vom Brett immer an der Innenseite des Schwimmbads Die Bretter des Schwimmbads verf gen ber eine Nut und oder einen Zinken damit die verschiedenen Schichten gut aufeinander passen Die Enden d...

Страница 67: ...6 2 2 2 Montage 1 2 3 4 1 2 3 4 antibakterielle Filz Nach dem Trocknen der Platte wird der antibakterielle Filz sauber aufgespreizt Vermeiden Sie Unebenheiten im Filz 2 3 4 7x110mm M12 Nicht anwendbar...

Страница 68: ...mmer ableiten Bevor Sie die letzte Schicht anbringen ist der Skimmer zwischen die Bretter einzuf hren Der Skimmer wird mit 4 St ck Inox Schrauben 3 5 x 20mm in den Ecken des Skimmers an den Brettern b...

Страница 69: ...Abdeckbretter gleichma ig um das Schwimmbad herum 4x30mm Die Abdeckbretter werden durch L Klammern unterst tzt Verteilen Sie die Anzahl L Klammern gleichma en um das Schwimm bad herum Drehen Sie die...

Страница 70: ...t elasticity An opening must be cut for the skimmer and the water return device TIP Store the liner some days in advance at room temperature You can tape the corners of the pool in order to prevent fo...

Страница 71: ...Sorgen Sie daf r dass die Schrauben l cher des Dichtungsringes bereinstim men mit denen des Skimmers Schrauben Sie jetzt die Verarbeitungs haube darauf dazugeh rige Schrauben befinden sich im Karton...

Страница 72: ...entil Entleerungskappe Netzkabel Verbindungsleitung Die Pumpe darf nie mehr als 4 Meter h her sein als den Filtereingang und soll in einem trockenen Raum aufgestellt werden Die Pumpe ist j hrlich zu i...

Страница 73: ...e dass Sand oder Kies in des Mundst ck des Abzweigrohrs gelangt F llen Sie das Filter zuerst mit Kies und dann mit Sand Der Sand hat eine unbegrenzte Lebens dauer und ist nur nachzuf llen wenn er verl...

Страница 74: ...nometer Verbinden Sie die Pumpe und das Filter ber eine halbbiegsame Leitung mitein ander 9 10 Drehen Sie die Verbindungsteile in das Filter und in die Pumpe Schieben Sie die Fassungen und danach die...

Страница 75: ...chtring in die Fassung Drehen Sie die Mutter der Fassung fest So wird die Verbindung vollkom men wasserdicht Bei einer Kupplung ohne Gummipa ckung ist am Gewinde der Kupplung oder des Nippels Teflon a...

Страница 76: ...Filter entl ften wenn Sie ein neues Ger t oder eines das l nger nicht verwendet wurde in Betrieb nehmen au erdem nachdem Sie einen Bodensauger eingesetzt haben wenn der Skimmer infolge eines niedrigen...

Страница 77: ...ige po tentiell auftretende Probleme und deren L sungsm glichkeiten angef hrt K nnen Sie das Problem nicht selbst l sen rufen Sie bitte den H ndler Ihres Schwimmbads an Funktion 4 GESCHLOSSEN Das Vent...

Страница 78: ...aubt An der Treppe wird eine Halterung mit Winkeleisen befestigt 50 x 50 x 25 Schrauben 4 x 40 4 x 40 mm An der Seite des Schwimmbades an der die h lzerne Treppe angebracht werden soll ist auch eine L...

Страница 79: ...her f r die Halter mit einem Bohrer mit Diameter 50 mm 80 mm 50 mm 3 Befestigen Sie die zwei Halter und schrauben Sie sie die Erdung fest Die Erdung verringert Rost au er mit Elektrolyse 4 Befestigen...

Страница 80: ...Seitenrand fest Dieser angebaute Technikraum ist in drei verschiedenen Abmessungen erh ltlich Das freistehende Modell mit 4 W nden errichten Sie auf analoge Weise _____ 3 5 Filz Der Filz ist in Rollen...

Страница 81: ...ht nutzen empfehlen wir es abzudecken _____ 4 2 Technische Installation Der Technikraum kann sich n her als 3 5 m vom Schwimmbad entfernt befinden vorausgesetzt er ist mit einem Schloss verriegelt und...

Страница 82: ...spizieren Sie j hrlich die Pumpe um eine ordnungsgem e Funktion zu garantieren Die Filterpumpe ist normalerweise wartungsfrei Wenn Sie jedoch das Filter f r sehr verschmutzte Schwimmb der einsetzen fr...

Страница 83: ...durch Trockenpumpen Sch den durch berschwemmen oder berfluten Sch den durch Reibung oder Korrosion Sch den durch einen defekten An schluss Sch den durch eine ohne Vorfilter einge setzte Pumpe Durch Dr...

Страница 84: ...ltro per assicurarsi che la struttura non venga mai a contatto diret tamente con il terreno tenendo separata la struttura dalla sabbia stabilizzata con cui si andranno a riempire i vuoti dopo il monta...

Страница 85: ...telo in plastica feltro antibatterico incluso 15 cm telo in plastica feltro antibatterico 50 cm 15 cm feltro protettivo non incluso terreno terreno sabbia stabilizzata fuoriterra interrata drenaggio...

Страница 86: ...appropriate secondo l ordine corretto L identificazione della tavola deve sempre essere all interno della piscina Le tavole della piscina sono dotate di linguette e o scanalature per assicurare un fi...

Страница 87: ...ontaggio 1 2 3 4 1 2 3 4 feltro antibatterico Quando le fondamenta sono completamente asciutte sulla superficie deve essere disteso il feltro antibatterico evitando irregolarit 2 3 4 7x110mm M12 Non a...

Страница 88: ...Prima di montare l ultimo strato necessario inserire lo skimmer fra le tavole Lo skimmer viene fissato alle tavole per gli angoli dello skimmer stesso non preforato con quattro viti in acciaio inossi...

Страница 89: ...sidabile Distribuire del bordo in modo uniforme della piscina 4x30mm I bordi vengono sostenuti da staffe a L Esse vanno collocate in modo equidistante intorno alla circonferenza della piscina Avvitare...

Страница 90: ...ent elasticity An opening must be cut for the skimmer and the water return device TIP Store the liner some days in advance at room temperature You can tape the corners of the pool in order to prevent...

Страница 91: ...llo skimmer Ora fissare il coperchio le viti corrispond enti si trovano nella scatola dello skim mer Tagliare la parte del rivestimento interna allo skimmer Quindi inserire la placchetta di copertura...

Страница 92: ...no metallico 10 Manometro 11 pompa 12 Viti dadi per la pompa 13 Tubo 2 4 Installazione delle parti tecniche 2 4 1 Parti Seguire le istruzioni contenute nel manuale allegato per l installazione del fil...

Страница 93: ...er 1 3 Assicurarsi che la protezione in plastica imbuto sia sopra al filtro per evitare la caduta di sabbia ghiaia nell imboccatura del tubo di raccordo Riempire il filtro prima con la ghiaia e poi co...

Страница 94: ...iltro 8 Ora applicare del nastro in Teflon sulla filettatura esterna del manometro Svitare la valvola piccola sul lato della valvola principale per inserire il manometro La pompa e il filtro sono coll...

Страница 95: ...tagno Nel caso di attacchi senza guarnizione in gomma si consiglia di applicare del Teflon alla filettatura o al nipplo per preservarne la capacit impermeabile Rubinetti Preparare i connettori del rub...

Страница 96: ...a e quindi una di minuzione dell efficacia della depurazione attraverso la sabbia con anche il rischio di danni al motore Il filtro deve essere svuotato dell aria al primo utilizzo di un nuovo disposi...

Страница 97: ...il problema da soli contattare il rappresentante di vendita della propria piscina Funzione 4 CHIUSO Posizione che chiude tutte le uscite della valvola a 6 vie per la pulizia del pre filtro Assicurarsi...

Страница 98: ...lato 4x40 4 5x50 mm Un angolo viene fissato ai gradini 50x50x25 vite 4x40 4x40 mm Sul lato della piscina dove andranno collocati i gradini in legno necessario fissare un pezzo di legno di pino viti 5...

Страница 99: ...dall interno della copertura 2 Fare due fori per i fermi con un dia metro di 50 mm 80 mm 50 mm 3 Posizionare i due fermi e fissarli con messa a terra 4 Posizionare i gommini alle estremit dei gradini...

Страница 100: ...perfettamente angolata Quindi avvitare gli altri lati Questo alloggiamento integrato disponibile in tre diverse misure Il modello indipendente a 4 lati viene montato in modo simile _____ 3 5 Feltro Il...

Страница 101: ...interno della piscina Quando la piscina non in uso si consiglia di coprirla Non camminare sui teloni impermeabili _____ 4 2 Installazione delle parti tecniche L alloggiamento per le parti tecniche pu...

Страница 102: ...una volta l anno per garantirne un buon funzionamento In genere la pompa del filtro non neces sit di manutenzione ma l uso frequente del filtro in piscine molto sporche potrebbe provocare il blocco d...

Страница 103: ...vione o inon dazione danni provocati da crepe o corrosione danni conseguenti a allaccio errato danni provocati da uso della pompa senza pre filtro materiale smontato o riparato da terzi rottura dei co...

Страница 104: ...Koolskampstraat 21 B 8830 Gits T 32 0 51 21 13 48 info exteriorliving be www exteriorliving be inspired by www exteriorliving be...

Отзывы: