USER GUIDE
12-Channel Thermocouple Datalogger
Model TM500
netzerotools.com
Extech TM500 12 Channel Thermocouple Datalogger Type J K E T R S
Страница 1: ...USER GUIDE 12 Channel Thermocouple Datalogger Model TM500 netzerotools com netzerotools com netzerotools com Extech TM500 12 Channel Thermocouple Datalogger Type J K E T R S ...
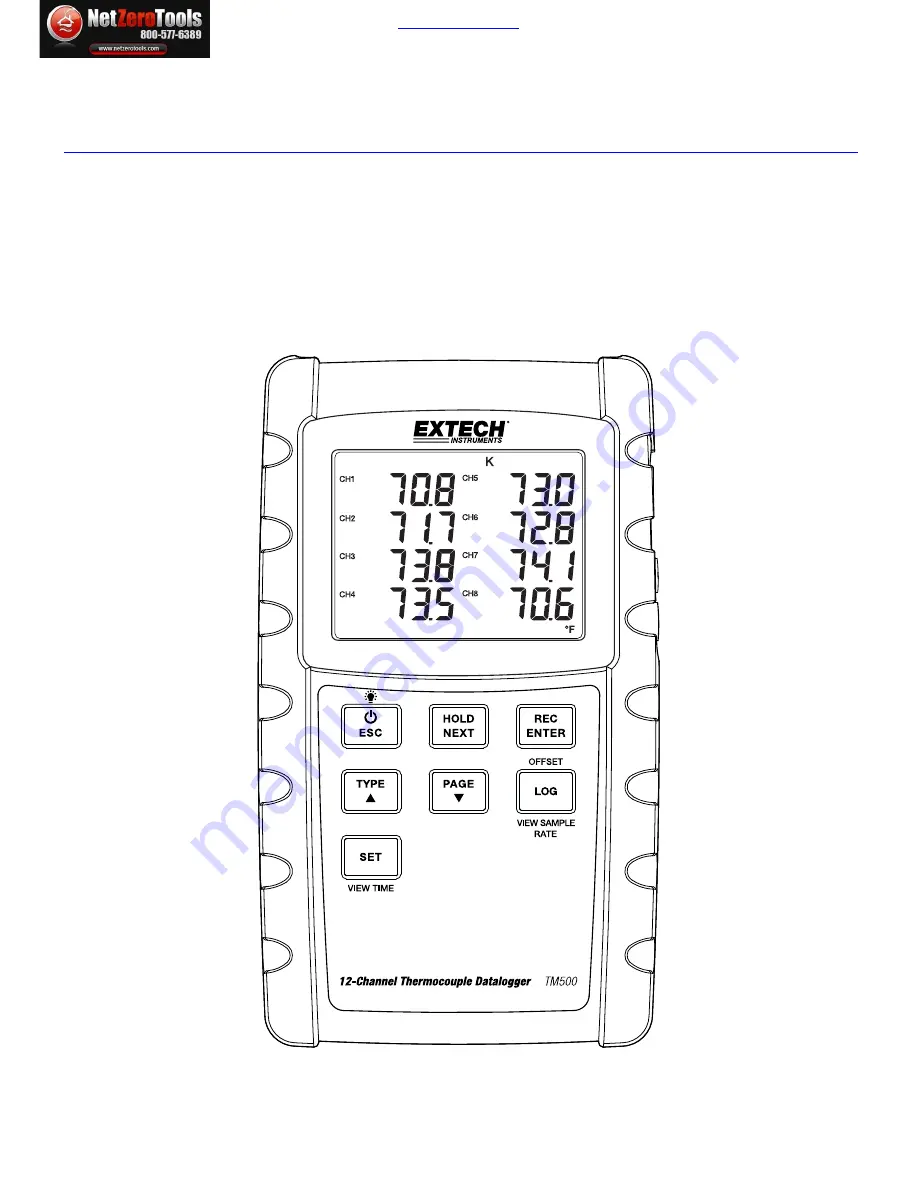
Страница 2: ...per use will provide years of reliable service Please visit the Extech Instruments website to check for the latest version of this User Guide Meter Description 1 Thermocouple inputs 2 DC power adapter SD memory slot and PC interface jack 3 Power ON OFF and Backlight key 4 HOLD and NEXT key 5 Power ON OFF and ESC key 6 REC and ENTER 7 TYPE key K J T R E or S 8 LOGGER Offset key 9 SET Time Check key...
Страница 3: ... that the adaptor is connected correctly to the meter and to an AC source refer to the AC Power Adaptor section later in this guide Connecting Thermocouple Sensors This meter can accept Thermocouple temperature probe Types K J T E R or S Connect up to twelve 12 thermocouples to the sub miniature jacks at the top of the meter labeled T1 through T12 Select the desired mode of operation and other set...
Страница 4: ...nds 5 The available Setup parameters are listed below Additional detailed information is provided below this list dAtE Set the clock Year Month Date Hours Minutes Seconds LooP Start and End a loop measurement cycle dEC Set the numerical format USA decimal 20 00 or European comma 20 00 PoFF Automatic power off Enable or disable the auto power off function bEEP Set the beeper sound ON OFF t CF Selec...
Страница 5: ... is used to separate units from tenths i e 20 00 The European format uses a comma i e 20 00 to separate units from tenths To change this setting 1 Access the dEC parameter 2 Use the arrow buttons to select USA or EUro Press ENTER to confirm setting 3 Press the ENTER button to exit to the Setup mode Press ESC to exit setup mode Setting Poff Enabling Disabling the Auto Power OFF Feature 1 Access the...
Страница 6: ... and 3600 seconds Use 0 for manual logging mode A sampling rate 1 second is recommended 3 Press the ENTER button to confirm the entry 4 Press the ENTER button to exit to the Setup mode Press ESC to exit setup mode SD Card FORMATTING 1 Access the Sd F parameter 2 Use the arrow buttons to select YES to format the card select NO to abort Note that all data on the card will be lost if formatting is at...
Страница 7: ...re 2 Use the up and down arrow keys to adjust the display on the right to offset the display as desired 3 When finished press the ENTER button to store the offset and return to normal operation 4 All of the thermocouple readings will now reflect the offset value programmed by the user To clear the OFFSET follow the steps below 1 Switch the meter power OFF 2 Press and hold the HOLD and REC buttons ...
Страница 8: ...the display backlight ON or OFF press the backlight button momentarily The meter will beep when switching the backlight ON or OFF unless the beeper is disabled as described in the Setup Mode section of this user guide Time Check Momentarily press the SET button and the meters current Date and Time will appear in the lower left corner of the display Sampling Time Check When in normal mode press the...
Страница 9: ...d the logger s clock set to allow for accurate date time stamping during datalogging sessions Refer to the Setup Mode section for SD card formatting and time date setting instructions European and USA numerical formats differ The data on the SD card can be formatted for either format The meter defaults to USA mode where a decimal point is used to separate units from tenths i e 20 00 The European f...
Страница 10: ... 5 To pause the datalogger press the LOGGER button momentarily The DATALOGGER and REC icons will stop flashing To resume logging simply press the LOGGER button again momentarily 6 To terminate the datalogging session press the LOGGER button to stop the logging and then press the REC button for at least 1 5 seconds 7 When an SD card is used for the first time a folder is created on the card and nam...
Страница 11: ...cal datalogging 2 With the meter switched OFF remove the SD Card 3 Plug the SD Card directly into a PC SD card reader If the PC does not have an SD card slot use an SD card adaptor available at most outlets where computer accessories are sold 4 Power the PC and run a spreadsheet software program Open the saved documents in the spreadsheet software program see example spreadsheet data screens below...
Страница 12: ...ing polarity Replace the battery compartment cover with the two 2 Phillips screws Battery Safety Reminders Never dispose of batteries in a fire Batteries may explode or leak Never mix battery types Always install new batteries of the same type As consumers users are legally required to take used batteries to appropriate collection sites the retail store where the batteries were purchased or wherev...
Страница 13: ...ss on slower computers Memory Card SD memory card 1G to 16GB size Temperature Compensation Automatic compensation for all thermocouple types Display update rate Approx 1 second Data Output RS 232 USB PC computer interface 9600 N 8 1 Operating Temperature 0 to 50 C 32 to 122 F Operating Humidity 85 R H maximum Auto Power OFF After 10 minutes of inactivity can be disabled Power Supply Eight 8 1 5 VD...
Страница 14: ...o 999 9 C 0 4 0 5 C 1 C 1000 to 1300 C 0 4 1 C 0 1 F 148 0 to 58 1 F 0 4 1 8 F 58 0 to 999 9 F 0 4 1 F 1 F 1000 to 2372 F 0 4 2 F Type J 0 1 C 100 0 to 50 1 C 0 4 1 C 50 0 to 999 9 C 0 4 0 5 C 1 C 1000 to 1150 C 0 4 1 C 0 1 F 148 0 to 58 1 F 0 4 1 8 F 58 0 to 999 9 F 0 4 1 F 1 F 1000 to 2102 F 0 4 2 F Type T 0 1 C 100 0 to 50 1 C 0 4 1 C 50 0 to 400 0 C 0 4 0 5 C 0 1 F 148 0 to 58 1 F 0 4 1 8 F 58...