background image


1.3 Reading the LED Status 

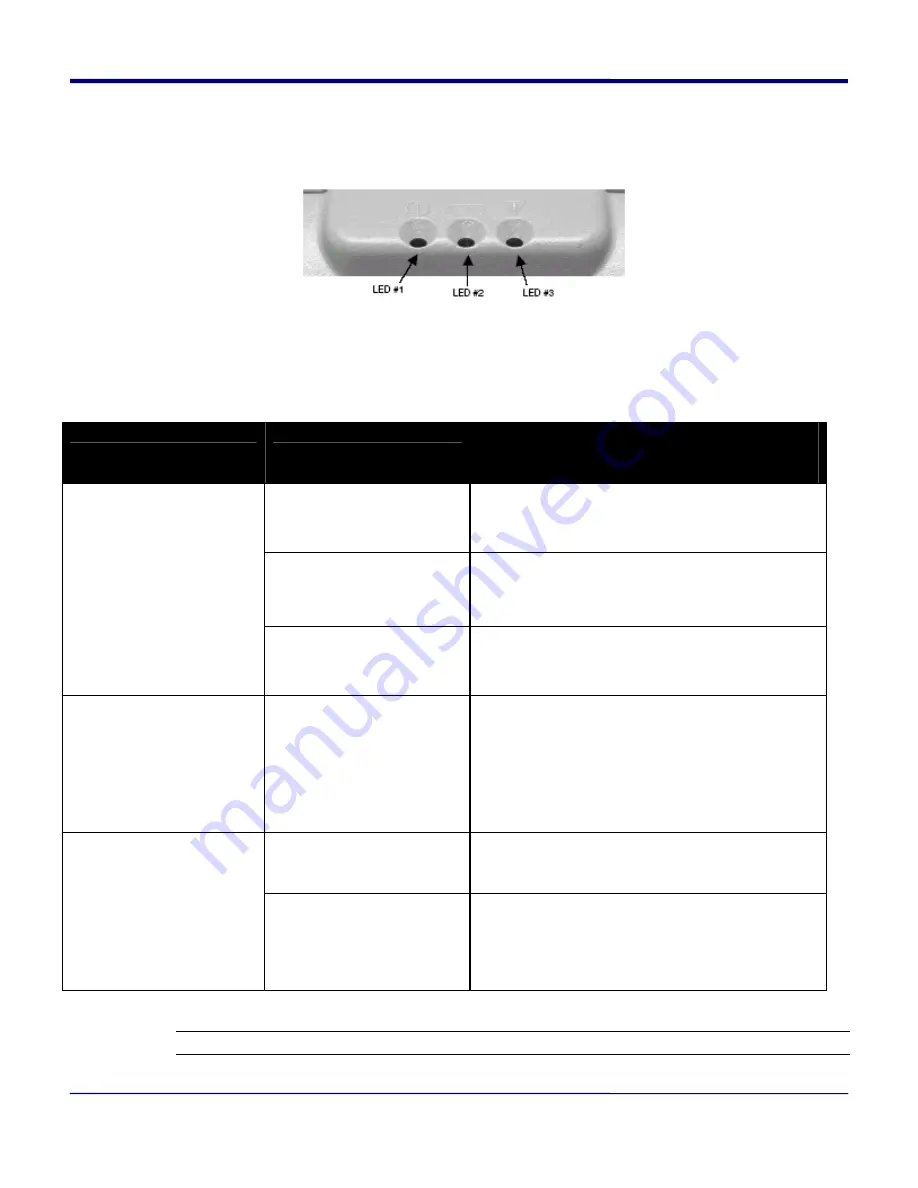
The illustration below points out the location of the LED indicators described in Table 1

.  


FIGURE 4:  LED INDICATOR LOCATIONS 


This table explains the LED indicator status. Refer to Figure 1 for the locations described for 
ON/OFF and FEED pushbutton switches and AC adaptor socket


Table 1 - Reading the LED Status 

LED Indicator 

State 


Status 


GREEN 

If the LED’s Color is Green it indicates that 
Power is ON and that the printer is in RS232 

or IrDA mode 

PURPLE/ORANGE 

If the LED’s Color is PURPLE it indicates LOW 
power in Bluetooth (BT) mode. If it is 

ORANGE it indicates low power in RS232 
mode. 

LED #1 

BLUE 

If the LED’s Color is Blue it indicates that 

Power is ON and that the printer is in 
Bluetooth mode 

LED # 2 

YELLOW 

The battery charger is being charged at a 

fast rate. If the battery is below 5V, the 
battery is being “trickle” charged until the 

battery voltage reaches 5V, and then the 
fast charge rate is started. The LED will turn 

off when the battery is fully charged.  
 

GREEN 

ƒ


Indicates that MCR is ready to accept 
data. 


LED # 3 

RED 

ƒ


Indicates a fault condition or a printer 
error. The printer is not ready to accept 

data. 

ƒ


Printer is out-of-paper. 


Note: Refer to the troubleshooting guide to determine error or fault condition. 


1500T User’s Guide 

                              Rev 2.1 


9


Содержание S1500T

Страница 1: ...S S1 15 50 00 0T T U Us se er r G Gu ui id de e Revision 2 1 10 01 2007...

Страница 2: ...onnecting the Printer 13 3 2 Connecting the Printer 14 3 3 Serial Communication 15 3 4 Infrared Communications IrDA 16 3 5 Bluetooth Communication Option 17 3 6 Magnetic Stripe Reader Option 18 3 7 Pr...

Страница 3: ...5 3 Regulatory Notes 28 6 Customer Support 29 6 1 Online Technical Assistance 29 6 2 Technical Support Request 29 1500T User s Guide Rev 2 1 3...

Страница 4: ...and 17 and Low Voltage Directive 73 23 EEC EN 61131 2 Conforms to the following regulation and or standards FCC Part 15 Subpart B Class B CE EN60950 CE EN55022 Class B CE EN61000 3 2 CE EN61000 3 3 CE...

Страница 5: ...ed for servicing at an Authorized Service Center Other than routine maintenance described in this manual the user should not attempt to repair service or disassemble this product Incorrect operation h...

Страница 6: ...restaurants ticketing and many others where point of service receipts are required The package contains S1500T Printer Battery Cartridge Universal AC Adaptor US UK European and Australian plugs for c...

Страница 7: ...he battery Note Refer to the illustration below to install the battery pack in the printer Unlock the battery door by sliding the battery door locking tab down Open the battery door to an angle of abo...

Страница 8: ...wall mounted charger is not supplied with plugs for use in Korea Model S1500T Input Voltage Current 100 240 VAC 0 4A Input Frequency 47 63 Hz Output Voltage Current 10VDC 1 32A Do not use a charger n...

Страница 9: ...power in Bluetooth BT mode If it is ORANGE it indicates low power in RS232 mode LED 1 BLUE If the LED s Color is Blue it indicates that Power is ON and that the printer is in Bluetooth mode LED 2 YEL...

Страница 10: ...printer into the slot of the connector Pull down until you hear a click The printer is now secure Place the loop over your belt Allow the printer to hang down on the left or right hip To release the...

Страница 11: ...URE 5 OPENING PAPER DOOR Note Paper Door Release button must be depressed when opening and closing paper door Place the paper roll into the paper supply well Make sure the paper supply unwinds from th...

Страница 12: ...or glue the core will be pulled into the mechanism causing jamming and possible gear damage Proper paper roll supplies are available from Extech as P N 757060 2 2 Tearing Paper The printer s paper do...

Страница 13: ...IrDA mode the printer will stay on all the time Press the On Off switch to turn the printer off The green LED turns off To start the self test press and hold the FEED switch then press the On Off swit...

Страница 14: ...Parameters Baud Rate Data Bit and Parity must be set Note Optional serial cable is available for Serial RS232 communication part 5892RJD9 Printer drivers for Windows 95 98 NT 2000 and XP are availabl...

Страница 15: ...ontrol Continuous Power On On Auto Power Off Off DEFAULT 6 7 Parity bit SW6 SW7 No Parity Off Off DEFAULT Odd Parity On Off Even Parity On On 8 Printer Power Control SW8 Hardware control Continuous Po...

Страница 16: ...n the OFF position 3 4 Infrared Communications IrDA Dip Switch 1 must be in the ON position The printer can be powered up by pressing the power On Off switch If no IrDA connection is made the printer...

Страница 17: ...you turn Dip Switch 8 ON it will have the same effect as turning Dip Switch 4 ON but in order to turn the printer OFF you have to take the battery out otherwise it will go into low power mode but neve...

Страница 18: ...ipe the card through the reader either left to right or right to left The magnetic stripe must be facing toward the paper supply door as indicated below while it is passed through the reader FIGURE 9...

Страница 19: ...OFF 13 19 Printer receiver is off NORM 14 20 Return to default AUXOFF 15 21 Printer to Host printer is off CANCEL 18 24 Cancel and reset printer BUFFER ESC 1B 27 Escape EXTEND 1C 28 Extended print EXT...

Страница 20: ...e characters printed as received ESC P Select Buffer mode characters are printed on D ESC V n1 n2 8 bit Graphic command ESC v n1 n2 RLE Compressed Graphic command 3 7 5 Magnetic Card Reader Commands W...

Страница 21: ...et Out of Paper Sensitivity ESC Q F m Set Forward Black Mark Seek ESC Q B m Reverse Black Mark Seek 3 7 7 Printer Supervisory and Control Commands Command String Printer Action V Buffer power timer ba...

Страница 22: ...the swab across the black mark sensor to remove any build up Moisten another cotton swab and rub the swab across the tear bar to remove any build up Note You may experience dust build up depending on...

Страница 23: ...incorrect type Follow instructions in Section 4 5 to dispose used batteries 4 3 Verifying Battery Charge State We strongly recommend testing your printer before returning it to Extech Follow these st...

Страница 24: ...40 F to 104 F 4 C to 40 C Do not store a fully charged battery at temperatures greater than 104 F 40 C for long periods of time the battery may permanently lose charge capacity The recommended temper...

Страница 25: ...the print head following the cleaning instruction listed in Section 4 1 Red Error LED on Check that paper roll is not out Error reading MCR After extended printing print head may be hot printer will p...

Страница 26: ...57 mm 5 rolls per pack 757060 CASE Thermal Paper Case of 200 757150 Thermal Print Head Cleaning Pen 757160 Magnetic Card Reader Cleaning Cards 5 per order 757351 Shoulder Strap with Quick Clip 767400...

Страница 27: ...and bold Large rotated Supported Bar Codes Codabar Code 39 UCC EAN 128 UPC EAN JAN Interleaved 2 of 5 Code 128 Memory 32K SRAM 256K 32K Flash Charging Time Approximately 180 minutes Communications RS...

Страница 28: ...tion is subject to the following two conditions 1 this device may not cause harmful interference and 2 this device must accept any interference received including interference that may cause undesired...

Страница 29: ...bleshooting Guide http www extech com printer techSupport troubleShootGuide html 6 2 Technical Support Request If you need technical assistance regarding software hardware or operation of Extech print...

Страница 30: ...Portable Printer Division http www extech com Printer Copyright 2007 Extech Instruments Corporation All rights reserved including the right of reproduction in whole or in part in any form...

Отзывы: