User's Guide
True RMS Multimeter Extech 430
Test Equipment Depot - 800.517.8431 - 99 Washington Street Melrose, MA 02176
FAX 781.665.0780 - TestEquipmentDepot.com
Страница 1: ...User s Guide True RMS Multimeter Extech 430 Test Equipment Depot 800 517 8431 99 Washington Street Melrose MA 02176 FAX 781 665 0780 TestEquipmentDepot com ...
Страница 2: ...a potentially hazardous situation which if not avoided could result in death or serious injury This CAUTION symbol indicates a potentially hazardous situation which if not avoided may result damage to the product This symbol advises the user that the terminal s so marked must not be connected to a circuit point at which the voltage with respect to earth ground exceeds in this case 600 VAC or VDC T...
Страница 3: ...00Vrms on 400mV range mA AC DC 500mA 250V fast acting fuse A AC DC 20A 250V fast acting fuse 30 seconds max every 15 minutes Frequency Resistance Capacitance Duty Cycle Diode Test Continuity 250Vrms for 15sec max Temperature 60V DC 24V AC 2 USE EXTREME CAUTION when working with high voltages 3 DO NOT measure voltage if the voltage on the COM input jack exceeds 600V above earth ground 4 NEVER conne...
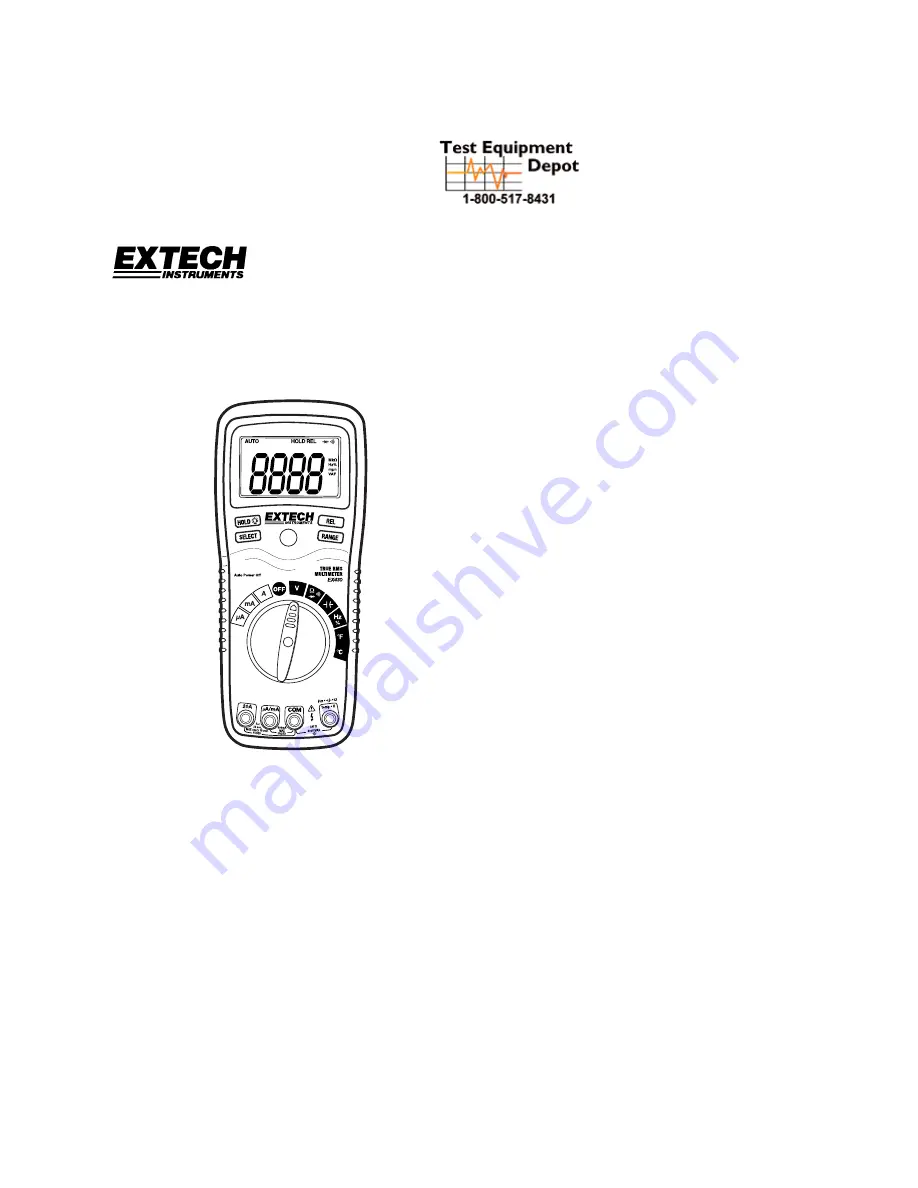
Страница 4: ... stand and battery compartment are on rear of unit Symbols and Annunciators Continuity Diode test Battery status Test lead connection error n nano 10 9 capacitance µ micro 10 6 amps cap m milli 10 3 volts amps A Amps k kilo 10 3 ohms F Farads capacitance M mega 10 6 ohms Ω Ohms Hz Hertz frequency V Volts Percent duty ratio REL Relative AC Alternating current AUTO Autoranging DC Direct current HOLD...
Страница 5: ...age 750V 1V 1 8 reading 6 digits 3 reading 8 digits 400µA 0 1µA 4000µA 1µA 40mA 0 01mA 400mA 0 1mA 1 5 reading 3 digits 4A 0 001A DC Current 20A 0 01A 2 5 reading 5 digits 50 to 400Hz 400Hz to 1KHz 400µA 0 1µA 4000µA 1µA 40mA 0 01mA 400mA 0 1mA 1 8 reading 8 digits 3 0 reading 7 digits 4A 0 001A AC Current 20A 0 01A 3 0 reading 8 digits 3 5 reading 10 digits NOTE Accuracy is stated at 65 o F to 83...
Страница 6: ...5 digits 500 0Hz 0 1Hz 5 000kHz 0 001kHz 50 00kHz 0 01kHz 500 0kHz 0 1kHz 1 2 reading 2 digits 5 000MHz 0 001MHz 10 00MHz 0 01MHz 1 5 reading 4 digits Frequency Sensitivity 0 8V rms min 20 to 80 duty cycle and 100kHz 5Vrms min 20 to 80 duty cycle and 100kHz 0 1 to 99 9 0 1 1 2 reading 2 digits Duty Cycle Pulse width 100µs 100ms Frequency 5Hz to 150kHz 4 to 1382 F 1 F Temp type K 20 to 750 C 1 C 3 ...
Страница 7: ...er second nominal Low Battery Indication is displayed if battery voltage drops below operating voltage Battery One 9 volt NEDA 1604 battery Fuses mA µA ranges 0 5A 250V fast blow A range 20A 250V ceramic fast blow Operating Temperature 41ºF to 104ºF 5ºC to 40ºC Storage Temperature 4 o F to 140 o F 20 o C to 60 o C Operating Humidity Max 80 up to 87ºF 31ºC decreasing linearly to 50 at 104ºF 40ºC St...
Страница 8: ...is normal and is caused by the high input sensitivity The reading will stabilize and give a proper measurement when connected to a circuit DC VOLTAGE MEASUREMENTS CAUTION Do not measure DC voltages if a motor on the circuit is being switched ON or OFF Large voltage surges may occur that can damage the meter 1 Set the function switch to the green V position 2 Press the SELECT button to indicate DC ...
Страница 9: ...let before assuming that no voltage is present CAUTION Do not measure AC voltages if a motor on the circuit is being switched ON or OFF Large voltage surges may occur that can damage the meter 1 Set the function switch to the green V position 2 Press the SELECT button to indicate AC on the display 3 Insert the black test lead banana plug into the negative COM jack Insert red test lead banana plug ...
Страница 10: ...w mA position and insert the red test lead banana plug into the µA mA jack 4 For current measurements up to 20A DC set the function switch to the yellow 20A range and insert the red test lead banana plug into the 20A jack 5 Press the SELECT button to indicate DC on the display 6 Remove power from the circuit under test then open up the circuit at the point where you wish to measure current 7 Touch...
Страница 11: ...ents up to 400mA AC set the function switch to the yellow mA position and insert the red test lead banana plug into the µA mA jack 4 For current measurements up to 20A AC set the function switch to the yellow 20A range and insert the red test lead banana plug into the 20A jack 5 Press the SELECT button to indicate AC on the display 6 Remove power from the circuit under test then open up the circui...
Страница 12: ...n switch to the green Ω position 2 Insert the black test lead banana plug into the negative COM jack Insert the red test lead banana plug into the positive Ω jack 3 Press the SELECT button to indicate Ω on the display 4 Touch the test probe tips across the circuit or part under test It is best to disconnect one side of the part under test so the rest of the circuit will not interfere with the resi...
Страница 13: ... wish to check 5 If the resistance is less than approximately 150Ω the audible signal will sound If the circuit is open the display will indicate OL DIODE TEST 1 Set the function switch to the green position 2 Insert the black test lead banana plug into the negative COM jack and the red test lead banana plug into the positive diode jack 3 Press the SELECT button to indicate on the display 4 Touch ...
Страница 14: ... Read the capacitance value in the display FREQUENCY MEASUREMENTS 1 Set the rotary function switch to the green Hz position 2 Insert the black lead banana plug into the negative COM jack and the red test lead banana plug into the positive Hz jack 3 Touch the test probe tips to the circuit under test 4 Read the frequency on the display DUTY CYCLE 1 Set the rotary function switch to the Hz position ...
Страница 15: ...the part whose temperature you wish to measure Keep the probe touching the part under test until the reading stabilizes about 30 seconds 4 Read the temperature in the display Note The temperature probe is fitted with a type K mini connector A mini connector to banana connector adaptor is supplied for connection to the input banana jacks Test Equipment Depot 800 517 8431 99 Washington Street Melros...
Страница 16: ...or 2 seconds Note Manual ranging does not apply for the Capacitance Frequency and Temperature functions RELATIVE MODE The relative measurement feature allows you to make measurements relative to a stored reference value A reference voltage current etc can be stored and measurements made in comparison to that value The displayed value is the difference between the reference value and the measured v...
Страница 17: ...er off after 15 minutes LOW BATTERY INDICATION The icon will appear in the lower left conner of the display when the battery voltage becomes low Replace the battery when this appears WRONG CONNECTION INDICATION The icon will appear in the upper right conner of the display and the buzzer will sound whenever the positive test lead is inserted into the 20A or uA mA input jack and a non current green ...
Страница 18: ...Y If it gets wet wipe it off 2 USE AND STORE THE METER IN NORMAL TEMPERATURES Temperature extremes can shorten the life of the electronic parts and distort or melt plastic parts 3 HANDLE THE METER GENTLY AND CAREFULLY Dropping it can damage the electronic parts or the case 4 KEEP THE METER CLEAN Wipe the case occasionally with a damp cloth DO NOT use chemicals cleaning solvents or detergents 5 USE...
Страница 19: ... by removing two screws B using a Phillips head screwdriver 3 Insert the battery into battery holder observing the correct polarity 4 Put the battery cover back in place Secure with the screw WARNING To avoid electric shock do not operate the meter until the battery cover is in place and fastened securely NOTE If your meter does not work properly check the fuses and battery to make sure that they ...
Страница 20: ...move the old fuse and install the new fuse into the holder 7 Always use a fuse of the proper size and value 0 5A 250V fast blow for the 400mA range 20A 250V fast blow for the 20A range 8 Align the center board with the connectors and gently press into place 9 Replace and secure the rear cover battery and battery cover WARNING To avoid electric shock do not operate your meter until the fuse cover i...