background image

Form No. 4503-736 Rev A

RED Equipped User’s Guide

WARNING

CALIFORNIA

Proposition 65 Warning

This product contains a chemical or chemicals known to the State of California

to cause cancer, birth defects, or reproductive harm.

Introduction

CONGRATULATIONS

on the purchase of your Exmark Mower with RED technology. The patented RED

Technology system is an onboard intelligence platform to help increase fuel efficiency. It enables communication
and response between key systems on the mower. The selectable operating modes on RED equipped mowers
enable operators to match power to specific mowing conditions. Efficient Mode offers peak performance power
with reduced fuel consumption, emissions, noise, and overall wear on the machine. Max Mode provides
increased power for operating in demanding conditions. Low Mode enables optimal operation in wet conditions
and helps reduce deck packing for a superior cut.

Important:

To maximize safety, performance, and proper operation of this machine, it is essential

that all operators carefully read and fully understand the contents of this User’s Guide along with
the Operator’s manual provided with the product. Safe operation of Exmark equipment is essential.
Failure to comply with the operating instructions or receive proper training may result in injury. Go
to http://www.Exmark.com for additional safe operation information, such as safety tips, training
materials, and Operator’s manuals.

The patented RED Technology system monitors engine temperature, oil pressure, and the overall electrical
system, placing the machine in Safe Transport Mode when critical thresholds are exceeded–allowing safe return
for servicing. A visual and audible warning of critical system issues is also displayed.

The patented RED Technology system increases clutch life and improves operator efficiency by automatically
adjusting the engine speed during PTO engagement/disengagement.

This manual will explain the Operator interface to allow users to access information, reset counters, and
modify system settings.

Exmark reserves the right to make changes or add improvements to its products at any time without
incurring any obligation to make such changes to products manufactured previously. Exmark, or its
distributors and dealers, accept no responsibility for variations which may be evident in the actual
specifications of its products and the statements and descriptions contained in this publication.

© 2017—Exmark Mfg. Co., Inc.
Industrial Park Box 808
Beatrice, NE 68310

www.Exmark.com

Original Instructions (EN)

Printed in the USA

All Rights Reserved

*4503-736* A


Содержание LZS850EKA724W0

Страница 1: ...ssential Failure to comply with the operating instructions or receive proper training may result in injury Go to http www Exmark com for additional safe operation information such as safety tips training materials and Operator s manuals The patented RED Technology system monitors engine temperature oil pressure and the overall electrical system placing the machine in Safe Transport Mode when criti...

Страница 2: ...llowing icons Gauge and Meters Processing Advanced Settings Battery Voltage Maintenance and Service Engine Hours Fuel Level Cancel Exit PTO Toggle Between Screens Park brake Enter Return Neutral Lock Located in top row of Information Screen Previous 2 ...

Страница 3: ...OPC Operator Presence Control Next Max Engine Speed Reset Efficient Engine Speed Play Start Low Engine Speed Pause Stop Transmission Oil Maintenance Increase Engine Oil Temperature Decrease 3 ...

Страница 4: ...Engine Oil Maintenance Yes No Located on bottom row of some menu screens 4 ...

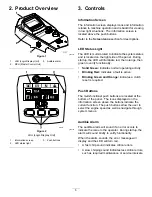
Страница 5: ...n to verify functionality Solid Green indicates normal operating activity Blinking Red indicates a fault is active Blinking Green and Orange indicates a clutch reset is required Push Buttons The multi functional push buttons are located at the bottom of the panel The icons displayed on the information screen above the buttons indicate the current function The push buttons allow the user to select ...

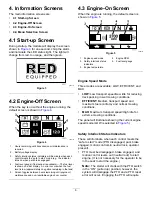
Страница 6: ...d non resettable engine hour counter 4 3 Engine On Screen When the engine is running the default screen is shown in Figure 5 g030173 Figure 5 1 Engine speed mode 4 Engine RPM 2 Safety interlock status indicators 5 Fuel level gauge 3 Engine temperature Engine Speed Mode Three modes are available LOW EFFICIENT and MAX LOW Low transport speed Low idle for reducing deck packing in wet mowing condition...

Страница 7: ...ay the engine temperature When the temperature is high and approaching an overheat condition the bar graph will flash When the engine has overheated the bar graph will be completely filled Engine RPM Displays the RPM of the engine Fuel Level if fuel sender is available The fuel level is shown on a bar display An error appears when the fuel level is low approximately one gallon remaining in the tan...

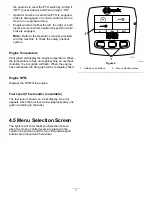
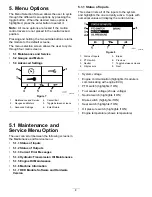
Страница 8: ...ion The user can scroll between the following screens in the Maintenance and Service menu 5 1 1 Status of Inputs 5 1 2 Status of Outputs 5 1 3 Current Error Messages 5 1 4 Hydraulic Transmission Oil Maintenance 5 1 5 Engine Oil Maintenance 5 1 6 Machine Information 5 1 7 RED Module Software and Hardware Version 5 1 1 Status of Inputs This screen lists all of the inputs to the system and highlights...

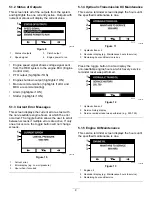
Страница 9: ...tween screens if multiple errors are active If only one error occurs the toggle button will not change screens g030185 Figure 10 1 Current error 2 Error display e g Low oil pressure 3 Hour when it occurred 5 1 4 Hydraulic Transmission Oil Maintenance This service reminder screen displays the hours until the specified maintenance is due g030186 Figure 11 1 Hydraulic trans oil 2 Reminder display e g...

Страница 10: ... 7 RED Module Software and Hardware Version The screen displays the current installed version of software and hardware for both the LDU Logic Display Unit and the MCU Master Control Unit Select the toggle button to see the MCU screen g030191 Figure 16 1 Module information 4 Software version 2 LDU 5 Toggle 3 Hardware version g030192 Figure 17 1 Module information 3 Hardware version 2 MCU 4 Software...

Страница 11: ...ur meter and press the reset button to confirm the reset press Y yes or N no to cancel g030203 Figure 20 1 Reset 3 Y yes 2 Are you sure 4 N no 5 2 2 PTO Hour Counter This screen displays a non resettable total PTO hour counter and a resettable trip counter g030204 Figure 21 1 PTO hours 3 Trip hours 2 Non resettable total hours 4 Reset trip hours To reset the hour meter highlight the hour meter and...

Страница 12: ... when Trip Statistics 1 is paused the statistics are highlighted and the reset button is available Pressing the reset button resets all three parameters Pressing the play button will start data collection g038364 Figure 25 1 Trip statistics 1 4 Displays gallons liters of fuel 2 Displays engine ON hours 5 Play Start 3 Displays PTO ON hours 6 Reset When one of the trip statistics is playing the stat...

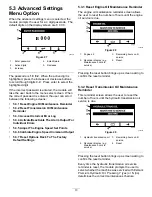
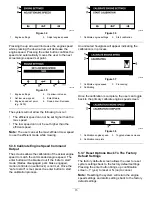
Страница 13: ...e Speed Command Output 5 3 7 Reset Options Back To The Factory Default Settings 5 3 1 Reset Engine Oil Maintenance Reminder The engine oil maintenance reminder screen allows the user to reset the number of hours until the engine oil service is due g030245 Figure 28 1 Engine oil 3 Remaining hours until service 2 Reminder display e g Maintenance hours to service 4 Reset Pressing the reset button bri...

Страница 14: ...ssing the enter button brings the user to screens that allows the user to activate or deactivate the audible alarm for individual errors Note Not all audible alarms can be deactivated g030225 Figure 32 1 Alarms 3 Audible alert 2 Activate Deactivate 4 Enter Return The highlighted error name indicates that the audible alarm is active Pressing enter modifies the status of the audible alarm to ON or O...

Страница 15: ...ded engine speed The enter button will be blacked out if the safe to start mode blades disengaged park brake engaged motion controls in neutral lock is not met Once the safe to start is met press the enter button to start the calibration process g030234 Figure 36 1 Calibrate engine settings 2 Start calibration An animated hourglass will appear indicating the calibration is in process g030235 Figur...

Страница 16: ...mow mode engine speed 9 Auto Idle Down Mode If the operator leaves the seat and the safety interlocks allow the engine to remain running the system will enter the auto idle mode and automatically set the engine speed to the low transport speed When the operator returns to the seat the system will automatically return to the previously selected engine speed mode If the operator selects another engi...

Страница 17: ... to the default Efficient Transport Mode speed and place the machine in Safe Transport Mode Safe Transport Mode limits the engine speed locks out the PTO and disengages the clutch a Clutch Overcurrent error message will display Cycling the key switch to OFF and then to the ON position will clear the fault 2 System Overvoltage 16VDC If the voltage exceeds 16 volts the system will disengage the clut...

Страница 18: ... battery and engine charging system Contact an Authorized Service Dealer System Under voltage 9VDC Blink Red Disallow clutch engagement Disengage clutch System voltage below lower limit of 9 volts Check battery and engine charging system Contact an Authorized Service Dealer Clutch Overcurrent Blink Red RED limp mode engine limited to efficient and PTO disengaged Clutch current is above limit Cycle...

Отзывы: