background image

Maintenance

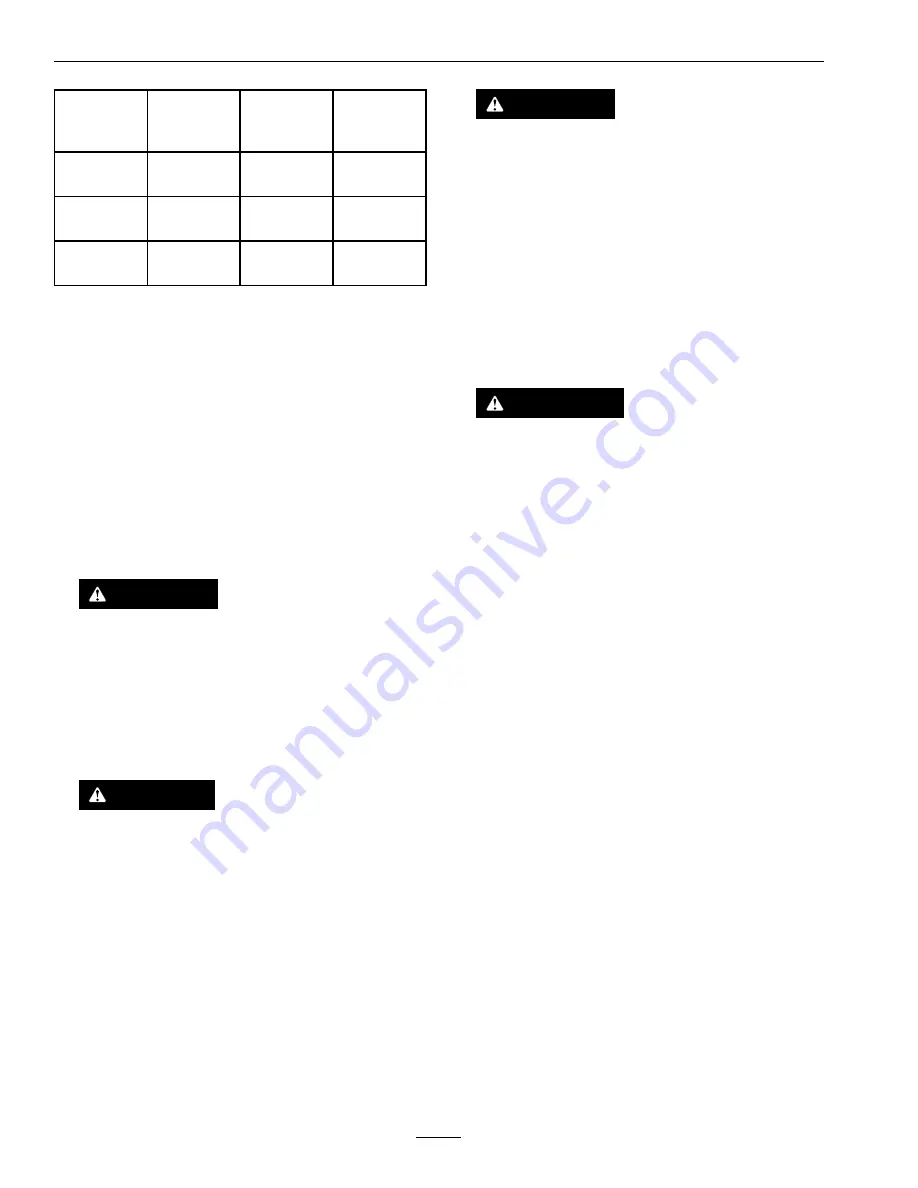
Voltage
Reading

Percent
Charge

Maximum
Charger
Settings

Charging
Interval

12.0–12.2

25–50%

14.4 volts/4
amps

2 Hours

11.7–12.0

0–25%

14.4 volts/4
amps

3 Hours

11.7 or less

0%

14.4 volts/2
amps

6 Hours or
More

Important:

For Kohler EFI units: Unplug the

harness from the ECU before performing any
welding on the equipment.

Recommended Jump
Starting Procedure

Service Interval: As required

1. Check the weak battery for terminal corrosion

(white, green, or blue “snow”), it must be cleaned
off prior to jump starting. Clean and tighten
connections as necessary.

CAUTION

Corrosion or loose connections can cause
unwanted electrical voltage spikes at anytime
during the jump starting procedure.

Do Not attempt to jump start with loose or
corroded battery terminals or damage to the
engine or EFI may occur.

DANGER

Jump starting a weak battery that is cracked,
frozen, has low electrolyte level, or an
open/shorted battery cell, can cause an
explosion resulting in serious personal injury.

Do Not jump start a weak battery if these
conditions exist.

2. Make sure the booster is a good and fully charged

lead acid battery at 12.6 volts or greater. Use
properly sized jumper cables (4 to 6 AWG) with
short lengths to reduce voltage drop between
systems. Make sure the cables are color coded or
labeled for the correct polarity.

CAUTION

Connecting the jumper cables incorrectly
(wrong polarity) can immediately damage the
electrical and/or EFI system.

Be certain of battery terminal polarity and
jumper cable polarity when hooking up
batteries.

Note:

The following instructions are adapted

from the SAE J1494 Rev. Dec. 2001 – Battery
Booster Cables – Surface Vehicle Recommended
Practice (SAE – Society of Automotive
Engineers).

WARNING

Batteries contain acid and produce explosive
gases.

Shield the eyes and face from the batteries
at all times.

Do Not lean over the batteries.

Note:

Be sure the vent caps are tight and level.

Place a damp cloth, if available, over any vent
caps on both batteries. Be sure the vehicles do
not touch and that both electrical systems are
off and at the same rated system voltage. These
instructions are for negative ground systems only.

3. Connect the positive (+) cable to the positive (+)

terminal of the discharged battery that is wired to
the starter or solenoid as shown in Figure 28.

42


Содержание LAZER Z E Series

Страница 1: ...LAZER Z For Serial Nos 316 000 000 Higher Lazer Z LZE LZS LZX Units Part No 4502 754 Rev A ...

Страница 2: ... The enclosed Engine Owner s Manual is supplied for information regarding The U S Environmental Protection Agency EPA and the California Emission Control Regulation of emission systems maintenance and warranty Keep this engine Owner s Manual with your unit Should this engine Owner s Manual become damaged or illegible replace immediately Replacements may be ordered through the engine manufacturer L...

Страница 3: ...com for additional safe operation information such as safety tips training materials and Operator s manuals If additional information is needed or should you require trained mechanic service contact your authorized Exmark equipment dealer or distributor All Exmark equipment dealers and distributors are kept informed of the latest methods of servicing and are equipped to provide prompt and efficien...

Страница 4: ...raulic System Filter and Fluid 48 Wheel Hub Slotted Nut Torque Specification 49 Check Spark Arrester if equipped 49 Thread Locking Adhesives 49 Mobil HTS Grease Or Food Grade Anti seize X Series Only 49 Copper Based Anti seize 50 Dielectric Grease 50 Adjustments 50 Deck Leveling 50 Pump Drive Belt Tension 52 Deck Belt Tension 52 Adjusting the Parking Brake 52 Electric Clutch Adjustment 54 Motion C...

Страница 5: ...s or mechanic s can not read this manual it is the owner s responsibility to explain this material to them other languages may be available on our website Become familiar with the safe operation of the equipment operator controls and safety signs All operators and mechanics should be trained The owner is responsible for training the users Never let children or untrained people operate or service t...

Страница 6: ...and avoid creating any source of ignition until fuel vapors have dissipated Do Not operate without entire exhaust system in place and in proper working condition DANGER In certain conditions during fueling static electricity can be released causing a spark which can ignite gasoline vapors A fire or explosion from gasoline can burn you and others and cause property damage Always place gasoline cont...

Страница 7: ...tches and other devices in place and in proper working condition Never mow with the discharge deflector raised removed or altered unless there is a grass collection system or mulch kit in place and working properly Do Not change the engine governor setting or overspeed the engine Park machine on level ground Stop engine wait for all moving parts to stop remove key and engage parking brake Before c...

Страница 8: ...ffs ditches steep banks or water Figure 3 Figure 3 1 Safe Zone Use the mower here on slopes less than 15 degrees 2 Danger Zone Use a walk behind mower and or hand trimmer on slopes greater than 15 degrees near drop offs and water 3 Water Remove or mark obstacles such as rocks tree limbs etc from the mowing area Tall grass can hide obstacles Watch for ditches holes rocks dips and rises that change ...

Страница 9: ... Shut off fuel while storing or transporting Do Not store fuel near flames or drain indoors Park machine on level ground Never allow untrained personnel to service machine Use jack stands to support components when required Carefully release pressure from components with stored energy Disconnect battery or remove spark plug wire before making any repairs Disconnect the negative terminal first and ...

Страница 10: ...SI OSHA and NFPA and or government regulations such as EPA and CARB WARNING Hydraulic fluid escaping under pressure can penetrate skin and cause injury Fluid accidentally injected into the skin must be surgically removed within a few hours by a doctor familiar with this form of injury or gangrene may result If equipped make sure all hydraulic fluid hoses and lines are in good condition and all hyd...

Страница 11: ... your authorized Exmark equipment dealer or distributor or from Exmark Mfg Co Inc Safety signs may be affixed by peeling off the backing to expose the adhesive surface Apply only to a clean dry surface Smooth to remove any air bubbles Familiarize yourself with the following safety signs and instruction labels They are critical to the safe operation of your Exmark commercial mower 99 8936 1 Machine...

Страница 12: ... roll bar is down 3 Read the Operator s manual drive slowly and carefully 109 6036 1 Read the Operator s manual 2 Remove the ignition key and read the instructions before servicing or performing maintenance 3 Height of cut 112 9028 1 Warning stay away from moving parts keep all guards in place 114 4465 1 Hydraulic fluid service interval 50 hours 3 Lubricate service interval 500 hours 2 Tire pressu...

Страница 13: ... brake engaged 116 4858 116 8283 1 Warning read the Operator s Manual for instructions on torquing the blade bolt nut to 55 60 ft lb 75 81 N m 116 8724 All Units except EFI 1 Throttle fast 4 Choke off 2 Throttle slow 5 PTO 3 Choke on 116 8725 EFI Units Only 1 Throttle fast 3 PTO 2 Throttle slow 4 Check engine 13 ...

Страница 14: ...ro oil 116 8727 117 0346 1 Fuel leak hazard read the Operator s Manual do not attempt to remove the roll bar do not weld drill or modify the roll bar in any way 117 3864 1 Read the Operator s Manual 2 Fill to bottom of filler neck warning do not overfill the tank 14 ...

Страница 15: ...r first 100 hours then every 500 hours thereafter 126 4108 EFI Red Equipped Units Only 1 Engine oil temperature 5 Throttle efficient setting engine rotational speed standard idle speed fuel economy 2 Engine oil pressure 6 Throttle maximum setting engine rotational speed high idle speed 3 Engine failure malfunction 7 PTO with clutch saver read the Operator s manual 4 Throttle low setting engine rot...

Страница 16: ... from moving parts keep all guards and shields in place 2 Thrown objects hazard mower do not operate without the deflector discharge cover or grass collection system in place 126 6599 1 Thrown objects hazard keep bystanders a safe distance from the machine 2 Cutting dismemberment of hand stay away from moving parts keep all guards and shields in place 132 5063 B1 B2 and B3 Models Only 1 Cam lock 2...

Страница 17: ...oading onto a trailer do not use dual ramps only use a singular ramp wide enough for the machine and that has an incline less than 15 degrees back up the ramp in reverse and drive forward off the ramp 2 Cutting and pinching hazard keep hands and feet away from moving parts keep all guards and shields in place 5 Bodily harm hazard look behind you when mowing in reverse 3 Thrown object hazard keep b...

Страница 18: ...Safety 132 5080 B1 B2 and B3 Models Only 1 Firmest position 2 Softest position 18 ...

Страница 19: ...ki P N 49019 0014 Kohler Kohler P N 24 050 13 Kohler EFI Kohler P N 25 050 42 Fuel Shut Off Valve All Units 1 4 turn ON OFF Fuel level eight segment display right hand control panel Low fuel indicator light Electrical System Charging System Flywheel Alternator Charging Capacity Kohler and Kawasaki 15 amps Kohler EFI 20 amps Battery Type BCI Group U1 Recommended Minimum Battery CCA All Kohler 940 a...

Страница 20: ... safety switch and Seat Isolation System to enhance ride of standard seat A1 and A2 Models Deluxe suspension adjustable spring suspension seat with high back padded flip up armrests and integral safety switch Seat height remains the same Seat Isolation System for reduced vibration to enhance ride of standard seat Optional seat accessories for units with standard seats Custom Ride Suspension System...

Страница 21: ...E Series 48 or 52 inch decks 0 8 mph 12 9 km hr forward 0 4 5 mph 7 2 km hr reverse All E Series except 48 or 52 inch decks and X and S Series 12cc 0 10 mph 16 1 km hr forward 0 5 5 mph 8 9 km hr reverse X and S Series 16cc 0 11 5 mph 18 5 km hr forward 0 6 mph 9 7 km hr reverse Drive wheel release valves allow machine to be moved when engine is not running Tires and Wheels X Series Drive Pneumati...

Страница 22: ...dles X Series Solid steel spindles with 1 18 inch 30 mm I D bearings S and E Series Solid steel spindles with 984 inch 25 mm I D bearings Deck Drive Electric clutch 48 and 52 inch 60R 72R Decks B Section belt with self tensioning idler 60 and 72 inch Decks 5V Section belt with self tensioning idler Deck Side Discharge Full floating deck is attached to out front support frame Anti scalp rollers pro...

Страница 23: ... cm 84 8 inches 215 4 cm 87 8 inches 223 0 cm Rear Discharge Units Roll Bar Up Roll Bar Down 87 2 inches 221 5 cm 89 2 inches 226 61 cm Overall Height All Models Except B1 B2 and B3 Roll Bar Up Roll Bar Down 70 5 inches 179 1 cm 46 8 inches 118 9 cm B1 B2 and B3 Models Roll Bar Up Roll Bar Down 70 5 inches 179 1 cm 50 3 inches 127 8 cm Tread Width Center to Center of Tires Widthwise Side Discharge...

Страница 24: ...ch side discharge decks do not require a weight kit Side Discharge Units Only 48 inch Deck 52 inch Deck 60 inch Deck Accessory Score Light Kit 2 3 2 Suspension Seat CRSS 11 12 3 Bagger 0 0 3 Pneumatic Caster Tires 6 8 5 Mulch Kit 3 4 5 Striper Kit 2 0 0 OCD02 5 7 4 Hitch Kit 1 2 1 Sunshade Kit 2 3 2 Total Accessory Score Total Accessory Score Required Weight Kit s 0 9 None required 10 19 116 1173 ...

Страница 25: ... Nyloc Nut Rear Discharge Units See Figure 20 30 35 ft lb 41 47 N m Engine Mounting Bolts 27 33 ft lb 37 45 N m Wheel Lug Nuts 85 105 ft lb 115 142 N m Wheel Motor Mounting Bolts 67 83 ft lb 50 113 N m Wheel Hub Slotted Nut 211 260 ft lb 286 352 N m Rollover Protection System Roll Bar 1 2 inch Mounting Bolts 100 110 ft lb 136 149 N m Clutch Retaining Bolt secured with threadlocker 55 60 ft lb 75 8...

Страница 26: ...ting position Controls Motion Control Levers The motion control levers located on each side of the console control the forward and reverse motion of the machine Moving the levers forward or backward turns the wheel on the same side forward or reverse respectively Wheel speed is proportional to the amount the lever is moved Moving the levers outward from the center position into the T slot locks th...

Страница 27: ... switch 2 Message display 5 Throttle 3 Ignition switch 6 Choke Throttle Control All Units Except EFI RED Equipped Units Located on right console red lever see Figure 6 The throttle is used to control engine speed Moving the throttle lever forward will increase engine speed and moving the throttle lever to the rear will decrease engine speed Moving the throttle forward into the detent is full throt...

Страница 28: ... lever engages a parking brake on the drive wheels Note The LCD indicator appears in the message display on the RH console when the park brake is engaged see Figure 9 Pull the lever up and rearward to engage the brake Push the lever forward and down to disengage the brake The unit must be tied down and brake engaged when transporting Ignition Switch Located on right console see Figure 6 The igniti...

Страница 29: ...cator light appears when the fuel level is low approximately one gallon remaining in the tank Drive Wheel Release Valves WARNING Hands may become entangled in the rotating drive components below the engine deck which could result in serious injury or death Stop engine remove key allow all the moving parts to stop before accessing the drive wheel release valves WARNING The engine and hydraulic driv...

Страница 30: ...r of the floor pan Push the pedal forward with your foot to raise the cutting deck Allow the pedal to move rearward to lower the cutting deck to the cut height that has been set Transport Lock Located on the height of cut adjustment plates to the right of the parking brake Position in the transport latching position to automatically latch the cutting deck when raised to the transport position see ...

Страница 31: ...e safety device Keep the roll bar in the raised and locked position when operating the mower Lower the roll bar temporarily only when absolutely necessary 1 The knob must be completely latched with the tabs interlocking as shown in Figure 12 to lock the roll bar in the raised operate position 2 Apply forward pressure to the upper hoop of the roll bar 3 Pull the knob and rotate 90 to hold in the un...

Страница 32: ...discharge opening will allow objects to be thrown in an operator s or bystander s direction Also contact with the blade could occur Thrown objects or blade contact can cause serious injury or death Never operate the mower with the discharge deflector raised removed or altered unless there is a grass collection system or mulch kit in place and working properly The PTO push pull switch engages the c...

Страница 33: ... To begin movement forward or backward the operator must be in the seat the brake lever must be disengaged pushed down before the motion control levers can be moved in or the engine will stop When the motion control levers are positioned fully outward apart in the T slot the drive system is in the neutral lock position Figure 14 Note The N LCD indicator appears when both levers are in the neutral ...

Страница 34: ... the rear and to the left 3 To stop position both motion control levers in the neutral operate position Adjusting the Cutting Height The cutting height of the mower deck is adjusted from 1 to 5 1 2 inches 2 5 cm to 14 cm in 1 4 inch 6 4 mm increments 1 Stop the machine and move the motion control levers outward to the neutral locked position 2 Disengage the PTO 3 Position the transport lock in the...

Страница 35: ...For cutting heights above 3 5 inches 90 mm use the bottom hole The rollers will still be effective against scalping 1 Anti scalp roller mounting bracket 2 Cutting height For Maximum Deck Flotation place the rollers one hole position lower Rollers should maintain 1 4 inch 6 4 mm clearance to the ground Do Not adjust the rollers to support the deck 7 Reinstall the mounting hardware Side Discharge Un...

Страница 36: ...ove each bumper to the desired position and secure them with the bolts and nuts Torque nut to 10 12 ft lb 14 16 N m Note Only use the top or center sets of holes to adjust the bumpers The bottom holes are used when switching sides at which time they become the top holes on the other side of the mower Adjusting the Suspension Seat For B1 B2 and B3 Models Only The suspension system adjusts to provid...

Страница 37: ...ote Ensure the left and right rear shock assemblies are always adjusted to the same positions Adjust the rear shock assemblies Figure 24 A C D g030019 B Figure 24 Adjusting the Front Shock Assembly The front shock assembly is set at the middle position and is normally not adjusted 37 ...

Страница 38: ...ow moving vehicle emblem is dangerous and can lead to accidents causing personal injury Do not drive machine on a public street or roadway Loading the Machine Use extreme caution when loading or unloading machines onto a trailer or a truck Use a full width ramp that is wider than the machine for this procedure Back up ramps and drive forward down ramps Figure 26 g028043 Figure 26 1 Back up ramps 2...

Страница 39: ...en the ramp and the trailer or truck Ensure the length of ramp is at least four times 4X as long as the height of the trailer or truck bed to the ground This will ensure that ramp angle does not exceed 15 degrees on flat ground Back up ramps and drive forward down ramps Avoid sudden acceleration or deceleration while driving the machine on a ramp as this could cause a loss of control or a tip over...

Страница 40: ...eel lug nuts Check the park brake adjustment After the first 250 hours Change the hydraulic filter and fluid Before each use or daily Check the engine oil level Check the mower blades Check the safety interlock system Check the rollover protections systems roll bar knobs Check the seat belt Check for loose hardware Clean the engine and exhaust system area Clean the hydro fan cooling guards hydro c...

Страница 41: ...ts terminals and related accessories contain lead and lead compounds chemicals known to the State of California to cause cancer and reproductive harm Wash hands after handling Allowing batteries to stand for an extended period of time without recharging them will result in reduced performance and service life To preserve optimum battery performance and life recharge batteries in storage when the o...

Страница 42: ...t 2 Make sure the booster is a good and fully charged lead acid battery at 12 6 volts or greater Use properly sized jumper cables 4 to 6 AWG with short lengths to reduce voltage drop between systems Make sure the cables are color coded or labeled for the correct polarity CAUTION Connecting the jumper cables incorrectly wrong polarity can immediately damage the electrical and or EFI system Be certa...

Страница 43: ...connect Check Mower Blades Service Interval Before each use or daily 1 Stop engine wait for all moving parts to stop and remove key Engage parking brake 2 Lift deck and secure in raised position as stated in the Clean Grass Build Up Under Deck section 3 Inspect blades and sharpen or replace as required 4 Reinstall the blades if they were removed in the following order A Install bushing through bla...

Страница 44: ...tion control lever in starter must not crank repeat again with the right lever in then with both levers in starter must not crank 2 Check the kill circuits Run engine at one third throttle disengage parking brake and raise off of seat but do not get off of machine engine must initiate shutdown after approximately 1 2 second has elapsed seat has time delay kill switch to prevent cut outs on rough t...

Страница 45: ...ngine Owner s Manual for additional information Every 500 hours Replace the secondary air cleaner element May need more often under severe conditions See the Engine Owner s Manual for additional information 1 Stop engine wait for all moving parts to stop and remove key Engage parking brake 2 See the Engine Owner s Manual for maintenance instructions Check Air Filter Assembly if equipped Service In...

Страница 46: ...til the unit cools before checking the hydraulic oil 3 Slide the seat all the forward to access the caps on the LH and RH hydro drives 4 Clean the area around hydraulic reservoir cap and remove cap 5 Wipe the dipstick clean and re insert the cap back into the hydro Lightly tighten the cap 6 Remove the cap again and check the level of the oil on the dipstick See Figure 34 for oil levels Figure 34 1...

Страница 47: ...top and remove key Engage parking brake Figure 35 1 Seal guard 2 Spacer nut with wrench flats 2 Remove caster wheel from caster forks 3 Remove seal guards from the wheel hub 4 Remove one of the spacer nuts from the axle assembly in the caster wheel Note that thread locking adhesive has been applied to lock the spacer nuts to the axle Remove the axle with the other spacer nut still assembled to it ...

Страница 48: ...e use of improper components can result in system failure gasoline leakage and possible explosion Use only approved fuel lines and fuel filters for high pressure systems Replacement Filters Kawasaki Kawasaki P N 49019 0014 Kohler Kohler P N 24 050 13 Kohler EFI Kohler P N 25 050 42 Note It is important to reinstall the fuel line hoses and secure with plastic ties the same as they were originally i...

Страница 49: ...cification Service Interval After the first 100 hours Every 500 hours thereafter Torque the slotted nut to 211 260 ft lb 286 352 N m Note Do Not use anti seize on wheel hub Check Spark Arrester if equipped Service Interval Every 50 hours WARNING Hot exhaust system components may ignite gasoline vapors even after the engine is stopped Hot particles exhausted during engine operation may ignite flamm...

Страница 50: ...echanical or hydraulic jacks may not be enough support or may malfunction allowing the unit to fall which could cause injury Do Not rely solely on mechanical or hydraulic jacks for support Use adequate jack stands or equivalent support Deck Leveling 1 Position the mower on a flat surface 2 Stop engine wait for all moving parts to stop and remove key Engage parking brake 3 Check the tire pressure i...

Страница 51: ...es 7 6 cm 2 Back blade tip 3 Front blade tip 4 3 inches 7 6 cm 5 Level surface 10 Adjust the height to increase turn the adjuster screw clockwise to decrease turn counterclockwise X Series Loosen the jam nuts on the top of each deck adjuster Fine tune the adjuster on the front deck lift assembly by turning it to get 3 inch 7 6 cm height see Figure 38 Figure 38 1 Adjuster link 3 Adjuster 2 Jam nut ...

Страница 52: ...tached in the front holes at the factory see Figure 41 If needed use the back holes for further adjustment when leveling the mower deck Figure 41 1 Mower deck 3 Back hole 2 Front hole 16 If the deck is too low tighten the single point adjustment bolt by rotating it clockwise If the deck is too high loosen the single point adjustment bolt by rotating it counterclockwise Note Loosen or tighten the s...

Страница 53: ...e the drive wheel release handle to the released position Refer to the Drive Wheel Release Valves section in Operation 8 Check to see if there is a visible gap between the L bracket and the linkage stop see Figure 42 Figure 42 Left Side Shown 1 L bracket 4 Rear linkage assembly 2 Linkage stop 5 Caliper 3 Gap 6 Wheel hub 9 Disengage the park brake the lever should be in the down position Turn the w...

Страница 54: ...tween the rotor and armature If the gap is greater than 04 inch 1 mm proceed with the following steps A Loosen both brake mounting bolts one half to one full turn see Figure 44 Note Do Not remove the brake pole from the field shell armature The brake pole has worn to match the armature and needs to continue to match after the shim is removed to ensure proper brake torque Figure 44 1 Brake mounting...

Страница 55: ...aces 1 Prior to starting the engine push the deck lift pedal and remove the height of cut pin Lower deck to the ground 2 Raise the rear of machine up and support with jack stands or equivalent support just high enough to allow drive wheels to turn freely 3 Remove the electrical connection from the seat safety switch located under the bottom cushion of the seat The switch is a part of the seat asse...

Страница 56: ...Figure 48 RH Motion Control Shown 1 Torque nyloc nut to 200 in lb 16 7 ft lb Bolt must protrude past end of nyloc nut after torque A T 40 Torx bit will be necessary to hold the stud from turning 2 Most resistance firmest feel 3 Damper 4 Medium resistance medium feel 5 Least resistance softest feel Motion Control Neutral Lock Pivot Adjustment The flanged nut can be adjusted to obtain a more desired...

Страница 57: ...hten both bolts to secure the control in the new position 3 Repeat the adjustment for the opposite control lever Motion Control Full Forward Tracking Adjustment If the machine travels or pulls to one side when the motion control levers are in the full forward position adjust the cover plates 1 Loosen the screws on a cover plate see Figure 51 2 Slide the cover plate backward or forward to adjust th...

Страница 58: ...ne shrouding and exhaust system area 3 Wipe up any excessive grease or oil around the engine and exhaust system area Remove Engine Shrouds and Clean Cooling Fins Service Interval Every 100 hours 1 Stop engine wait for all moving parts to stop and remove key Engage parking brake 2 Remove cooling shrouds from engine and clean cooling fins Also clean dust dirt and oil from external surfaces of engine...

Страница 59: ...wing the unit to fall which could cause injury Do Not rely solely on mechanical or hydraulic jacks for support Use adequate jack stands or equivalent support 3 Clean out any grass build up from underside of deck and in discharge deflector Cleaning the Suspension System Note Do not clean the shock assemblies with pressurized water g030538 Figure 53 Waste Disposal Motor Oil Disposal Engine oil and h...

Страница 60: ...rvice Dealer Starter does not crank 8 Faulty module 8 Replace module 1 Fuel tank is empty 1 Fill the fuel tank 2 Fuel shutoff valve is closed 2 Open the fuel shutoff valve 3 Oil level in the crankcase is low 3 Add oil to the crankcase 4 The throttle and choke are not in the correct position 4 Be sure the throttle control is midway between the SLOW and FAST positions and the choke is in the ON posi...

Страница 61: ...4 Replace the spring Machine does not drive 5 Hydraulic fluid level is low or too hot 5 Add hydraulic fluid to reservoir or let it cool down 1 Blade s not sharp 1 Sharpen the blade s 2 Cutting blade s is are bent 2 Install new cutting blade s 3 Mower deck is not level 3 Level mower deck from side to side and front to rear 4 Underside of mower is dirty 4 Clean the underside of the mower 5 Tire pres...

Страница 62: ...cessary 2 Low voltage supply at the clutch 2 Check coil resistance battery charge charging system and wiring connections and replace if necessary 3 Damaged coil 3 Replace clutch 4 Inadequate current supply 4 Repair or replace clutch lead wire or electrical system Clean connector contacts Clutch will not engage 5 Rotor armature airgap is too large 5 Remove shim or replace clutch 62 ...

Страница 63: ...B C D BROWN PINK PINK PINK PINK RED BLACK PINK GRAY PINK BLUE BLACK BLACK BLACK TVS DIODE BROWN BLACK VIOLET PINK 2 1 1 3 2 4 5 6 7 8 1 A B 2 3 1 5 4 1 2 5 4 3 1 2 1 2 1 2 9 12 3 10 1 8 6 5 11 2 4 7 B A 7 4 5 9 3 6 8 1 2 C A B A B 1 2 2 1 2 1 2 1 A B 9 7 4 1 2 3 8 4 1 2 3 5 3 7 1 2 6 8 4 5 B C A F D A C B E 5 3 2 1 4 A B 7 1 6 12 A B IGNITION SWITCH NOTE CONNECTORS VIEWED FROM MATING CONNECTOR TER...

Страница 64: ...PINK MIL PWR BROWN BROWN VIOLET FUEL SENDER B NC BROWN PINK PINK PINK PINK RED BLACK PINK GRAY PINK BLUE BLACK BLACK BLACK TVS DIODE BROWN BLACK VIOLET PINK 2 1 1 3 2 4 5 6 7 8 1 A B 2 3 1 5 4 1 2 5 4 3 1 2 1 2 1 2 9 12 3 10 1 8 6 5 11 2 4 7 B A 7 4 5 9 3 6 8 1 2 C A B A B E A F B C D 1 2 2 1 2 1 2 1 A B 9 7 4 1 2 3 8 4 1 2 3 5 3 7 1 2 6 8 4 5 B C A F D A C B E 5 3 2 1 4 A B 7 1 6 12 A B IGNITION ...

Страница 65: ...Schematics Electrical Diagram Kohler EFI Red Equipped Units 65 ...

Страница 66: ...T_R SW5 B GND S D REG START SOLENOID AC AC IGNITION MODULES SPARK PLUG SPARK PLUG KAW TWIN NEUT_L LH HYDRO IN DRIVE RH HYDRO IN DRIVE SW4 12 B 10 KEY_S 9 KEY_A 4 SEAT 11 BRAKE 2 NEUTRAL 3 PTO 5 FUEL 1 START_RELAY 7 MAGNETO 6 FUEL_SOLENOID 8 GROUND HOUR METER 2 R A I A 4 7 1 3 6 5 A 3 SW1 1 B B C B 8 2 4 5 IGNITION C F A B D KEY SW OPTIONAL ACCESSORIES E S Ignition switch terminal locations viewed ...

Страница 67: ...AC IGNITION MODULES SPARK PLUG SPARK PLUG KOHLER CARB NEUT_L SW4 12 B 10 KEY_S 9 KEY_A 4 SEAT 11 BRAKE 2 NEUTRAL 3 PTO 5 FUEL 1 START_RELAY 7 MAGNETO 6 FUEL_SOLENOID 8 GROUND HOUR METER 2 R A I A 4 7 1 3 6 5 A 3 SW1 1 B B C B 8 2 4 5 IGNITION C F NC A B D KEY SW OPTIONAL ACCESSORIES E S Ignition switch terminal locations viewed from back OFF no connections ON BRIA START BRIS BK BLACK BN BROWN BU B...

Страница 68: ...E 2 NEUTRAL 3 PTO 5 FUEL 1 START_RELAY 7 MAGNETO 6 FUEL_SOLENOID 8 GROUND HOUR METER R A I A 4 7 1 3 A 3 SW1 B B C B 8 2 4 5 IGNITION C B D KEY SW OPTIONAL ACCESSORIES E A 3 5 2 6 4 S Ignition switch terminal locations viewed from back OFF no connections ON BRIA START BRIS BK BLACK BN BROWN BU BLUE GN GREEN GY GREY LT GR LIGHT GREEN OR ORANGE PK PINK R RED T TAN V VIOLET W WHITE G032376 R F NC NC ...

Страница 69: ...1 5 A SW1 B B C B 8 2 4 5 IGNITION 2 3 5 1 6 KEY SW OPTIONAL ACCESSORIES 4 S Ignition switch terminal locations viewed from back OFF no connections ON BRIA START BRIS BK BLACK BN BROWN BU BLUE GN GREEN GY GREY LT GR LIGHT GREEN OR ORANGE PK PINK R RED T TAN V VIOLET W WHITE R W RED WHITE R Y RED YELLOW BK OR BLACK ORANGE BK W BLACK WHITE G032374 STARTER R Y R Y GN OR FUEL PUMP ECU OIL TEMP E GOV G...

Страница 70: ...Schematics Hydraulic Diagram 70 ...

Страница 71: ...ystem coverage All warranty work must be performed by an authorized Exmark Service Dealer using Exmark approved replacement parts Instructions for Obtaining Warranty Service The product must be registered with original proof of purchase by an Exmark Service Dealer before obtaining any warranty service Contact any Exmark Service Dealer to arrange service at their dealership To locate a dealer conve...

Страница 72: ...st be performed by an authorized Exmark Service Dealer using Exmark approved replacement parts Instructions for Obtaining Warranty Service The product must be registered with original proof of purchase by an Exmark Service Dealer before obtaining any warranty service Contact any Exmark Service Dealer to arrange service at their dealership To locate a dealer convenient to you access our website at ...

Страница 73: ...Service Record Date Description of Work Done Service Done By 73 ...

Страница 74: ...74 ...

Страница 75: ...se the slope indicator to determine the degree of slope of hills before operating Do Not operate this machine on a slope greater than 15 degrees Fold along the appropriate line to match the recommended slope 2 Align this edge with a vertical surface a tree building fence pole etc 3 Example of how to compare slope with folded edge 75 ...

Страница 76: ... RIDE SEAT SUSPENSION SYSTEM DUAL TAIL WHEEL FLOOR PAN EXTENDER HITCH KIT LIGHT KIT MICRO MULCH SYSTEM ROLL OVER PROTECTION SYSTEM ROPS SNOW BLADE SNOWBLOWER SUN SHADE TRASH CONTAINER ULTRA VAC COLLECTION SYSTEM ULTRA VAC QUICK DISPOSAL SYSTEM WEATHER CAB Some accessories and options not available for some models Place Model No and Serial No Label Here Included in the Literature Pack or Fill in Be...

Отзывы: