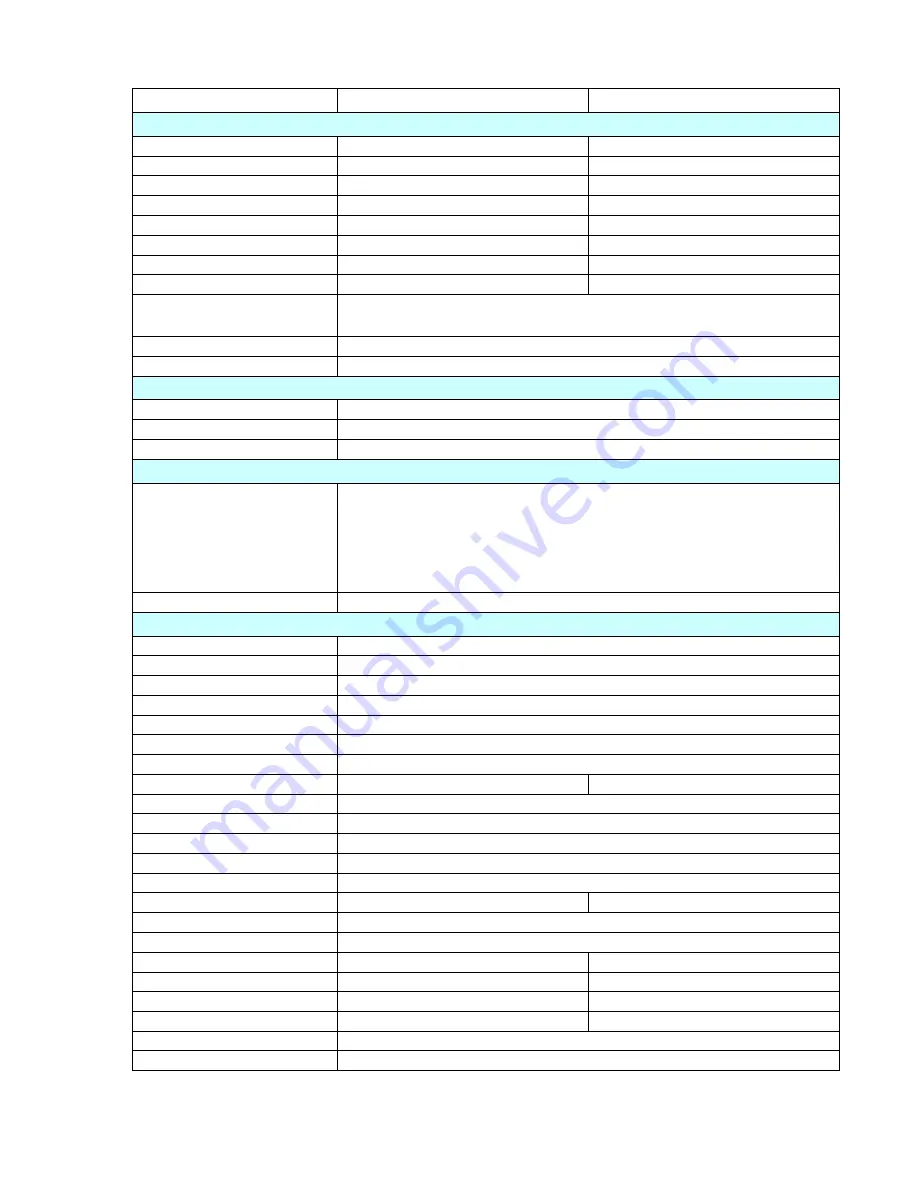
Exland EL-17PA1L Скачать руководство пользователя страница 23


10. Technical Data 

Model 

EL-17PA1L EL-19PA1L 

System 

Panel Size 

17" LCD 

19" LCD 

Resolution 

1280 x 1024 

1280 x 1024 

Pixel Pitch (H xV) 

0.264(H) x 0.264(V) 

0.294(H) x 0.294(V) 

Contrast Ratio 

1000:1 

1000:1 

Luminance 

250 cd/

 250 

cd/


Aspect Ratio 

4:3 

4:3 

Response Time 

Tr+Tf=5 ms 

Tr+Tf=5ms 

View Angle 

U/D: 75/85 , L/R: 85/85 

U/D: 75/85,L/R : 85/85 

Video Signal 

Analog RGB Signal ,   

composite signal 1.0Vpp/75 ohm, Y:1Vp-p, C:0.3Vp-p 

Video Color System 

NTSC/PAL auto detection switch 

Scan Frequency 

H:31K~81KHz, V:56~75Hz 

Operation Interfaces 

Front Panel Controls 

 Menu/Enter, Power,+/- ,Source/Exit 

OSD Control 

Yes  

OSD Language 

English, Francais, Deutsch, Espanol, Italiano,Russian,Chinese(7) 

Input / Output Connector 

Input Connector 

  D-sub(VGA)                                   x 1  

   S-Video                                         x 1  

  Video  Input(BNC Jack)                   x 1                                

          RCA Audio (R+L)                           x 1 sets                          

  PC Audio Input (Ø3.5 Jack)            x 1                                 

  Power Input (DC 12V)                    x 1 

Output Connector 

Video Output(BNC)                          x 1 

Mechanical & Electrical Design 

PIP & PBP 

Yes  

Video Output Looping 

Yes  

3D Comb Filter 

Yes  

De-Interlace Yes 


Power Failure Auto Recovery 

Yes  

Anti Burn-in  

Yes  

Pro 5 Image Ratio  

Yes  

VESA Mounting 

100 x 100 mm 

75 x 75 mm 

Front Bezel Material 

Plastic 

Back Cabinet Material 

Plastic 

Stand Material 

Plastic 

Speaker Output 

2W x 2 

Power Input 

DC12V, 3A 

Power Consumption 

25W(Max) 

30W(Max) 

Working Temperature 

5~+40 


Working Humidity 

20% ~ 85%RH 

Unit Dimension(WxHxD) 

395(W) x 386(H) x 172(D) mm

427(W) x 420(H) x 172(D) mm

Packing Dimension(WxHxD) 

440(W) x 460(H) x190(D) mm

470(W) x 460(H) x175(D) mm

Net Weight 

4.7 Kg

5.3 Kg

Gross Weight 

6.0 Kg

6.6 Kg

Regulatory CE,FCC,RoHS 

Color Black 


21 

Содержание EL-17PA1L

Страница 1: ...CCTV LCD Monitor User Manual For models EL 17PA1L EL 19PA1L _____________________...

Страница 2: ...ted Kingdom 4 3 Standards and Guidelines 5 3 1 FCC Requirements 5 3 2 FCC Warning 5 3 3 CE Conformity 5 3 4 RoHS Compliance Statement 5 3 5 Information on Disposal for Your Old Product 6 4 Hardware In...

Страница 3: ...our computer just plug it in and it is ready for use 2 The monitor will accept and display analog video NTSC or PAL PC type video and Digital video sources 3 Low radiation and reduced flickering compa...

Страница 4: ...ained to ensure reliable and continued operation and to protect the LCD monitor from overheating Do not block ventilation slots and openings with objects or install the LCD monitor in a place where ve...

Страница 5: ...rements and may look like this Figure A1 below Figure A1 Figure A2 2 3 1 For the United States and Canada In the United States and Canada the male plug is a NEMA5 15 style Figure A2 above UL Listed an...

Страница 6: ...en and Yellow Ground Earth z Blue Neutral z Brown Live If the colored wires of the mains lead of this appliance do not correspond with the colored markings identifying the terminals in your plug proce...

Страница 7: ...ncreasing the separation between the equipment and the receiver z Connecting the equipment into an outlet on a circuit different from the one which the receiver is connected z Consulting the dealer or...

Страница 8: ...ling of used electrical and electronic equipment When this corssed out wheeled bin symbol is attached to a product it means the product is covered by the European Directive 2002 979 EC If you wish to...

Страница 9: ...To select the input signal source when the OSD menu is Off The available signal source will be shown in the following order PC AV1 S Video1 2 To exit the menu when you finish the setting 2 Down Decre...

Страница 10: ...computer 5 D Sub VGA Input Connect to the VGA output of your computer or DVR 6 S Video Input Connect the S Video 4 pin DIN connector from the DVR or AV equipment to the Monitor 7 8 Composite Video Inp...

Страница 11: ...lume and press to decrease volume i DEFAULT Press Default to clear all the setting and return to factory default j MUTE and PAUSE Press MUTE to mute the sound and press PAUSE to pause the video k OSD...

Страница 12: ...to select the Picture option 2 Various picture settings are available from the Picture menu Use or to select item that you want to adjust and press Menu key again until grey bar changes to blue color...

Страница 13: ...six settings to choose from 1 Standard 2 Cold 3 Warm 4 User To select User you may press or to increase decrease the Blue bar to adjust color of Red Green and Blue Sound Video Mode 1 Press the Menu k...

Страница 14: ...the Menu key to enter the Sub Position and press or to select 0 4 as the position of sub screen 0 Top left 1 Bottom left 2 Central 3 Top right 4 Bottom right Display Video Mode Press the Menu key on t...

Страница 15: ...al lines To enlarge the 4 3 video source to 5 4 panel format 2 4 3 Under V The format is the Letter Box under scan mode that shows the real 4 3 video source on 5 4 panel format without distortion That...

Страница 16: ...y There are four levels to select 1 Low 2 Medium 3 High 4 Off Press or key to select the level Function Video Mode Press the Menu key on the buttons to call out the OSD Menu Press or to select Functio...

Страница 17: ...30 Min 2 60 Min 3 90 Min 4 120 Min 5 150 Min 6 Off To select 30 Min the image will move left for one pixel for every 30 minutes to select 60 Min the image will move left for one pixel for every 60 mi...

Страница 18: ...djust backlight Increasing the figure will enhance the backlight Decreasing the figure will reduce backlight Color Temp Select the Color Temp for white balance Press Menu to enter OK mode There are 4...

Страница 19: ...mage ratio to choose 1 4 3 2 16 9 Press or key to select the ratio you want 1 4 3 The image fully fills up the 4 3 screen on both Vertical and Horizontal lines 2 16 9 This mode to make the format as 1...

Страница 20: ...e to the video signal source under RGB mode Press Menu to enter OK mode to activate the Auto Adjust function Function PC VGA Mode The setup is the same as page 12 for Function adjustment of Video Mode...

Страница 21: ...e front of LCD Monitor is in still green Check if the computer or AV equipment video signal cables are properly secured Abnormal image Check and make sure the computer or AV equipment video signal cab...

Страница 22: ...ertical Nominal Pixel Clock MHz Nominal Frequency 0 5 kHz Nominal Frequency 1 Hz DOS 720 400 70 31 469 70 087 28 322 VGA 640 480 60 31 469 59 940 25 175 640 480 72 37 861 72 809 31 500 640 480 75 37 5...

Страница 23: ...put Output Connector Input Connector D sub VGA x 1 S Video x 1 Video Input BNC Jack x 1 RCA Audio R L x 1 sets PC Audio Input 3 5 Jack x 1 Power Input DC 12V x 1 Output Connector Video Output BNC x 1...

Отзывы: