To get the best out of your new toaster, please
read through these instructions carefully before
using it for the first time. Pay particular attention
to the safety measures. We also recommend that
you keep the instructions for future reference, so
that you can remind yourself of the functions of
the toaster.
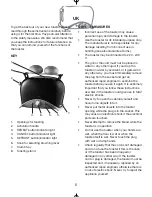
KEY
1.
Openings for toasting
2.
Activation handle
3.
REHEAT button/indicator light
4.
CANCEL button/indicator light
5.
DEFROST button/indicator light
6.
Knob for selecting browning level
7.
Crumb tray
8.
Toasting stand
SAFETY MEASURES
•
Incorrect use of the toaster may cause
personal injury and damage to the toaster.
•
Use the toaster for its intended purpose only.
The manufacturer is not responsible for any
damage resulting from incorrect use or
handling (see also Guarantee Terms).
•
The toaster may be connected to 220 - 240
V.
•
The grill or the cord must not be placed in
water or any other liquid. If you drop the
toaster in water by accident, or it gets wet in
any other way, you must immediately remove
the plug from the socket and get an
authorised repair engineer to examine the
toaster before you use it again. It is extremely
important that you follow these instructions,
as water in the toaster could give rise to fatal
electric shocks.
•
Never try to open the cabinet yourself and
never force objects into it.
•
Never put metal objects into the toaster
opening while the plug is in the socket. This
may cause an electrical shock if the electrical
parts are touched.
•
Never attempt to remove the bread while the
toaster is in operation.
•
Do not use the toaster when your hands are
wet, when the floor is wet or when the
toaster itself is wet. Never touch the plug
with wet or damp hands.
•
Check regularly that the cord is not damaged
and do not use the toaster if this is the case,
or if the toaster has been dropped or
damaged in any other way. If the toaster,
cord or plug is damaged, the toaster must be
inspected and, if necessary, repaired by an
authorised repair engineer, otherwise there is
a risk of electric shock. Never try to repair the
appliance yourself.
6
UK
1.
2.
4.
6.
5.
3.
7.
8.
T-323_IM_rev 02/08/04 13:27 Side 6
Содержание 243-016
Страница 1: ...DK Elektrisk br drister 2 UK Electronic toaster 6 243 016 BLACK SERIES...
Страница 10: ......


