background image

20

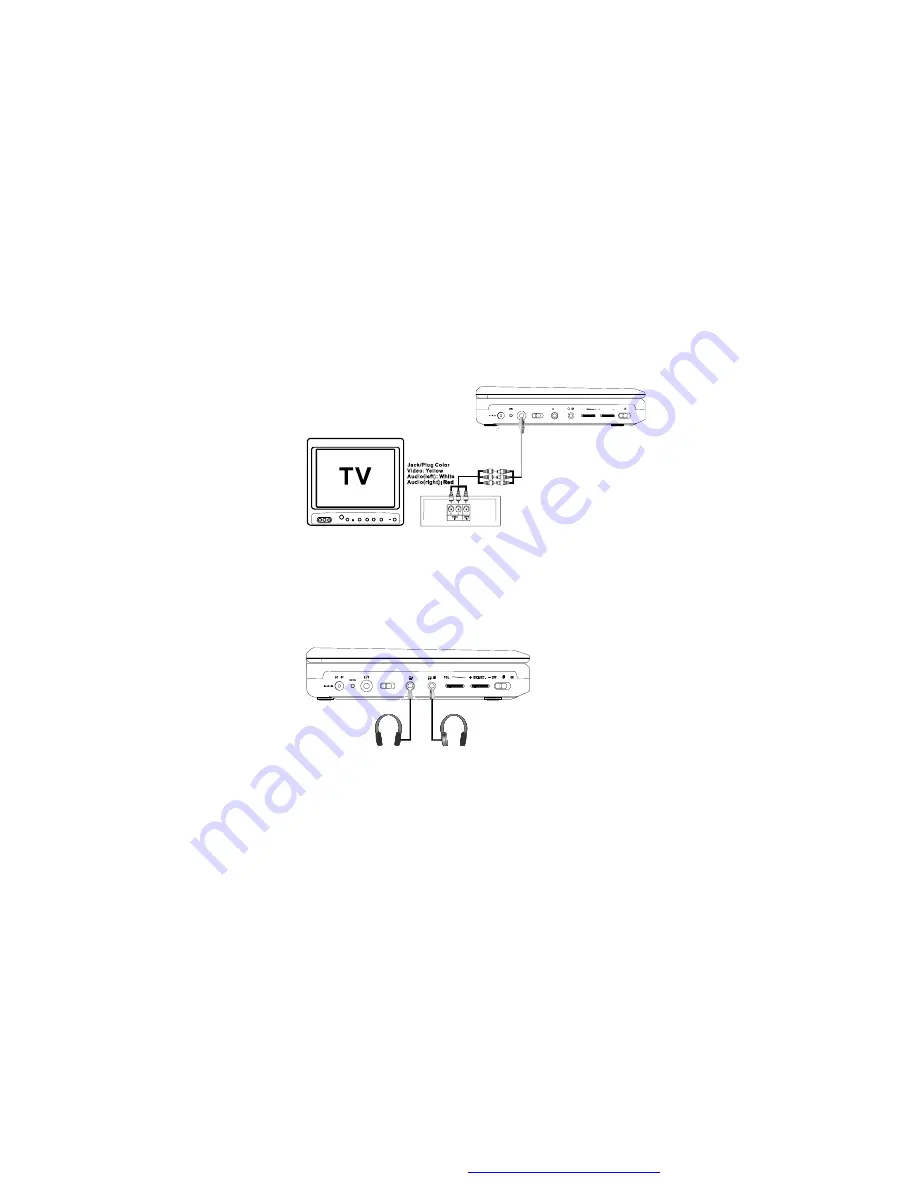
M.  Connecting to other equipments. 

( Refer to Figure 4)

1. You can also connect the DVD player to a TV to enjoy high quality stereo
sound and picture on another monitor.

a. Position the AV In/Out Switch to 

Out

 Position.

b. Connect one end of the audio/video cable

s black  (1/8

  plug)  plug into

the unit

s  DVD  AV  jack, and connect  the other end to the AUDIO INPUT

jacks on your TV or Monitor through AV adapter cable(white = left channel,

red = right channel, yellow=video).

Note:

 Optional wired headphone may be used with the unit. Simply plug

in the headset to either Headphone 1 jack or Headphone 2 jack on the left

side of the DVD.(Refer to Figure 5)

Plugging into Headphone jack 1 disables the internal speakers.

2.  You can enjoy the other audio and video source input from AV jack.

a. Position the AV In/Out Switch to 

In

 Position.

b. Connect one end of the audio/video cable

s black  (1/8

  plug)  plug into

the unit

s  DVD  AV  jack, and connect  the other end to the AUDIO Output

jacks on your Camcorder or other DVD through the AV adapter cable(white

= left channel, red = right channel, yellow=video).

Note:

 Please don

t connect other AV signal source with the AV jack when

the unit is in 

Out

 Mode.

Figure 4

Figure 5

D C  9V

OFF           ON

A/ V

2

1

VO L.

BR IG HT .

I N   O UT


*

*

I N   OU T


PDF created with FinePrint pdfFactory Pro trial version 

http://www.fineprint.com

Содержание 38-2553

Страница 1: ...PORTABLE 7 LCD MONITOR AND DVD PLAYER P OW ER 38 2553 PDF created with FinePrint pdfFactory Pro trial version http www fineprint com...

Страница 2: ...yright protection technology must be authorized by Macrovision Corporation and is intended for home and other limited viewing uses only unless otherwise authorized by Macrovision Corporation Reverse e...

Страница 3: ...F Loading and Playing a Disc 6 G Setup 7 H Basic Operation 13 I Menu 14 J Display 14 K Playing Audio CDs 16 L Playing MP3 Discs 18 M Connecting to other equipments 22 N Specifications 24 O Rechargeabl...

Страница 4: ...ose this appliance to rain or moisture Do not place the set on an unstable cart stand tripod bracket or table to prevent it from falling Keep the unit away from strong magnets heat sources direct sunl...

Страница 5: ...use liquid cleaners or aerosol cleaners Use a cloth lightly dampened with water for cleaning the exterior of the system only 6 Disc Do not use irregularly shaped discs such as heart or star shaped di...

Страница 6: ...Battery 8 1 x Bag D Powering and installation 1 Powering the system indoors Refer to Figure 1 Plug one end of the AC to DC adapter into the DC input jack on the left side of the main unit then plug th...

Страница 7: ...ake sure four corners of unit are tightened by narrow flexes 3 Place the bag with unit into back of car seat and fasten it into the headrest with length adjustable waist strap 4 Handle the carrying wi...

Страница 8: ...7 Volume Up Down Control 8 Brightness Up Down Control 9 Power On Off Switch 10 Remote Control Sensor 11 Power LED 12 Open Switch 13 LCD Panel Shut Off Switch 14 Previous Button 15 Next Button 16 Stop...

Страница 9: ...Button 18 Angle Button 19 Play Pause Button F Loading and Playing a Disc a After connecting power to the unit power on DVD player with the power switch The power LED will light b Open the disc tray b...

Страница 10: ...menus Note Press to return the previous menu a TV Display Normal PS When the player outputs signal to a normal TV a nor mal picture is shown on the full screen Normal LB When the player outputs signal...

Страница 11: ...function are only effective for OPEN operation 2 Video Quality Setup 1 In Setup menu Press the or button to select Video Quality Setup and is highlighted Press ENTER to enter the Video Quality Setup p...

Страница 12: ...menu and press the ENTER to confirm your selection 6 Repeat steps 3 5 for other menus Note Press to return the previous menu a Audio b Subtitle c Disc Menu Note Language and subtitle selection are on...

Страница 13: ...Default Password is 3308 This password is always effective even after you have selected your own password and changed it To avoid the possibility of others using the default password to set the parent...

Страница 14: ...4 8 16 or 32 times speed Used for Menu Navigation Execute item or confirm setting Select item or setting Pressing for less than 3 seconds to return to the root menu pressing for more than 3 seconds to...

Страница 15: ...ent Chapter Number 3 the total Number of Chapters 4 and the Playing elapsed Time for the title 5 The heading will disappear automatically after 3 seconds if DISPLAY button is not pressed Title Chapter...

Страница 16: ...TLE to select the subtitle language you desire with the current Subtitle Language Number 1 and the total Number of Subtitle Languages 2 displayed If there are mul tiple languages press SUBTITLE again...

Страница 17: ...dio Language Screen Display Some DVDs only allow access to this function through the DVD menu 5 ZOOM During playback press ZOOM to enlarge the picture by 2x 3x or 4X with the current zoom multiple 1 P...

Страница 18: ...second time to set the Ending Point B and the player will repeatedly play the part between Point A and Point B A B Repeat Ending Point Screen Display c Press A B a third time to cancel A B repeat and...

Страница 19: ...an audio CD press the DISPLAY button constantly on the remote to view time information The options below appear on screen display circularly to show you what information is available using this funct...

Страница 20: ...example Single Elapsed Screen Display USING THE REPEAT FEATURE The default mode for the Repeat feature is OFF Pressing 1 ALL REPEAT consecutively changes the repeat options Track repeats the track tha...

Страница 21: ...u screen appears automatically You can use the menu screen to select your desired folders and songs or the system plays the songs in the order they were burned onto the disc 1 Press the or button to c...

Страница 22: ...specific folder Repeat off normal playback As you toggle through the options the repeat mode changes The selected repeat mode loops repeatedly until you turn it off NOTICE icon in front of a file name...

Страница 23: ...hone 1 jack or Headphone 2 jack on the left side of the DVD Refer to Figure 5 Plugging into Headphone jack 1 disables the internal speakers 2 You can enjoy the other audio and video source input from...

Страница 24: ...rograms with Optional Tuner box Please refer to the specific operations described in the TV tuner Figure 7 AV IN E PORT IN can t wok at the same time because signal supported with external TV Tuner or...

Страница 25: ...and low level of degradation This means the Li Polymer batteries do not have Memory Effect and thus can be recharged safely regardless of whether the battery is fully or only partially discharged Ple...

Страница 26: ...Battery Recharge 1 Once the battery is fully discharged immediately recharge re gardless of whether you plan to use battery or not in order to maxi mize battery life 2 Please remove battery from the p...

Страница 27: ...ing the DVD Player Battery Removing the Battery Pack 1 First make sure the player is in Power Off mode and the AC power supply has been disconnected 2 Press the Push button on the side of battery 3 Pu...

Страница 28: ...the moment 4 You ve requested a title or chapter number that is out of range Can t advance through a movie The icon appears on screen SOLUTION PROBLEM No sound or distorted sound Picture is distorted...

Страница 29: ...egion If the regional codes don t match the disc can t be played This DVD is coded for Region Number 2discs The disc is dirty Clean it Condensation has formed Allow player to dry out Disc won t play P...

Страница 30: ...PDF created with FinePrint pdfFactory Pro trial version http www fineprint com...

Отзывы: