background image

Accessing Your Unit Remotely

166

FTB-200 v2

Working With TightVNC

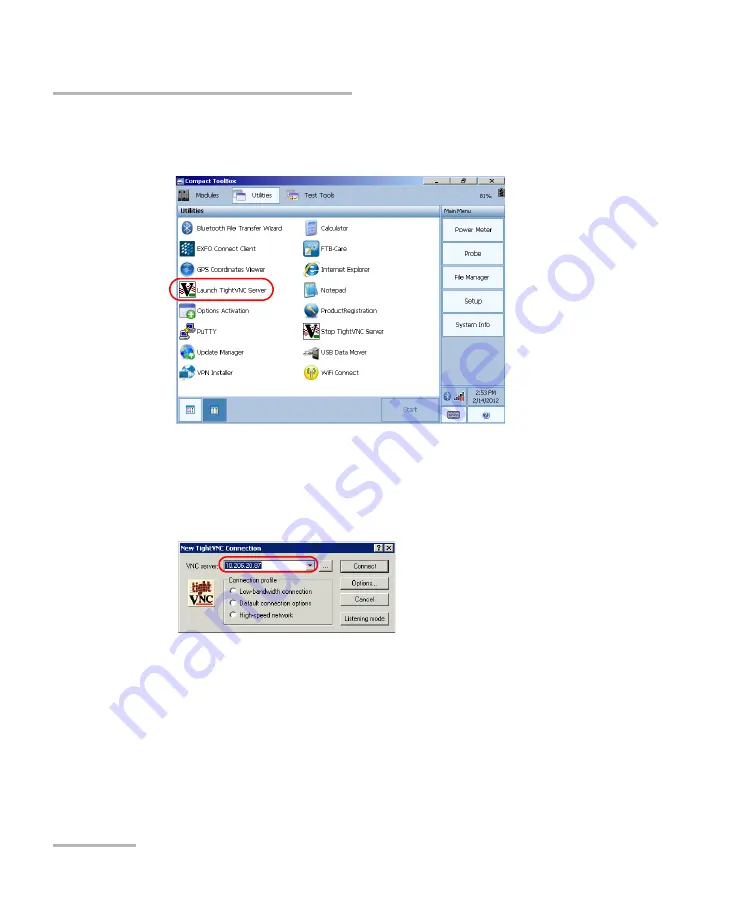
5.

From Compact Toolbox, select the 

Utilities

 tab, then double-tap 

Launch TightVNC Server

.

6.

From your computer, double-click the TightVNC Viewer shortcut on 
your desktop.

7.

In the 

VNC Server

 list, type the IP address of your unit that you wrote 

down at step 4. 

8.

Click 

Connect

.

Содержание FTB-200

Страница 1: ...User Guide Compact Modular Platform FTB 200 v2...

Страница 2: ...r any infringements of patents or other rights of third parties that may result from its use No license is granted by implication or otherwise under any patent rights of EXFO EXFO s Commerce And Gover...

Страница 3: ...TO DETERMINE THAT THE SOFTWARE IS SUITABLE FOR SUCH USE NO WARRANTIES FOR THE SOFTWARE THE SOFTWARE is provided AS IS and with all faults THE ENTIRE RISK AS TO SATISFACTORY QUALITY PERFORMANCE ACCURAC...

Страница 4: ...the Supplemental Components are provided to you by MS Microsoft Corporation or their subsidiaries then you will be licensed by such entity under the same terms and conditions of this EULA except that...

Страница 5: ...2 Safety Information 11 Other Safety Symbols on Your Unit 12 Laser Safety Information 13 Electrical Safety Information 14 3 Getting Started with Your Unit 19 Inserting and Removing Test Modules 19 Usi...

Страница 6: ...s 82 Setting Other Parameters 82 5 Working with Your Unit 83 Printing Documents 83 Viewing PDF Files 86 Taking Screen Captures 87 Setting Storage Parameters for Screen Captures 90 Reading Audio and Vi...

Страница 7: ...uchscreen of Your FTB 200 v2 Unit 177 Recharging the Main Battery 177 Recalibrating the Battery 179 Replacing Batteries 182 Recalibrating the Unit 183 Recycling and Disposal Applies to European Union...

Страница 8: ...es reasonable efforts to ensure compliance to the applicable standards The limits set by these standards are designed to provide reasonable protection against harmful interference when the equipment i...

Страница 9: ...d including interference that may cause undesired operation FCC Radiation Exposure Statement This equipment complies with FCC radiation exposure limits set forth for an uncontrolled environment This d...

Страница 10: ......

Страница 11: ...e use of a touchscreen replace the words click and double click Main Features Your unit has the following characteristics Two slot platform Multitasking possibilities Touchscreen LCD and touchscreen o...

Страница 12: ...Web access from your unit Possibility to take screen captures PDF file generator and viewer available from your unit Easy transfer of files and folders to a USB storage device Easy updates for applic...

Страница 13: ...ular Platform 3 Main Features USB host port AC adapter charger connector Fiber inspection probe port RJ 45 port Headset microphone port for 2 5 mm connector Left panel Right panel USB host ports Built...

Страница 14: ...vary with the applications LED Status Meaning Green Unit is on Green blinking Unit is in Standby mode Off Unit is off or in Hibernation mode Green Battery is fully charged Green blinking Battery is c...

Страница 15: ...ently displayed Pass result does not exceed the defined threshold Green blinking Result statuses from two or more applications Pass no results exceed the defined threshold Red Result status from appli...

Страница 16: ...cond shortcut button Starts the associated application the on screen keyboard or the built in power meter application see Configuring the Shortcut Buttons on page 59 Starts the fiber probe application...

Страница 17: ...nformation transfer These two devices are optional There are two USB 2 0 host ports located on the left panel of the unit All the other ports are located on the right panel of the unit 8 pin mini DIN...

Страница 18: ...o battery power or vice versa without affecting operation Automatic recharge when AC adapter charger is connected Rechargeable battery for clock This battery can keep the date and time for weeks even...

Страница 19: ...njury Do not proceed unless you understand and meet the required conditions CAUTION Indicates a potentially hazardous situation which if not avoided may result in minor or moderate injury Do not proce...

Страница 20: ......

Страница 21: ...ed herein may result in hazardous radiation exposure or impair the protection provided by this unit IMPORTANT When you see the following symbol on your unit make sure that you refer to the instruction...

Страница 22: ...he following symbols may also appear on your unit Symbol Meaning Direct current Alternating current Both direct and alternating current The unit is equipped with an earth ground terminal The unit is e...

Страница 23: ...put port It is potentially harmful in direct intrabeam viewing The following label s indicate that the product contains a Class 3R source When the VFL laser is active the LED on the front of the unit...

Страница 24: ...utes a major safety hazard To avoid electrical shock do not operate the unit if any part of the outer surface covers panels etc is damaged Only authorized personnel should carry out adjustments mainte...

Страница 25: ...ondary and is suitably rated for the country where the unit is sold Use only accessories such as the car outlet adapter batteries and fiber inspection probe designed for your unit and approved by EXFO...

Страница 26: ...C 122 F Relative humidityc c Measured in 0 C to 31 C 32 F to 87 8 F range decreasing linearly to 50 at 40 C 104 F unit 95 non condensing AC adapter 10 to 80 non condensing Maximum operation altitude 2...

Страница 27: ...cal Safety Information IMPORTANT The operation and storage temperatures of some modules may differ from the temperatures specified for your platform In this case always ensure that you comply with the...

Страница 28: ......

Страница 29: ...Platform is turned on This will result in immediate and irreparable damage to both the module and unit CAUTION To avoid damaging your unit use it only with modules approved by EXFO WARNING When the l...

Страница 30: ...g Started with Your Unit 20 FTB 200 v2 Inserting and Removing Test Modules To insert a module into the Compact Modular Platform 1 Turn off your unit 2 Position the unit so that its front panel is faci...

Страница 31: ...nnector pins 4 Insert the protruding edges of the module into the grooves of the unit s module slot 5 Push the module all the way to the bottom of the slot until the retaining screw makes contact with...

Страница 32: ...e to the module lift the mobile part of the retaining screw and use it to turn the retaining screw clockwise until it is tightened This will secure the module into its seated position When you turn on...

Страница 33: ...Turn off your unit 2 Position the unit so that the bottom panel is facing you 3 Lift the mobile part of the retaining screw and use it to turn the retaining screw counterclockwise until it stops The...

Страница 34: ...s 5 Hold the module by its sides or by the handle NOT by the connector and pull it out 6 Cover empty slots with the supplied protective covers CAUTION Pulling out a module by a connector could serious...

Страница 35: ...ard is displayed However if you prefer you can use a hardware keyboard Note Even if a keyboard is connected the on screen keyboard will still be displayed when you work in Compact Toolbox Mouse If you...

Страница 36: ...dy available on your unit GPS USB key purchased from EXFO To be able to know the position of your unit latitude and longitude coordinates For more information see Retrieving the GPS Location of Your U...

Страница 37: ...n under the clock 2 Select the location where you want to enter text 3 Enter the data as required 4 Exit the location when you have finished entering data Right Clicking with the Touchscreen If you ar...

Страница 38: ...onfigure your unit to switch automatically from Standby to Hibernation mode after the specified delay Shutdown completely cuts power to the test modules and platform the unit will perform a complete r...

Страница 39: ...o turn off the unit 1 Press the On Off button OR On the Windows taskbar tap Start This will display the standard shutdown window from which you have a choice of actions or shutdown modes 2 Select Shut...

Страница 40: ...v2 Turning On or Off the Unit 4 From the When I press the power button on my computer list select the desired behavior Ask me what to do option is selected by default 5 Tap Apply to confirm the chang...

Страница 41: ...1 From the Main Menu tap Setup 2 Double tap Application Startup 3 Select the Power on the unit when AC outlet is connected or after power outage box to enable the corresponding option OR Clear the bo...

Страница 42: ...e software that comes with your platform and the module applications as well as Update Manager All the necessary files will be copied to the USB key Each time you purchase a new module you will also r...

Страница 43: ...upgrades the computer and USB key are only necessary if you do not wish to download the files directly on your unit Note For more information on the installation refer to the Update Manager online hel...

Страница 44: ...B key 2 If it is not already done turn on your unit 3 Exit Compact Toolbox and the modules applications 4 If you want to install Update Manager using the USB key disconnect it from the computer and co...

Страница 45: ...install or update applications using the USB key disconnect it from the computer and connect it to one of the USB ports of your unit 4 Copy the installation files from the USB key to the folder conta...

Страница 46: ...orts of the computer 3 From the Welcome window on the installation DVD click Compact Toolbox and Tools 4 Select the Compact Toolbox check box and click Next 5 Follow the on screen instructions All the...

Страница 47: ...or platform serial number depending on whether the software options were purchased for a module or the platform Customer s name Customer s company name Customer s phone number Customer s e mail addre...

Страница 48: ...e options for your unit 1 Connect a USB memory key to one of the USB ports of your computer 2 Copy the key file to the USB memory key 3 Disconnect the USB key from the computer and connect it to your...

Страница 49: ...he Browse button to locate the key file that you want to use 6 Press Activate The option indicator will turn into a green check mark to confirm that the option is now active 7 Close to exit Note At th...

Страница 50: ...re options for your module 1 Connect a USB memory key to one of the USB ports of your computer 2 Copy the key file to the USB memory key 3 Disconnect the USB key from the computer and connect it to yo...

Страница 51: ...o use 6 Press Activate The option indicator will turn into a green check mark to confirm that the option is now active Note You can see the supported options for the module in the Options list 7 Press...

Страница 52: ...Compact Toolbox To start a module application 1 From Compact Toolbox select the module to use It will turn blue to indicate that it is highlighted 2 Under Applications select an application then pres...

Страница 53: ...y to a fiber inspection probe display To adjust the display brightness Press the key repeatedly to switch between brightness levels OR 1 From the Main Menu tap Setup 2 Double tap Brightness 3 Move the...

Страница 54: ...crophone and Speaker Volume To fit your work environment you may adjust the microphone and speaker volume Values are kept in memory even when you turn the unit off To adjust the microphone volume 1 Fr...

Страница 55: ...45 Adjusting Microphone and Speaker Volume 4 Under Voice recording tap Volume 5 Under Microphone use the slider to adjust the sound of your microphone Close the window when your settings are complete...

Страница 56: ...Setting Up Your Unit 46 FTB 200 v2 Adjusting Microphone and Speaker Volume To adjust the speaker volume 1 From the Main Menu tap Setup 2 Double tap Sounds and Audio Devices 3 Select the Volume tab...

Страница 57: ...e slider to adjust the sound of your speaker Note You can also select the Mute check box if you want to quickly turn off the sound Note You can tap the Advanced button if you want to refine the volume...

Страница 58: ...t calibration method is performed using four points but you can also perform a 25 point calibration linearization if you need more accuracy You can stop the calibration process at any time but the tou...

Страница 59: ...application displays OK to indicate that the new parameters have been taken into account Note If you want to stop the calibration process stop pressing the screen The application will close automatic...

Страница 60: ...200 v2 Recalibrating the Touchscreen To recalibrate the touchscreen with a 25 point linearization 1 From the Main Menu tap Setup then double tap Touch Screen Calibration 2 Tap Advanced 3 Select the To...

Страница 61: ...application displays OK to indicate that the new parameters have been taken into account Note If you want to stop the calibration process stop pressing the screen The application will close automatic...

Страница 62: ...hscreen Right Click Feature By default you can right click with your touchscreen see Right Clicking with the Touchscreen on page 27 However you can disable this feature if you prefer To enable or disa...

Страница 63: ...Setting Up Your Unit Compact Modular Platform 53 Enabling or Disabling the Touchscreen Right Click Feature 4 Select the Setting tab 5 Tap the Option button...

Страница 64: ...the Enable Auto Right Click check box to enable the option OR Clear the check box if you prefer to disable the right click 7 Tap Apply to confirm the changes and then OK to return to the Control Pane...

Страница 65: ...information on how to switch from one of the available languages to another see Selecting the Language of Operation on page 68 To customize the appearance and behavior of the on screen keyboard 1 Mini...

Страница 66: ...from standby or hibernate modes the application will prompt you to select a user and enter a password even if you have enabled the automatic logon feature By default the automatic logon is enabled for...

Страница 67: ...to the Control Panel window At next startup you will no longer need to specify a user name and password except if the unit comes back from standby or hibernate modes IMPORTANT You cannot create user a...

Страница 68: ...n To disable the automatic logon 1 From the Main Menu tap Setup 2 Double tap AutoLogon 3 Tap Disable Auto Logon 4 When the application prompts you confirm with Yes 5 Tap to return to the Control Panel...

Страница 69: ...cut buttons You can determine which application each of these shortcut buttons will start There are two shortcut buttons one to start an application related to the module in slot 0 or the on screen vi...

Страница 70: ...t Buttons To configure the shortcut buttons 1 From the Main Menu tap Setup 2 Double tap Application Startup 3 Under Shortcut buttons associate the application to each button 4 Tap Apply to confirm the...

Страница 71: ...atically the next time you turn on your unit after a shutdown not in standby mode For more information see Turning On or Off the Unit on page 28 If the specified application cannot be started for exam...

Страница 72: ...h on start up select the application or applications you want to start automatically when you turn on your unit Note The Power Meter application is only available if you purchased this option with you...

Страница 73: ...es FIP of the FIP 400 and FIP 400B series By default the unit prompts you to select the application corresponding to the FIP with which you want to work FIP 400 or FIP 400B If you prefer you can confi...

Страница 74: ...o option Note If the list is not available it means that the ConnectorMax2 application is not installed on your unit In this case the ConnectorMax application will start automatically enabling you to...

Страница 75: ...configure contact your network administrator For more information on printing see Printing Documents on page 83 To configure the printer 1 On your unit from the Main Menu tap Setup 2 Double tap Printe...

Страница 76: ...Network Printers 3 Select the HP Universal Printing PCL 6 item 4 From the menu select File Printing Preferences 5 Under Find a Printer select Enter a Printer Address 6 Enter the IP address of the prin...

Страница 77: ...the application prompts you click OK to acknowledge the message 10 If desired modify the printer preferences to your liking You can save the whole set of preferences for future use with the Save As bu...

Страница 78: ...ce the keyboards are added you can switch easily from one input language to another Values are kept in memory even when you turn the unit off IMPORTANT The keyboards that you add will not be available...

Страница 79: ...the Main Menu tap Setup 2 Double tap Regional and Language Options 3 Select the Languages tab 4 From the Language used in menus and dialogs list select the desired language 5 Tap Apply to confirm the...

Страница 80: ...B 200 v2 Selecting the Language of Operation To add new input languages 1 From the Main Menu tap Setup 2 Double tap Regional and Language Options 3 Select the Languages tab 4 Under Text services and i...

Страница 81: ...desired language 7 If necessary from the Keyboard layout IME list select the desired option 8 Tap OK to confirm 9 Repeat steps 5 to 8 for all the languages that you want to add 10 Tap Apply to confirm...

Страница 82: ...uage Note Modifying the input language does not modify the language of the interface To modify the language of the VLC media player 1 Minimize the Compact Toolbox window 2 On the Windows taskbar tap S...

Страница 83: ...date the time and the time zone see Adjusting the Date Time and Time Zone on page 75 Note Modifying location date and time settings will affect some of the Windows Embedded Standard settings To set d...

Страница 84: ...y refine the settings as follows 5a Tap Customize to display the detailed settings 5b Select either the Time or Date tab depending on the settings that you want to modify 6 Modify the settings 7 Tap A...

Страница 85: ...t the bottom of the Main Menu When saving results the unit also saves the corresponding date and time Note A dedicated clock battery keeps the date and time accurate For details see Replacing Batterie...

Страница 86: ...and Time Zone To adjust the date and time 1 From the Main Menu tap Setup 2 Double tap Date and Time 3 Select the Date Time tab 4 Modify the settings according to your needs 5 Tap Apply to confirm the...

Страница 87: ...Date Time and Time Zone To change the time zone 1 From the Main Menu tap Setup 2 Double tap Date and Time 3 Select the Time Zone tab 4 Modify the settings according to your needs 5 Tap Apply to confir...

Страница 88: ...schemes to manage power When you do not use the unit for a while the display may be turned off to save power You can also configure the unit to go into standby or hibernation mode after the specified...

Страница 89: ...on batteries Standard selected by default Turn off monitor Never After 5 minutes System standby Never After 15 minutes System hibernates Never After 30 minutes Always On Turn off monitor Never Never...

Страница 90: ...gement Options To select a power scheme 1 From the Main Menu tap Setup 2 Double tap Power Options 3 From the Power Schemes list select the desired predefined set of parameters 4 Tap Apply to confirm t...

Страница 91: ...ect the predefined set of parameters that you want to modify or on which you want to base your new scheme 4 Modify the parameters to your needs 5 Tap Save As If you want to modify the existing power s...

Страница 92: ...should configure your Internet access contact your network administrator To configure the Internet options 1 From the Main Menu tap Setup 2 Double tap Internet Options 3 Go to the Connections tab 4 M...

Страница 93: ...t must be accessible from this network by Wi Fi or standard Ethernet You must also define the printer on your unit before attempting to access it see Configuring Network Printers on page 65 If you can...

Страница 94: ...the Internet Explorer icon to open the browser 2 Select the document that you want to print as follows 2a From the menu select File Open 2b Tap Browse to locate the file that you want to open 2c Tap...

Страница 95: ...eters for the current work session 6 Tap Print to start the printing process 7 If you selected PDFCreator proceed as follows 7a Enter the desired information 7b Tap Save 7c Specify a location and a fi...

Страница 96: ...s reader refer to the SumatraPDF online help To view PDF files 1 From Main Menu select File Manager 2 Browse through the folders to find the desired PDF file 3 Double tap the file 4 The file opens aut...

Страница 97: ...be you can use the capture feature of the probe instead For more information on how to modify the default file format and destination folder see Setting Storage Parameters for Screen Captures on page...

Страница 98: ...of your unit s time settings Note The SEQUENTIAL NUMBER value is used to differentiate two captures that would have been taken at the same date and time There are two ways to capture images a quick mo...

Страница 99: ...you can also press the PRINT SCREEN key To take several screen captures 1 If you have configured one of the shortcut buttons to automatically display the virtual keyboard press the appropriate button...

Страница 100: ...r D Documents and Settings User_currently_logged _on My Documents Screen Snapshot where User_currently_logged _on corresponds to the user name of the person that is currently logged on the unit You ca...

Страница 101: ...meters for Screen Captures To set the default image format 1 Minimize the Compact Toolbox window 2 From the Windows taskbar double tap the icon 3 Under Image format select the option corresponding to...

Страница 102: ...it 92 FTB 200 v2 Setting Storage Parameters for Screen Captures To modify the destination folder 1 Minimize the Compact Toolbox window 2 From the Windows taskbar double tap the icon 3 Under Destinatio...

Страница 103: ...ge Parameters for Screen Captures 4 From the Browse for Folder window select the folder that you want to use to store the screen captures If necessary you can create a folder 5 When your selection is...

Страница 104: ...ead files that are stored on your unit on a USB memory key on a network folder or even on a Web site For more information on how to configure the language of the media player see Selecting the Languag...

Страница 105: ...select File Manager 2 Locate the video or audio file that you want to read 3 Double tap the file The media player starts reading automatically if the file format is recognized Note You can access the...

Страница 106: ...ll need a connection to the Internet You can either download the files directly to your unit or to a computer and transfer them to your unit later using a USB key Note Only administrator level users c...

Страница 107: ...r browser 5 Save the corresponding EXE installer to a location of your choice on a USB memory key connected to your computer or on your unit 6 If you have downloaded the file to a USB key connect the...

Страница 108: ...d to modify the Internet options see Configuring the Internet Options on page 82 For more information on how to connect to the Internet using a 3G USB modem key see Accessing the Internet with a 3G US...

Страница 109: ...ing the Web 2 Enter the desired Web address in the address bar and tap the button located at the right of the address bar to start browsing 3 Close the window to return to the Utilities tab Simply clo...

Страница 110: ...s no Subscriber Identity Module SIM card This means that you will need to Purchase a compatible and unlocked SIM card from a provider offering 3G services If you need more information on the 3G covera...

Страница 111: ...formation on how to download the kits refer to the Readme files provided with the kits IMPORTANT Only the Sierra Wireless 319U keys provided by EXFO are supported on your unit Before using the USB mod...

Страница 112: ...this point if you have used a USB memory key to transfer the installation files to your unit you can remove it You are now ready to install the AirCard Watcher application as explained hereafter To i...

Страница 113: ...will know that the installation is complete when the AirCard Watcher application starts 5 Close the AirCard Watcher application 6 Disconnect the USB modem key from your unit 7 Reconnect the USB modem...

Страница 114: ...and wait for the startup sequence to complete 2 If necessary insert the SIM card into the USB modem key For more information refer to the documentation that came with your modem key 3 If necessary co...

Страница 115: ...e online help provided with the application available by tapping from the toolbar Note The application will display a warning message if no SIM card has been inserted in the USB modem key Note Dependi...

Страница 116: ...the Clipboard in two formats a text string or a URL link The text string contains the GPS coordinates as well as a date and time stamp Once the information is in the Clipboard you can paste it to any...

Страница 117: ...d Platform kits If you need information on how to download the kits refer to the Readme files provided with the kits 3 Install the retrieved kits on your unit 3a Install the System Upgrade For more in...

Страница 118: ...on of your unit 1 Go outdoors with your unit 2 If necessary turn on your unit and wait for the startup sequence to complete 3 Ensure that the GPS USB key is connected to your unit IMPORTANT Always tur...

Страница 119: ...ce the GPS key is connected properly the utility will display Searching Finally when a connection can be established with the GPS satellites the utility will display Receiving coordinates Note As this...

Страница 120: ...rom Compact Toolbox select the Utilities tab 2 Double tap Notepad Accessing Other Tools Your unit comes with free tools such as Wireshark to help you troubleshoot networks For more information refer t...

Страница 121: ...z 2 kHz and 270 Hz The FTB 200 v2 can also include a visual fault locator VFL to inspect or identify fibers For more information on how to use the power meter or the VFL refer to the power meter onlin...

Страница 122: ...Meter and VFL 112 FTB 200 v2 To access the built in power meter or the VFL From the Main Menu tap Power Meter Note You can access the online help of the power meter and the VFL by tapping the button...

Страница 123: ...u will be prompted to select the application with which you want to work If you prefer you can configure the unit to always start your favorite application directly instead see Selecting the FIP Start...

Страница 124: ...ation Note If the ConnectorMax2 application is not installed on your unit the ConnectorMax application will start automatically enabling you to work with the probes of the FIP 400 series If you also w...

Страница 125: ...r unit Your unit is equipped with the following ports and devices for data transfer Three USB 2 0 ports to connect a memory key or a USB to RS 232 adapter see Using the USB to RS 232 Adapter on page 1...

Страница 126: ...t 1 From Main Menu tap System Info 2 Select Platform The free disk space is displayed next to the Available Flash on D APP item 3 When you have finished tap OK to close System Information To manage fi...

Страница 127: ...t 2 From Main Menu select File Manager The list of available drives and folders should include the memory key Removable Disk You can now manage your files and folders as you wish Note If you do not se...

Страница 128: ...s XP SP3 or later otherwise there could be problems during data transfer The computer must also be equipped with a Bluetooth device and be configured properly Note If you prefer to use devices such as...

Страница 129: ...that data will be sent using the Bluetooth Transfer Wizard of the computer Send a file option and received by the unit Receive a file option IMPORTANT Depending on the operating system that your comp...

Страница 130: ...1 Configure your unit as follows 1a From the Main Menu tap Setup 1b Double tap Bluetooth Devices 1c From the Options tab under Discovery select the Turn discovery on check box 1d Ensure that the Allo...

Страница 131: ...luetooth Devices 2b From the Options tab under Discovery select the Turn discovery on check box 2c Ensure that the Allow Bluetooth devices to connect to this computer check box is selected 2d Tap OK t...

Страница 132: ...Managing Data 122 FTB 200 v2 Transferring Data via Bluetooth 5 Double tap Bluetooth File Transfer Wizard 6 From the Welcome window tap Next 7 Select Send a file and tap Next...

Страница 133: ...g Data Compact Modular Platform 123 Transferring Data via Bluetooth 8 Select the computer to which you want to transfer data as follows 8a Tap Browse 8b Select the desired computer and then tap OK to...

Страница 134: ...luetooth 9 If you want to use a passkey select the corresponding check box and enter the passkey When you have finished tap Next 10 Tap Browse to select the file that you want to send to the computer...

Страница 135: ...is passkey is kept in memory both on your unit and on the computer until you remove this connection Setup Bluetooth Devices Devices or change the passkey 13 On the computer click Finish 14 From the Bl...

Страница 136: ...devices are enabled but not connected to a network If you have disabled the devices you must enable them before trying to connect to a wireless network see Enabling or Disabling the Bluetooth and Wi F...

Страница 137: ...ess Network 2d Ensure that the File and Printer Sharing item is selected 2e Tap OK to confirm 3 On your unit from Compact ToolBox select the Utilities tab 4 Double tap WiFi Connect 5 Tap OK to acknowl...

Страница 138: ...128 FTB 200 v2 Connecting to a Wireless Network 6 Double tap Wireless Network Connection 7 If your unit is already connected to a wireless network tap View Wireless Networks to display the list of wir...

Страница 139: ...Managing Data Compact Modular Platform 129 Connecting to a Wireless Network 8 From the Wireless Network Connection window select the wireless network to which you want to connect 9 Tap Connect...

Страница 140: ...may also need to configure other parameters before being able to transfer data via Wi Fi For information on the configuration specific to your network contact your network administrator As soon as the...

Страница 141: ...as been detected the unit assigns it a COM port number values begin at COM 3 This COM port number is kept in memory even when you turn the unit off This means that next time you connect the same adapt...

Страница 142: ...ct the USB end of the adapter to any of the USB ports Note If the device that you want to use is a computer not equipped with USB ports you may want to use a null modem serial cable as an extension ca...

Страница 143: ...our unit retrieve the COM port of the adapter as follows 3a On your unit from the Main Menu select Setup 3b Double tap Device Manager 3c Expand the Ports COM LPT list to retrieve the COM port number t...

Страница 144: ...ng Data 134 FTB 200 v2 Using the USB to RS 232 Adapter 4 From your unit configure the communication parameters as follows 4a On your unit from Compact ToolBox select the Utilities tab then double tap...

Страница 145: ...ou specify corresponds to the one that you wrote down at step 3c If you want to view the characters that you type on screen from the tree view select Terminal Under Local echo set the value to Force o...

Страница 146: ...differ from the one that you used on your unit 6 From the device establish communication with the unit using your favorite communication tool PuTTY HyperTerminal etc IMPORTANT To be able to establish...

Страница 147: ...corresponding options If you do not intend to transfer files via Bluetooth or to work with a wireless network for a certain period of time you may wish to disable the devices to extend battery life As...

Страница 148: ...Managing Data 138 FTB 200 v2 Enabling or Disabling the Bluetooth and Wi Fi Devices 3 Select Wireless Network Connection 4 From the File menu select Enable or Disable according to your needs...

Страница 149: ...ocuments which path is D Documents and Settings User_currently_logged _on My Documents where User_currently_logged _on corresponds to the user name of the person that is currently logged on the unit S...

Страница 150: ...names are kept The application generates folder names as follows YEAR MONTH DAY _ HOUR MINUTE SECOND Example For a copy operation requested on September 20 2013 the folder name could be 2013 09 20 13_...

Страница 151: ...tion 4 Select or clear the check boxes to adjust the folder selection to your needs 5 If necessary under Destination media select the desired USB storage device 6 Tap Copy The files will remain on you...

Страница 152: ...ata 142 FTB 200 v2 Transferring Files with the USB Data Mover Application To manage the list of source folders 1 From Compact Toolbox select the Utilities tab 2 Double tap USB Data Mover 3 Tap User Pr...

Страница 153: ...ular Platform 143 Transferring Files with the USB Data Mover Application 4 If you want to add your own folders to the list of source folders proceed as follows 4a Tap Add a Folder 4b Select the desire...

Страница 154: ...roceed as follows 5a Select the folder that you want to remove 5b Tap Remove Folder Note The application will not prompt you to confirm the removal of the folder from the list 6 When you have finished...

Страница 155: ...your unit was connected locally to the network This could be useful if you need to transfer data to a centralized folder on the company s private network for example To establish the communication bet...

Страница 156: ...Double tap VPN Installer 3 From the VPN Installer first window tap Continue IMPORTANT EXFO does not provide any VPN clients You must provide the installation files for one of the supported VPN clients...

Страница 157: ...ed VPN clients appear on the Supported software and versions list You can write down this list and contact your network administrator to get the installation files 5 Tap Cancel to close the VPN Instal...

Страница 158: ...to complete the installation If you updated the VPN client by mistake see Solving Common Problems on page 185 Your unit has been designed to work with specific versions of VPN clients NEVER UPDATE the...

Страница 159: ...urrent date modify it see Adjusting the Date Time and Time Zone on page 75 2 Retrieve the installation files on your unit as follows 2a On your unit create a folder on the Windows desktop 2b Copy the...

Страница 160: ...5 From the VPN Installer first window read the information When you have finished tap Continue 6 From the Supported software and versions list select the entry corresponding to the VPN client for whi...

Страница 161: ...er 8 Tap the Install button 9 Follow the on screen instructions Your unit will restart automatically to complete the installation of the VPN client All users will now be able to connect to a VPN from...

Страница 162: ......

Страница 163: ...user rights Taken into account Not taken into account Password protected Yes mandatory The user name and password are the same as those used to connect to the unit By default all the accounts with adm...

Страница 164: ...g it remotely Accessing Your Unit with Remote Desktop To be able to connect to the unit using Remote Desktop you must Know the IP address of the unit and provide it in the connection settings on the c...

Страница 165: ...45 port located on its right side If you want to use a wireless network see Connecting to a Wireless Network on page 126 You could also create a Private Area Network with your Bluetooth device contact...

Страница 166: ...e down at step 4 7 Click Connect 8 When the application prompts you enter your user name and password 9 Click OK to open the session Allowing Users with Limited Accounts to Use Remote Desktop By defau...

Страница 167: ...1 On your unit from the Main Menu select Setup 2 Double tap Remote Desktop 3 Ensure that Allow remote connections to this unit from computer using Remote Desktop client application is selected 4 From...

Страница 168: ...You can also configure the unit to prevent users to access it using Remote Desktop However all users having administrator user rights will be able to modify this setting at any time To prevent users...

Страница 169: ...Accessing Your Unit Remotely Compact Modular Platform 159 Working with Remote Desktop 3 Select the Do not allow remote connections to this unit option 4 Tap OK to confirm...

Страница 170: ...need to restart or shutdown your unit while you are controlling it remotely To restart or turn off your unit with Remote Desktop 1 Close all applications including Compact Toolbox 2 On the taskbar cl...

Страница 171: ...unit and provide it in the connection settings on the computer Know the password same for all users by default This section provides you with the basic information to control your unit with TightVNC...

Страница 172: ...er The TightVNC Server is already installed on your unit You must configure passwords before establishing a connection between a computer and your unit To configure the TightVNC Server 1 From Compact...

Страница 173: ...Modular Platform 163 Working With TightVNC 3 In the Primary password and View only password boxes type the desired passwords Note The two passwords are independent of each other They do not have to b...

Страница 174: ...ur computer 1 Insert the installation DVD into the CD DVD drive of your computer 2 From the DVD Main Menu click Explore this DVD 3 Open the Utilities folder and then copy the VNC Client folder 4 Paste...

Страница 175: ...em from communicating If you want to use an Ethernet network connect an RJ 45 network cable to the unit s RJ 45 port located on its right side If you want to use a wireless network see Connecting to a...

Страница 176: ...From Compact Toolbox select the Utilities tab then double tap Launch TightVNC Server 6 From your computer double click the TightVNC Viewer shortcut on your desktop 7 In the VNC Server list type the IP...

Страница 177: ...zed access when it is connected to a network or to the Internet The firewall has been preconfigured so that all the applications that come with your unit work properly However you can allow other appl...

Страница 178: ...ing Exceptions to the Firewall 3 Select the Exceptions tab 4 Tap Add Program to add any application that you need 5 When you have finished tap OK located at the bottom of the dialog box to confirm the...

Страница 179: ...st you can quickly verify that the remote host functions properly The ping test has six common parameters The URL IP address The number of packets to send The packet size The maximum time allowed for...

Страница 180: ...ting Network Connections 170 FTB 200 v2 Performing a Ping Test To perform a ping test 1 From Compact Toolbox select the Test Tools tab then double tap IP Tools 2 From IP Testing Tools select the Ping...

Страница 181: ...on to use the unit s default ping address The default value cannot be configured 4 Set the other parameters Number of packets to send Packet size Timeout limit TTL limit Clear the Allow fragmentation...

Страница 182: ...fy accesses blocked by firewalls or routing problems This trace route test utility enables you to Enter a remote host address Set the maximum time allowed for a packet to reach the remote host Set the...

Страница 183: ...s to reach You can tap the Default button to use the unit s default trace route address The default value cannot be configured 3 Set the other parameters Timeout limit TTL limit Select or clear the Re...

Страница 184: ...the importation into a Microsoft Excel worksheet By default the application suggests a file name For ping tests Ping for URL on YEAR _ MONTH _ DAY txt For trace route tests Trace Route for URL on YEA...

Страница 185: ...rea Keep the unit out of direct sunlight Avoid high humidity or significant temperature fluctuations Avoid unnecessary shocks and vibrations If any liquids are spilled on or into the unit turn off the...

Страница 186: ...e soft end of the swab moisten a cleaning tip with only one drop of isopropyl alcohol 4 While applying light pressure to avoid breaking the detector window gently rotate the cleaning tip on the detect...

Страница 187: ...battery is recharged automatically along with the main battery In Compact Toolbox the charge status is shown above Main Menu The unit also indicates the charge status with the LED on its front panel s...

Страница 188: ...on various factors such as the type of modules currently in use and the ambient temperature To ensure that batteries function or charge properly keep them in temperatures between 10 C and 40 C 50 F a...

Страница 189: ...The utility will charge the battery until it is full It will then discharge the battery completely You will have to let the battery recharge completely The whole calibration process can take several h...

Страница 190: ...aintenance 180 FTB 200 v2 Recalibrating the Battery To recalibrate the batteries 1 From the Main Menu select Setup and then double tap Battery Calibration 2 Connect the AC adapter charger to your unit...

Страница 191: ...ct Modular Platform 181 Recalibrating the Battery 3 Tap the Start Calibration button the Stop Calibration button will become available Once calibration is complete the Start Calibration button becomes...

Страница 192: ...ry contact EXFO to purchase a new one 2 Turn off the unit 3 Open the battery compartment door located at the top of the unit turn the cap counterclockwise and pull it away 4 Replace the battery 5 Clos...

Страница 193: ...of specifications depends on operating conditions For example the calibration validity period can be longer or shorter depending on the intensity of use environmental conditions and unit maintenance...

Страница 194: ...onths after the calibration date Recommended calibration period one year To ensure that your unit conforms to the published specifications calibration may be carried out at an EXFO service center or d...

Страница 195: ...nal power supply is disconnected Make sure the external power supply is connected at both ends Unit screen is dark Unit s backlight is off Press the backlight button Battery is discharged and unit has...

Страница 196: ...ured in place correctly see the Inserting and Removing Test Modules section The module s application has not been installed yet on your unit or the module s application is not up to date Ensure that t...

Страница 197: ...he system is displaying the boot menu 3 seconds press from the unit s keypad to select the emergency system tools operation mode OR Press the ARROW DOWN key on the keyboard if you have connected one P...

Страница 198: ...to standby or hibernation mode unexpectedly Power schemes are not defined correctly Select one of the predefined power schemes Always On or Max Battery For more information see the Configuring the Po...

Страница 199: ...For more information see the Accessing the Internet with a 3G USB Modem Key section The USB modem key is not detected properly Disconnect the modem key from your unit and try connecting it again If th...

Страница 200: ...You want to change your VPN client for another client OR You need to remove the VPN client from your unit Restore your unit To do so see the Restoring Your Unit to Normal Operation section The VPN cl...

Страница 201: ...you purchased it or restore it with a specific Windows image WIM that could have been provided to you by EXFO customer service for example Note You may find useful to connect a keyboard and a mouse t...

Страница 202: ...to select an item equivalent of the ENTER key To restore the system partition 1 Turn on the FTB 200 v2 2 While the system is displaying the boot menu 3 seconds press from the unit s keypad to select t...

Страница 203: ...indow select Restore system partition from an image then tap Next 5 If you want to revert your unit to its initial state most cases select Factory recovery image OR If you prefer to use an image file...

Страница 204: ...ubleshooting 194 FTB 200 v2 Restoring Your Unit to Normal Operation 6 Tap Next to proceed to the next step 7 Tap Next to start the restoration process The unit will restart upon completion of the proc...

Страница 205: ...t menu 3 seconds press from the unit s keypad to select the Maintenance and recovery mode OR Press the ARROW DOWN key on the keyboard if you have connected one 3 Press the unit s knob or ENTER on your...

Страница 206: ...to back up A check mark indicates a selection of the entire folder subfolders and files A shaded check box indicates that not all of the files of subfolders are selected 6 If the USB device you want t...

Страница 207: ...device at this point and that it does not show up in the list tap Back connect the device then tap Next to return to this window 8 Tap Next to start the file copy process A progress bar indicates whi...

Страница 208: ...e boot menu 3 seconds press from the unit s keypad to select the Maintenance and recovery mode OR Press the ARROW DOWN key on the keyboard if you have connected one 3 Press the unit s knob or ENTER on...

Страница 209: ...Unit to Normal Operation 5 Tap Next to start the disk analysis Once the analysis is complete you can view a report on each drive by tapping Details 6 Tap OK once you have finished 7 To exit the integ...

Страница 210: ...omer feedback manual exfo com To accelerate the process please have information such as the name and the serial number see the product identification label as well as a description of your problem clo...

Страница 211: ...uring the warranty period and found to meet all published specifications EXFO will charge standard calibration fees THIS WARRANTY IS IN LIEU OF ALL OTHER WARRANTIES EXPRESSED IMPLIED OR STATUTORY INCL...

Страница 212: ...e without incurring obligation to make any changes whatsoever on units purchased Accessories including but not limited to fuses pilot lamps batteries and universal interfaces EUI used with EXFO produc...

Страница 213: ...the conditions under which it was observed 5 Return the equipment prepaid to the address given to you by support personnel Be sure to write the RMA number on the shipping slip EXFO will refuse and re...

Страница 214: ...A and Canada Tel 1 418 683 5498 Fax 1 418 683 9224 support exfo com EXFO Europe Service Center Winchester House School Lane Chandlers Ford Hampshire S053 4DG ENGLAND Tel 44 2380 246800 Fax 44 2380 246...

Страница 215: ...M processor Windows Embedded Standard GENERAL SPECIFICATIONS Temperature Operating Storage b 0 C to 50 C 32 F to 122 F 40 C to 60 C 40 F to 140 F Relative humidity 0 to 95 non condensing Size H x W x...

Страница 216: ...86 dBm 1 86 dBm to min 0 01 max to 54 dBm 0 1 54 dBm to 64 dBm 1 64 dBm to min Automatic offset nulling range f Max power to 63 dBm for InGaAs Max power to 40 dBm for GeX Tone detection Hz 270 1000 20...

Страница 217: ...l hazard 9 of product hazard 9 certification information viii changing batteries 182 charger 15 checking data integrity 198 cleaning detector ports 176 front panel 175 touchscreen 177 clock battery se...

Страница 218: ...er safety LED 4 LED panel description 4 localizing your unit 106 longitude and latitude 106 M maintenance battery 177 detector ports 176 front panel 175 general information 175 touchscreen 177 maximum...

Страница 219: ...startup 61 software see application specifications product 205 startup option 61 storage requirements 175 storage path 90 surfing the Internet 98 symbols safety 9 system emergency tools 191 partition...

Страница 220: ...363 2006 X Indicates that this toxic or hazardous substance contained in at least one of the homogeneous materials used for this part is above the limit requirement in SJ T11363 2006 SJ T11363 2006 Pa...

Страница 221: ...MARKING REQUIREMENTS Product Environmental protection use period years Logo This Exfo product EXFO 10 Batterya a a If applicable 5...

Страница 222: ...EXFO ASIA PACIFIC 100 Beach Road 25 01 03 Shaw Tower SINGAPORE 189702 Tel 65 6333 8241 Fax 65 6333 8242 EXFO CHINA Beijing Global Trade Center Tower C Room 1207 36 North Third Ring Road East Dongchen...

Отзывы: