Excel Globetraveller Скачать руководство пользователя страница 13


                                                                              ~ 12 ~            


Globetraveller user manual 

© 2009 VAN OS MEDICAL 
International customers please contact: 
Tel. +31(0)167 573020, Fax +31(0)167 573381, E-mail: 

[email protected]

www.vanosmedical.com


Irish and UK customers please contact: 
Tel. +44(0)1757 701177, Fax +44(0)1757 706011, E-mail: 

[email protected]

www.vanosmedical.com


MAKING ADJUSTMENTS TO YOUR WHEELCHAIR CAN CAUSE BIG RISKS FOR YOUR SAFETY AND THE FUNCTION OF 

YOUR WHEELCHAIR. ADJUSTMENTS MADE BY YOURSELF ARE STRONGLY ADVISED AGAINST AND CARRIED OUT AT 

YOUR OWN RISK. ALWAYS SEEK ADVICE FROM AN APPROVED DEALER BEFORE MAKING ADJUSTMENTS. 


5 INSTRUCTIONS FOR USE AND MOUNTING OPTIONS 

In this chapter we will explore all the possibilities that you have with your wheelchair. All setting and user 
instructions, such as the removal of the footrest, will be discussed. 
 

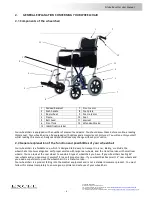
Your wheelchair is an Excel® Globetraveller


The wheelchair is available in self propel and transit versions, see section 2.2 for further explanation on this. On 
the cross-frame of your wheelchair you will find a label on which you can find which wheelchair you own. Further 
on in this chapter we can refer to a specific version. 


Warning: 

We advise you, if you want to make changes where tools are needed, to consult with your dealer. 
 

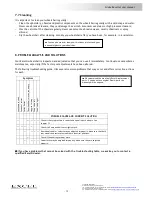
5.1 Tools and technical information 

 
For the maintenance of your wheelchair you will, in some cases, need tools. For your wheelchair you will need the 
following tools:  
 
Phillips screwdriver 


PH2  

Allen keys 


4, 5 and 6 mm  

Cross-ring or keys 


8, 10, 13 and 26 mm  

Spanners 


19 and 22 mm  

Socket wrench   


19 mm 


Excel® Globetraveller 


Seat width 


45 cm  

Seat depth 


43 cm  

Seat height 


50 cm  

Backrest height  


41 cm   

Total width  


12 cm + seat width  

Total length 


> 90 cm  

Total height 


> 92 cm  

Maximum user weight   


100 kg  

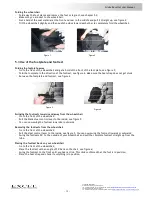
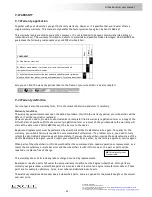
5.2 Opening and closing the wheelchair 


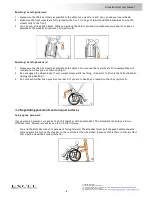
Opening the wheelchair


-


Make sure you stand to the side of the wheelchair;  

-


Hold the armrest of the side closest to you, and tilt the wheelchair slightly towards you; 

-


Push the seat side tubes downwards, this will unfold the wheelchair; 

-


Then, to fully open the wheelchair, push the side tubes of the seat frame into place, see figure 1; 

-


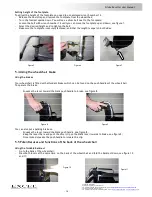
Make sure the side tubes are now in the seat receiving brackets on the main frame and check if the seat 
coating is flat; 

-


If you have removed them, place the foot or leg rest back onto the wheelchair, see chapter 5.3. You can now 
use the wheelchair. 

Содержание Globetraveller

Страница 1: ...Read instructions before use User Manual Globetraveller...

Страница 2: ...he safety instructions in this guide are general guidelines that must be seen as broad guidelines It is possible that you develop your own ways for many common actions However we advise you to consult...

Страница 3: ...RFACES 8 4 3 GOING UP AND DOWN RAMPS 9 4 4 GOING UP AND DOWN STAIRS 11 5 INSTRUCTIONS FOR USE AND MOUNTING OPTIONS 12 5 1 TOOLS AND TECHNICAL INFORMATION 12 5 2 OPENING AND CLOSING THE WHEELCHAIR 12 5...

Страница 4: ...n date The date on which your wheelchair was manufactured 2 Serial number Every wheelchair has its own unique identification number YOU must have this number when making technical requests or if warra...

Страница 5: ...ilities of your wheelchair Your wheelchair is a foldable one which is designed to be easy to transport in a car Mainly we divide the wheelchairs into two categories self propel version with large rear...

Страница 6: ...f damaged and worn parts will result in use for years without any problems A qualified Van Os Medical UK Ltd dealer who will use only Van Os Medical UK Ltd replacement parts will take care of your whe...

Страница 7: ...e balance of the chair and may injure the user Do not stand on the footrest this will cause the chair to tip and injure the user figure 4 For suitable protection of potential obstruction the lowest po...

Страница 8: ...g your individual technique The possibilities you have for making a transfer are depending on your physical characteristics We advise to discuss this first with your physical therapist However if you...

Страница 9: ...picture 8 Reaching bending backward 1 Manoeuvre the chair as closely as possible to the object You can use the rear wheels For example they will indicate how close you can come to object 2 Do not enga...

Страница 10: ...hair forward to the curb Then the user should lean back so the attendant can tilt the wheelchair to find a balance point When the wheelchair is balanced the attendant can move the wheelchair slowly of...

Страница 11: ...under control at all times Do not hurry down the slope but move slowly and safely The speed of descent is controlled by the amount of grip strength that you exercise on the hand rims In an effort to p...

Страница 12: ...ndants One attendant on the front of the wheelchair and one attendant on the back of wheelchair The attendant at the back of the wheelchair grabs the push handles and let the wheelchair tip backwards...

Страница 13: ...ou own Further on in this chapter we can refer to a specific version Warning We advise you if you want to make changes where tools are needed to consult with your dealer 5 1 Tools and technical inform...

Страница 14: ...3 Fold the footplate in the direction of the footrest see figure 4 Make sure the heel strap does not get stuck between the footplate and footrest see figure 4 Swinging the footrests towards and away...

Страница 15: ...tighten the bolt Make sure the footplate is securely fastened and that the length is equal on both sides 5 4 Using the wheelchair brake Using the brakes Your wheelchair is fitted with attendant brake...

Страница 16: ...other options on your wheelchair The seat cushion optional Your wheelchair can be equipped with a 5 cm thick nylon seat cushion This seat cushion is equipped with an anti skid layer see figure 12 You...

Страница 17: ...lagerij 9 Country The Netherlands EU Representative Name W van Os Address Koperslagerij 9 Country The Netherlands Function Director Technical constructed file Prepared by Name J M J Brouwer BBA Functi...

Страница 18: ...backrest than see chapter 5 Instructions for use and mounting options 6 2 Assembly If the rear wheels are removed you will have to place them back first see chapter 5 Instructions for use and mounting...

Страница 19: ...d unfold Make sure the wheelchair travels in a straight line while moving Make sure the cross frame is not bent and shows no wear signs When one of the exceptions noted above occurs please contact a q...

Страница 20: ...tely Continual use necessitates maintenance especially if the factory set adjustments have been altered The following troubleshooting guide lists several common problems that may occur and offers corr...

Страница 21: ...If within the warranty period your wheelchair will be defect it will be repaired or replaced However you do need to provide to Van Os Medical a complete filled in warranty registration form or a copy...

Страница 22: ...his manual you need to consult with an authorized Van Os Medical dealer The warranty is only valid during the indicated period If adjustments are made to the wheelchair who have structural impact on t...

Страница 23: ...wear and burrs Front forks for example control margin adjustment ball head axle Brakes for example adjustment re adjust control for margins Foot rests for example adjustment line out Frame for example...

Страница 24: ...www vanosmedical com...

Отзывы: