33
GENERAL ASSEMBLY INSTRUCTIONS
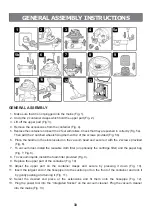
GENERAL ASSEMBLY
1. Make sure that it is not plugged into the mains (Fig. 1).
2. Undo the 2 container clasps which hold the upper part (Fig. 2).
3. Lift off the upper part (Fig. 3).
4. Remove the accessories from the container (Fig. 4).
5. Replace the container and insert the 2 feet with rollers. Check that they are pushed in correctly (Fig. 5a).
Then add the 2 notched wheels fixing them with 2 of the screws provided (Fig. 5b).
6. Place the handle in the slots located on the vacuum head and secure it with the 2 screws provided
(Fig. 6).
7. To vacuum dust, install the reusable cloth filter (or optionally the cartridge filter) and the paper bag
(Fig. 7, Fig. 8).
8. To vacuum liquids, install the foam filter provided (Fig. 9).
9. Replace the upper part of the container (Fig. 10).
10. Adjust the upper part on the container clasps and secure by pressing it down (Fig. 10).
11. Insert the largest end of the hosepipe into the suction port on the front of the container and lock it
by gently pushing and turning it (Fig. 11).
12. Select the desired end piece or the extensions and fit them onto the hosepipe (Fig. 12).
13. Plug the power tool into the “Integrated Socket” on the vacuum cleaner. Plug the vacuum cleaner
into the mains (Fig. 13).
4
2
3
9
5a
6
5b
12
13
1
8
7
10
11
Содержание CS 3
Страница 22: ...PIÈCES VUE ÉCLATÉE 22 ...
Страница 44: ...EXPLODED VIEW 44 ...
Страница 68: ...68 EXPLOSIONSZEICHNUNG ...
Страница 92: ...AANZICHT VAN GEDEMONTEERDE ONDERDELEN 92 ...
Страница 116: ...116 PIEZAS VISTA DETALLADA ...
Страница 118: ...CS 3 COMFORT ...


