


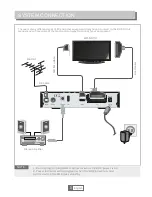


SYSTEM SETUP
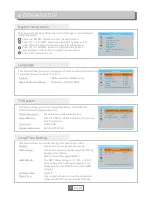
Audio Description Setting
On/Off
On/Off
-3~3
AD Service:
Use AD as default:
AD Volume Offset:
This menu allows you to set up Audio Description Setting.
1
English
9
Other
Antenna Power:
Channel Play Type:
Auto Standby:
Loopthrough In Standby:
This menu allows you to set Antenna Power, Channel Play Type,
Auto Standby and Loopthrough In Standby.
On (STB will provide 5V power to antenna)
Off (STB will not provide 5V power to antenna)
All/Free/Scrambled
30 Min/1 Hour/2 Hours/3 Hours/Off
On/Off
Audio Description Setting
AD Service
Use AD as default
AD Volume Offset
Off
Off
0
Other
Antenna Power
Channel Play Type
Auto Standby
Loopthrough In Standby
Off
All
3 Hours
Off
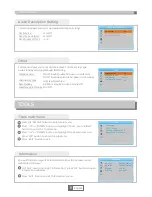
TOOLS
Information
In "Tools" menu, highlight "Information", press "OK" button to open
information window.
Press "EXIT" button to exit "Information" menu.
1
2
Tools main menu
4
1
2
3
Press the "MENU" button to enter main menu.
Press "UP" or "DOWN" button to highlight "Tools", press "RIGHT"
button to enter the Tools menu.
Press "UP" or "DOWN" button to highlight the desired item and
press "OK" button to enter the sub-menu.
Press "EXIT" button to exit.
You will find here important information about the hardware and
embedded software.
Tools
Information
Factory Setting
Software upgrade by USB
Remove USB device safely
Information
Receiver
Hardware
Software
Build Date
EVOLVEO Gamma T2
EVOLVEO Gamma T2
H265 V1.2.7
May 19 2017


