background image

3

5.     Reinstall the cover on your computer and reconnect any cables that you removed earlier 
        in the installation.

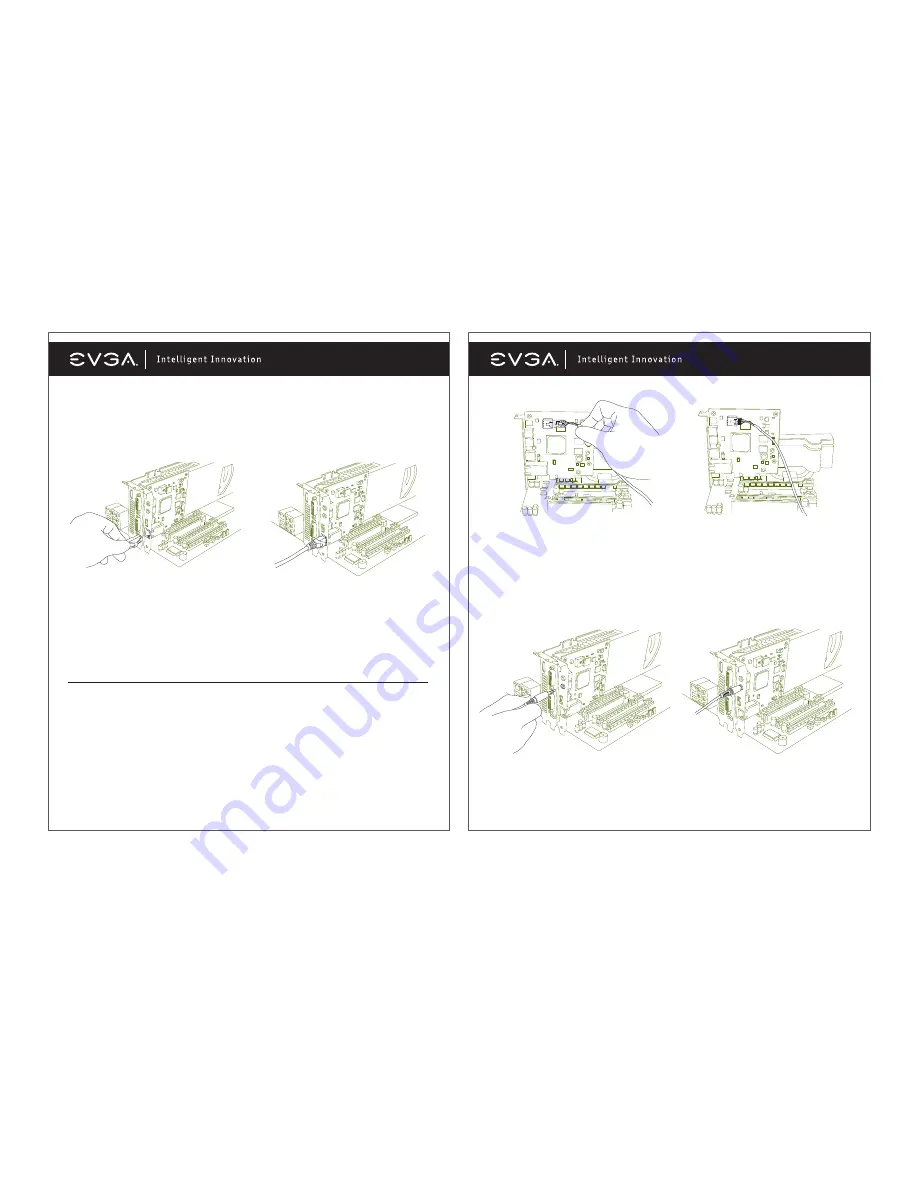
6.     Plug an Ethernet Cable into the EVGA Killer Xeno Pro. (RJ-45 port)

7.     Power up your computer.

8.     Insert the driver installation CD or double click on the EVGA Killer Xeno Pro driver executable file 
        that can be downloaded at 

www.evga.com/support/drivers

. The setup program takes over and 

        will walk you through the driver installation process.

9.     You may need to reboot your PC once the driver installation is complete.

Using Hardware Accelerated Voice Chat

If you are going to use the EVGA Killer Xeno Pro’s built in hardware voice chat, you will need to connect 
the included audio input/outputs correctly. There are two options for doing this, consisting of an internal
or external cable. NOTE: You only need to use one of the below two options.

Internal Cable:

1.     Connect the four-pin audio cable to the four-pin socket near the top of the EVGA Killer Xeno Pro card.

4

2.     Connect the other end of the audio cable to the input labeled “AUX” or “CD” on your motherboard 
        (if using onboard audio) or your soundcard if using a dedicated sound card.

3.     If you do not have a four-pin audio connector available on your motherboard or sound card, follow 
        the directions below to connect an external cable.

External Cable:

1.     Connect the external audio cable to the LINE OUT jack on the EVGA Killer Xeno Pro bracket.

2.     Connect the other end of the external audio cable to the MIC IN jack on your motherboard 
        (if using onboard audio) or your sound card if using a dedicated sound card.

Содержание KILLER XENO PRO

Страница 1: ...ER XENO TM PRO Installation Guide G a m i n g I m a g i n g 3 D V i d e o E n t e r t a i n m e n t P h o t o s G r a p h i c s EVGA Corp 2900 Saturn Street Suite B Brea CA 92821 www evga com 128 P2 K...

Страница 2: ...g network card into a 1x PCI E slot NOTE If you do not have an empty 1x PCI E slot you can install the card into any open PCI E slot The below images show both methods of installation Table of content...

Страница 3: ...audio input outputs correctly There are two options for doing this consisting of an internal or external cable NOTE You only need to use one of the below two options Internal Cable 1 Connect the four...

Страница 4: ...XenoTray exe This is your interface to access Killer Xeno features After installing the software package the icon will appear in your system tray You can right click the tray icon to 1 Change the stat...

Страница 5: ...ed By default Killer Configuration is installed Auto Optimized for your system In normal mode it is also possible to configure Link Speed Link Duplex Link Speed Auto Auto negotiates the fastest speed...

Страница 6: ...x Your Card ID is used to identify your specific card for registration and tech support The Diagnose button is a support tool that will generate a text file containing a variety of useful information...

Страница 7: ...ing ack frequency should only be done if you are selectively attempting to change latency behavior in specific programs But you should be very aware of its potential harm in other applications and you...

Страница 8: ...s Hints CANNOT CONNECT TO INTERNET First verify that your network cable is plugged into the Ethernet port of the Killer Xeno and that you are getting a link light The Killer Xeno does not broadcast ne...

Страница 9: ...d including interference that may cause undesired operation This equipment has been tested and found to comply with the limits for a Class B digital device pursuant to Part 15 of the FCC Rules These l...

Отзывы: