


SAFETY RULES AND RECOMMENDA
TIONS FOR THE USER
D
o not try to install the conditioner alone;
always contact specialized technical personnel.
C
leaning and maintenance must be carried out
by specialised technical personnel. In any case
disconnect the appliance from the mains
electricity supply before carrying out any
cleaning or maintenance.
E
nsure that the mains voltage corresponds to
that stamped on the rating plate. Keep the switch
or power plug clean. Insert the power plug
correctly and firmly into the socket , thereby
avoiding the risk of electric shock or fire due
to insufficient contact.
D
o not pull out the plug to switch off the
appliance when it is in operation, since this
could create a spark and cause a fire, etc.
I
f the appliance gives off smoke or there is a
smell of burning, immediately cut off the pow
er supply and contact the Service Centre.
H
ave repairs carried out only by an authorised
Service Centre of the manufacturer . Incorrect
repair could expose the user to the risk of
electric shock, etc.
T
he prolonged use of the device in such
conditions could cause fire or electrocution.
N
ever remain directly exposed to the flow of
cold air for a long time. The direct and prolonged
exposition to cold air could be dangerous for your
health .Particular care should be taken in the
rooms where there are children , old or sick
people.
T
his appliance has been made for air
conditioning domestic environments and must
not be used for any other purpose , such as for
drying clothes, cooling food, etc.
T
he packaging materials are recyclable and
should be disposed of in the sparate waste
bins . Take the air conditioner at the end of its
useful life to a special waste collection centre
for disposal.
O
nly use the air conditioner as instructed in
this booklet.These instructions are not int ended
to cover every possible condition and situation.
As with any electrical household appliance,
common sense and caution are therefore always
recommended for installation , operation and
maintenance.
A
lways use the appliance with the air filter
mounted . The use of the conditioner without
air filter could cause an excessive accumulation
of dust or waste on the inner parts of the device
with possible subsequent failures.
U
nhook the automatic switch if you foresee
not to use the device for a long time.
The airflow direction must be properly adjusted.
T
he user is responsible for having the appliance
installed by a qualified technician , who must
check that it is earthed in accordance with current
legislation and insert a thermomagnetic circuit
breaker.
E
nsure that the appliance is disconnected from
the power supply when it will remain inoperative
for a long period and before carrying out any
cleaning or maintenance.
S
electing the most suitable temperature can
prevent damage to the appliance.
T
he flaps must be directed downwards in
the heating mode and upwards in the cooling
mode.
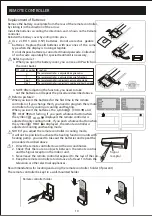
T
he batteries in remote controller must be
recycled or disposed of properly.
Disposal of Scrap Batteries --- Please discard
the batteries as sorted municipal waste at the
accessible collection point.
2


