7881TSM-IP
User Manual
Page - 50
Version 1.0
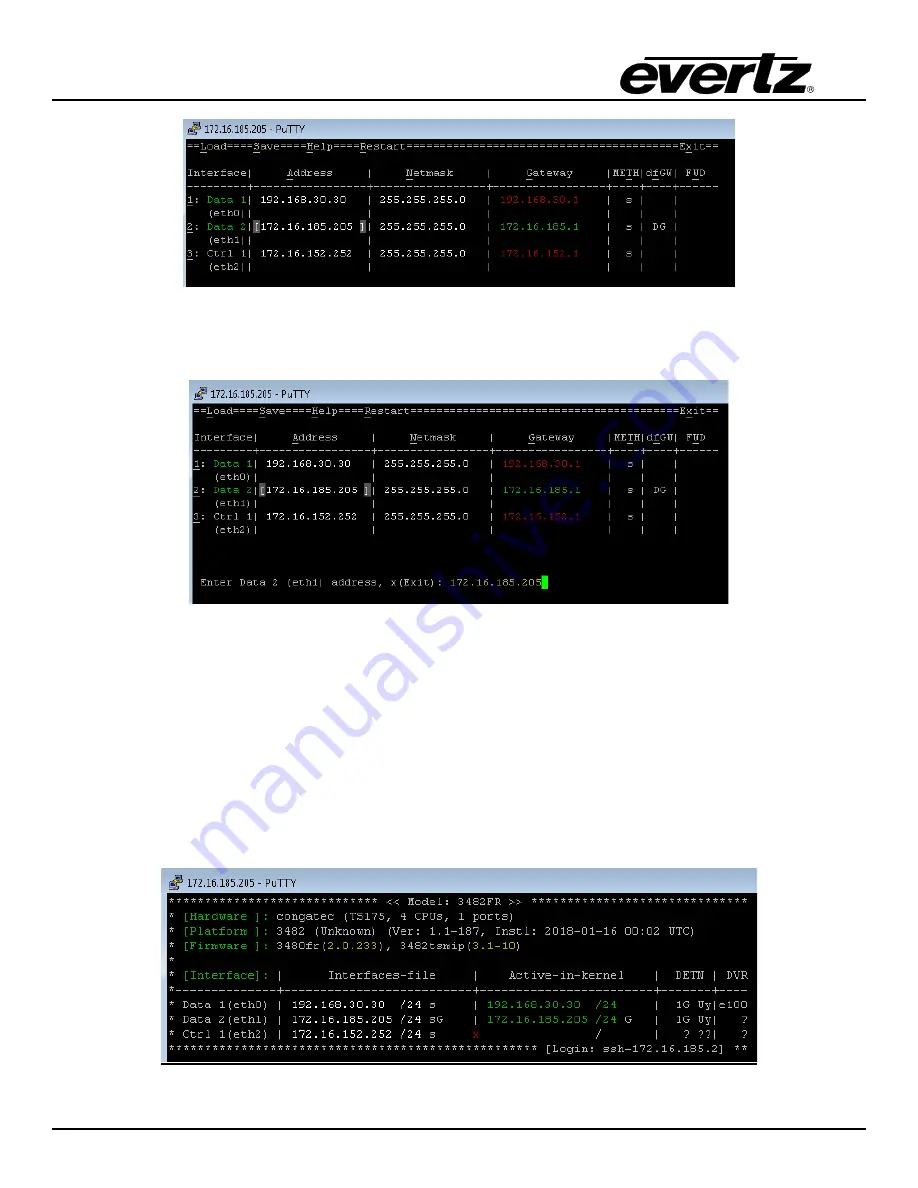
Figure 8-7: 7881TSM-IP PuTTy – Network Interfaces File Setting
6.
Type in the new IP address you want to set. Hit Enter
Figure 8-8: 7881TSM-IP PuTTy – Network Interfaces File Setting
7.
Repeat steps 4 & 5 for setting Netmask and Gateway.
8.
Move cursor to the “dfGW” column of Data2 (eth1) row. Click to set this to DG, as shown in above
figure
9.
Press “s” to save the changes
10.
Press “x” to exit
11.
Start a new putty session. Login using username:root and password:Evertz
12.
Type “reboot” command to perform full restart of the unit. When the unit comes back, login into
customer account and make sure new IP address is saved.
13.
The IP address in “Interfaces-file” and “Active-in-kernel” should match. If it does not match, power cycle
the unit again.
Figure 8-9: 7881TSM-IP PuTTy – Main Menu
Содержание 7881TSM-IP
Страница 2: ...This page left intentionally blank ...
Страница 6: ...7881TSM IP User Manual Page ii Version 1 0 This page left intentionally blank ...
Страница 12: ...7881TSM IP User Manual Page 2 Version 1 0 Figure 1 1 7881TSM IP Card ...
Страница 24: ...7881TSM IP User Manual Page 14 Version 1 0 This page left intentionally blank ...
Страница 27: ...7881TSM IP User Manual Version 1 0 Page 17 Figure 4 5 VistaLINK PRO System ...
Страница 28: ...7881TSM IP User Manual Page 18 Version 1 0 Figure 4 6 VistaLINK PRO VLAN Configuration ...
Страница 29: ...7881TSM IP User Manual Version 1 0 Page 19 Figure 4 7 VistaLINK PRO Port Monitoring ...
Страница 30: ...7881TSM IP User Manual Page 20 Version 1 0 Figure 4 8 VistaLINK PRO Notify ...
Страница 33: ...7881TSM IP User Manual Version 1 0 Page 23 Figure 5 3 VistaLink PRO Ethernet Ports Monitor Tab ...
Страница 37: ...7881TSM IP User Manual Version 1 0 Page 27 Figure 5 9 VistaLINK PRO Disk Folder Manager Tab ...
Страница 38: ...7881TSM IP User Manual Page 28 Version 1 0 This page left intentionally blank ...
Страница 56: ...7881TSM IP User Manual Page 46 Version 1 0 This page left intentionally blank ...


