background image


2408RGBT/DVIT RGBHV/DVI Portable SFP Fiber Transmitter 

 Revision 

1.1 

Page - 11


4. 

CARD-EDGE MONITORING AND CONTROL 

4.1. 

ACCESSING THE TOGGLE SWITCH AND PUSH BUTTON 

To expose the card edge controls you must remove the side panel. To do so, follow the instructions listed 
below: 
 

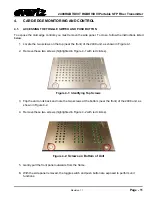
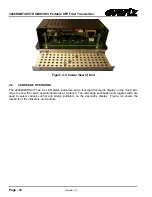
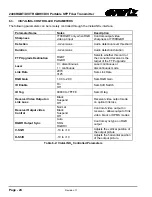
1.  Locate the two screws on the top (near the front) of the 2408 unit, as shown in Figure 4-1. 
 
2.  Remove these two screws (highlighted in Figure 4-1 with red circles). 


Figure 4-1: Identifying Top Screws 


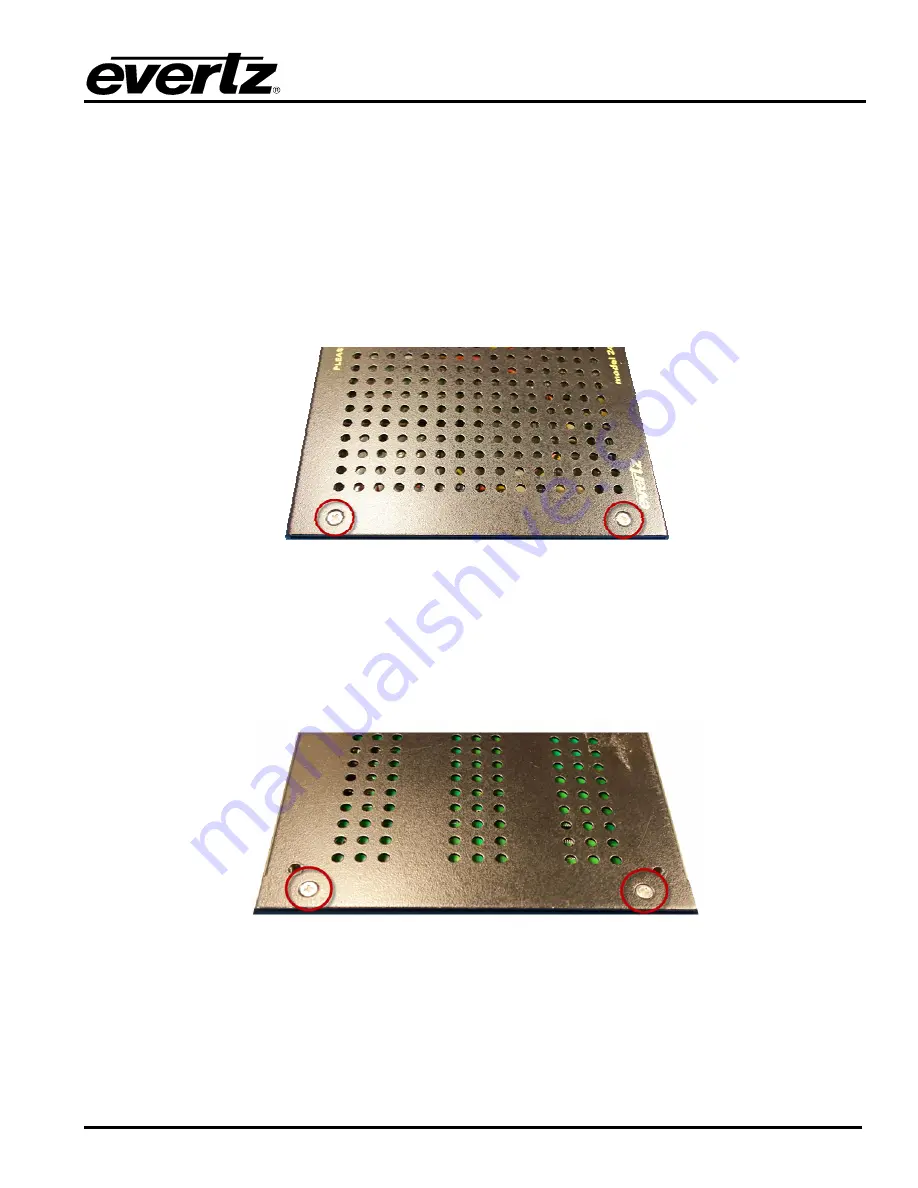
3.  Flip the unit on its back and note the two screws at the bottom (near the front) of the 2408 unit, as 

shown in Figure 4-2. 

 
4.  Remove these two screws (highlighted in Figure 4-2 with red circles). 


Figure 4-2

: Screws on Bottom of Unit 


5.  Gently pull the front panel outwards from the frame. 
 

6. 

With the side panel removed, the toggle switch and push button are exposed to perform unit 
functions.


Содержание 2408RGBT/DVIT

Страница 1: ...October 2009 The material contained in this manual consists of information that is the property of Evertz Microsystems and is intended solely for the use of purchasers of the 2408RGBT DVIT Evertz Microsystems expressly prohibits the use of this manual for any purpose other than the operation of the 2408RGBT DVIT All rights reserved No part of this publication may be reproduced without the express ...

Страница 2: ......

Страница 3: ...s two blades and a third grounding prong The wide blade or the third prong is provided for your safety If the provided plug does not fit into your outlet consult an electrician for replacement of the obsolete outlet Protect the power cord from being walked on or pinched particularly at plugs convenience receptacles and the point where they exit from the apparatus Only use attachments accessories s...

Страница 4: ...ly to cause harmful interference in which case the user will be required to correct the interference at his own expense INFORMATION TO USERS IN THE U S A NOTE FCC CLASS A DIGITAL DEVICE OR PERIPHERAL This equipment has been tested and found to comply with the limits for a Class A digital device pursuant to Part 15 of the FCC Rules These limits are designed to provide reasonable protection against ...

Страница 5: ...ALOG VIDEO INPUTS 9 3 2 DIGITAL VIDEO INPUTS 9 3 3 DIGITAL VIDEO CONTROL 9 3 4 ANALOG AUDIO INPUTS A2 VERSION 9 3 5 OPTICAL OUTPUT 10 3 6 ELECTRICAL 10 3 7 PHYSICAL 10 4 CARD EDGE MONITORING AND CONTROL 11 4 1 ACCESSING THE TOGGLE SWITCH AND PUSH BUTTON 11 4 2 CARD EDGE OPERATION 12 4 3 STATUS INDICATOR LEDS 14 4 4 CARD EDGE DISPLAY AND CONTROLS 14 4 4 1 Card Edge Display Warning Indications 15 4 ...

Страница 6: ...laying Input Signal Resolution 19 4 4 13 Displaying the RGB Output Video Sharpness 2408RGBT Models Only 20 4 4 14 Displaying the Selected Display Data Channel Mode 2408RGBT Models Only 20 4 4 15 Displaying the Video Input Sync 2408RGBT Models Only 20 4 4 16 Displaying the Selected Link Rate 20 4 4 17 Displaying the Selected ID Tag 21 4 4 18 Displaying the Firmware Version 21 5 JUMPER CONTROLS 22 5...

Страница 7: ...roduction of Laser Certification and Identification Label 7 Figure 4 1 Identifying Top Screws 11 Figure 4 2 Screws on Bottom of Unit 11 Figure 4 3 Inside View of Unit 12 Figure 4 4 Location of Status Indicators and Jumpers 13 Figure 4 5 2408RGBT Card Edge Menu 15 Tables Table 1 1 Sample Typical Fiber Application Configurations 2 Table 6 1 VistaLINK Monitored Parameters 23 Table 6 2 VistaLINK Contr...

Страница 8: ...2408RGBT DVIT RGBHV DVI Portable SFP Fiber Transmitter iv Revision 1 1 WARNING Never look directly into an optical fiber Irreversible eye damage can occur in a matter of milliseconds ...

Страница 9: ...e either expressed or implied The only warranty offered by Evertz in relation to this product is the Evertz standard limited warranty stated in the sales contract or order confirmation form Although every attempt has been made to accurately describe the features installation and operation of this product in this manual no warranty is granted nor liability assumed in relation to any errors or omiss...

Страница 10: ...2408RGBT DVIT RGBHV DVI Portable SFP Fiber Transmitter vi Revision 1 1 This page left intentionally blank ...

Страница 11: ...ansmitters are available in 1310nm 1550nm and CWDM wavelengths Features Digital DVI and analog RGB display technologies are supported through one interface on the 2408RGBT 2970Mb s and 3125Mb s user selectable Link Rates for routing and normal applications VESA video resolutions supported up to WUXGA 1920x1200 Two optional analog audio inputs Full 24 bits per pixel colour resolution True DC restor...

Страница 12: ...RGBT A2 Cxx 2dBm 2408RGBR A2 20dBm Different CWDM Wavelengths for Tx Rx with 8Ch CWDM Mux Demux Tx Power Rx Sensitivity are nominal values of 1dBm Assumes 8Ch CWDM Mux Demux loss of 3 5dB Fiber loss 0 35 0 25dB per km 1310nm 1550nm Table 1 1 Sample Typical Fiber Application Configurations DVI RGB IN TX Interface Control Indication MUX VistaLINK 2 Channel Analog Audio A2 version Optical Output Ever...

Страница 13: ... the DDC is subsequently changed then a full re boot will need to occur to allow the DDC change to take effect 1 Ensure that the PC is off or not connected to the RGBT DVIT card 2 Set the DDC emulation mode depending on your system configuration LCD Emulate display with digital DVI input and output CRTA Emulate display with analog RGB input and analog RGB output CRTD Emulate display with analog RG...

Страница 14: ...rtz transmitter SFP On the 2408RGBT models only the DVI I connector supports combined analog and digital video through a single interface An industry standard DB 15 connector adapter may be used for RGB Figure 2 1 shows all rear plate options for the 2408RGBT DVIT When installing the Evertz SFP module into the rear plate SFP housing align the transmit and receive arrow indicators UPWARDS with the ...

Страница 15: ...tely terminated cable assembly such as the Amp 16539332 1 Note When making digital DVI connections Evertz recommends using only high quality DVI cables no longer than 6 feet 1 8m AUDIO INPUTS A2 Version The 2408RGBT DVIT A2 module provides a terminal block for input connections compatible with either balanced or unbalanced analog audio Balanced audio signals should be connected to the positive and...

Страница 16: ...ble SFP Fiber Transmitter Page 6 Revision 1 1 2408RGBTxx EQX XENON EQT 3Gb s RoutingCore 2408RGBR DVI DVI 7708RGBT A2KM USB DVI Analog Audio PS2USB 2408RGBR A2KM USB DVI Analog Audio PS2USB Figure 2 2 Setup Using an Optical Router ...

Страница 17: ...ation and Identification labels are combined into one label As there is not enough room on the product to place the label it is reproduced here in the manuals There is no date of manufacture on this label as it can be traced by the bar code label placed on the printed circuit board of each Evertz plug in module The model number is one of 2408RGBT DVIT 13 2408RGBT DVIT A2 13 2408RGBT DVIT Cxx 2408R...

Страница 18: ...ore and therefore care must be taken to prevent fiber damage caused by heavy objects or abrupt fiber bending Evertz recommends that you maintain a minimum bending radius of 5 cm to avoid fiber bending loss that will decrease the maximum attainable distance of the fiber cable Evertz fiber optic modules come with lockout devices to prevent the user from damaging the fiber connector by installing a m...

Страница 19: ...nce 75Ω SNR 55dB Input Level 1Vp p max Linear Distortion 2 max Intensity Distortion 2 max 3 2 DIGITAL VIDEO INPUTS Number of Signals 1 Signal Type TMDS per DVI specification Connector DVI I Display Resolution Up to WUXGA 1920x1200 75Hz Colour Depth 24 Bit 3 3 DIGITAL VIDEO CONTROL Number of Signals 1 Signal Type DDC2B per DVI specification Connector DVI I 3 4 ANALOG AUDIO INPUTS A2 VERSION Number ...

Страница 20: ...versions 9 µm core single mode Output Wavelengths Standard 1310nm 1550nm nominal CWDM 1270nm to 1610nm ITU T G 694 2 compliant Output Power 1310nm FP Standard 1 dBm 1dBm CWDM DFB 2 dBm 1dBm 3 6 ELECTRICAL Voltage 12V DC nominal Power 11 Watts max 3 7 PHYSICAL Stand Alone units Dimensions With Flanges 7 81 L x 5 63 W x 1 75 H 199mm L x 143mm W x 45mm H ...

Страница 21: ... the 2408 unit as shown in Figure 4 1 2 Remove these two screws highlighted in Figure 4 1 with red circles Figure 4 1 Identifying Top Screws 3 Flip the unit on its back and note the two screws at the bottom near the front of the 2408 unit as shown in Figure 4 2 4 Remove these two screws highlighted in Figure 4 2 with red circles Figure 4 2 Screws on Bottom of Unit 5 Gently pull the front panel out...

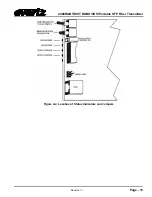
Страница 22: ...08RGBT DVIT has six LED status indicators and a four digit dot matrix display on the front card edge to show the card s operational status at a glance The card edge pushbutton and toggle switch are used to select various control and status indicators on the dot matrix display Figure 4 4 shows the locations of the indicators and controls ...

Страница 23: ...2408RGBT DVIT RGBHV DVI Portable SFP Fiber Transmitter Revision 1 1 Page 13 Figure 4 4 Location of Status Indicators and Jumpers ...

Страница 24: ...fer to section 4 4 7 for details about setting the audio detection threshold 4 4 CARD EDGE DISPLAY AND CONTROLS Additional signal and status monitoring is provided via the four digit dot matrix display located at the card edge The card edge pushbutton and toggle switch are used to navigate through the display menu Figure 4 5 provides a quick reference to the display menu structure Pressing the pus...

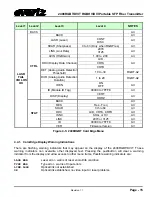
Страница 25: ...SHAR 0 thru 64 All DDC LCD CRTA CRTD All ISNC SOG or HV All LINK 2970 or 3125 All ID 00000 to 7FFFE All LASR FAIL VID LOS OK STAT VER Firmware Version All Figure 4 5 2408RGBT Card Edge Menu 4 4 1 Card Edge Display Warning Indications There are flashing warning indicators that may appear on the display of the 2408RGBT DVIT These warning indicators can overwrite other displayed text Pressing the pus...

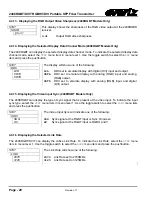
Страница 26: ...arpness of the RGB video output at the 2408RGBR receiver Note that this menu item is only available when there is RGB video input present at the 2408RGBT CTRL SHAR 0 to 31 To control the Sharpness select the CTRL menu item in the first menu level Use the toggle switch to select the SHAR menu item and press the pushbutton The toggle switch can then be used to set the value Press the pushbutton to a...

Страница 27: ...els Only The Display Data Channel is a digital connection between a computer display and the graphics adapter that allows the display to communicate its specifications to the adapter The 2408RGBT can emulate either a display with a digital input connection DVI to be used when connecting to a graphics adapter with DVI output or a display with an analog input connection RGB to be used when connectin...

Страница 28: ...e level set by the DET control before the audio is considered missing The range of adjustment is 1 to 20 seconds in one second increments Adjustment is completed using the card edge interface or through VistaLINK control CTRL DUR 1 20 To change the Audio Detection Duration select the CTRL menu item in menu level 1 Use the toggle switch to select the DUR menu item and press the pushbutton The toggl...

Страница 29: ...set a horizontal or vertical orientation for the card edge display CTRL DISP HORZ VERT To set the Display orientation select the CTRL menu item in the first menu level then use the toggle switch to show the DISP menu selection and use the pushbutton to select it Use the toggle switch to change between HORZ and VERT Press the pushbutton to make your selection The following selections are available ...

Страница 30: ...y with analog RGB input and analog RGB output CRTD DDC set to emulate display with analog RGB input and digital DVI output 4 4 15 Displaying the Video Input Sync 2408RGBT Models Only The 2408RGBT can display the type of sync signal that is present at the video input To indicate the input sync type select the STAT menu item in menu level 1 Use the toggle switch to select the ISNC menu item and pres...

Страница 31: ...0000 to 7FFFFE The display will show one of the following 00000 to 7FFFE ID Tag 4 4 18 Displaying the Firmware Version The VER option displays the card s current firmware version To display the firmware version select the STAT menu item in the first menu level then use the toggle switch to display the VER option and press the pushbutton to select it The firmware version will scroll across the disp...

Страница 32: ...he Upgrading Firmware chapter in the front of the binder for more information To upgrade the firmware in the module unit pull it out of the frame Move the RUN UPGRADE jumper J16 into the UPGRADE position Install the Upgrade cable provided located in the vinyl pouch in the front of the binder onto SERIAL header J7 at the card edge Re install the module into the frame Run the upgrade as described in...

Страница 33: ...graphical user interface GUI third party or custom manager software may be used to monitor and control Evertz VistaLINK enabled fiber optic products 2 Managed devices such as 2408RGBT DVIT cards each with a unique address OID communicate with the NMS through an SNMP Agent Evertz VistaLINK enabled 7700 series modules reside in the 3RU 7700FR C MultiFrame and communicate with the manager via the 770...

Страница 34: ...t of the FTP upgrade Laser 0 discontinuous 1 continuous Laser continuous or discontinuous mode Link Rate 2970 3125 Sets Link Rate RGB Gain 1 00 to 2 00 Sets RGB Gain ID Enable On Off Sets Soft Switch ID Tag 00000 to 7FFFE Sets ID tag Receiver Video Output on Link Loss Black Suspend Off Receiver video output mode on optical link loss Receiver Output video Control Normal Black Suspend Off Control of...

Страница 35: ...ing traps can be VistaLINK enabled and monitored Trap Description DVI Input Triggers when valid DVI input is lost RGB Input Triggers when valid RGB input is lost Laser Triggers when Laser Fault is detected Audio 1 Triggers when Audio 1 is lost Audio 2 Triggers when Audio 2 is lost Table 6 3 VistaLINK Traps ...

Страница 36: ...2408RGBT DVIT RGBHV DVI Portable SFP Fiber Transmitter Page 26 Revision 1 1 This page left intentionally blank ...

Отзывы: