background image

C H A P T E R   3   O S D   M E N U   A N D   C O N F I G U R A T I O N  


23 

3.2 RS485 ID & Baud Rate Setting  

Note

: This section is optional preserved for the people that want to change camera ID and 

baud rate. In most situations, we suggest you can just use Camera ID-99 and Baud Rate-9600, 
Protocol-Pelco D on keyboard, then it would work.  


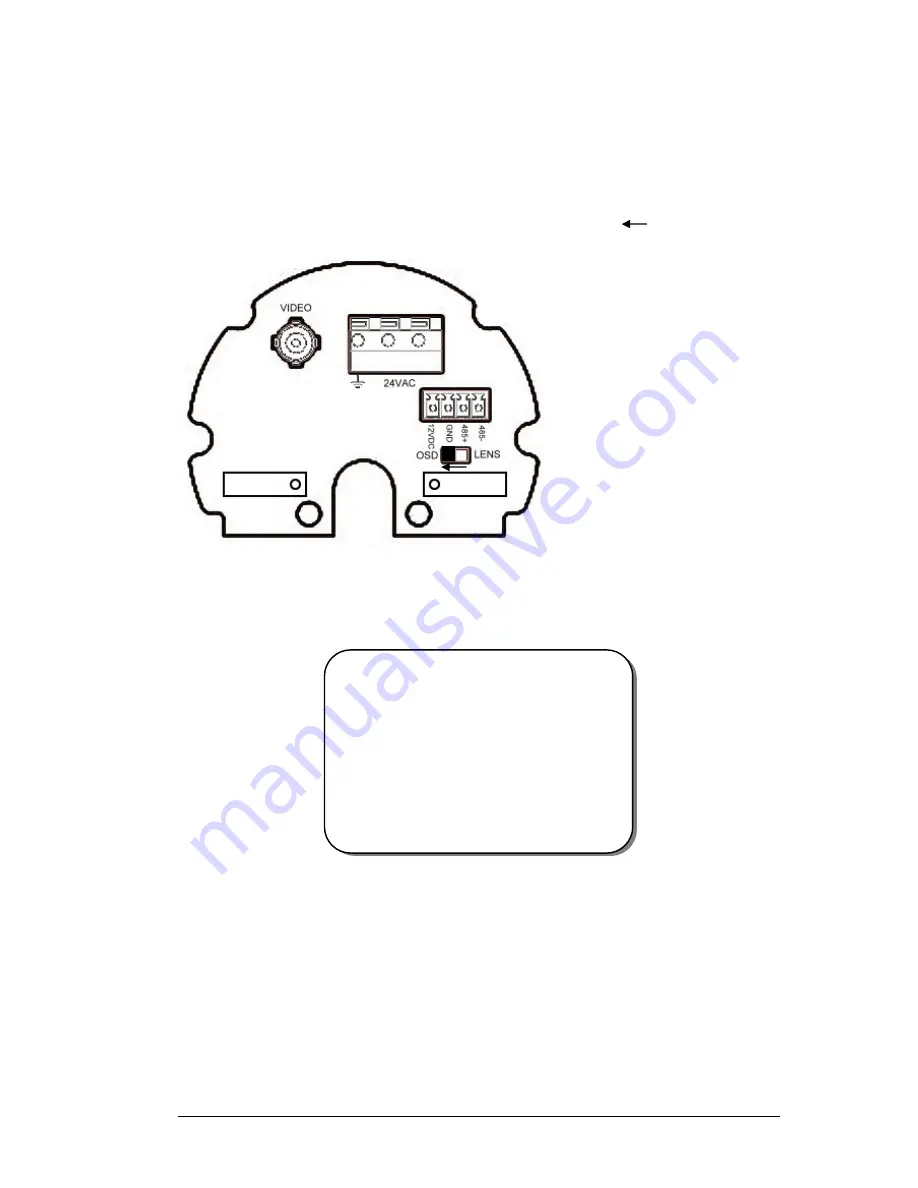
I. Please turn the control key selection switch at back panel to “

OSD

”(       ). 


II. Press the mini-joystick for 4 seconds until you see the following menu.  


III. Turn the mini-joystick up (

c

) or down (

d

) to adjust setting, press mini-joystick to go next 

selection. 
IV. Please wait 3 seconds after setting any item, it will automatically switch to next setting item.  
V. Camera setting order: 
a. Firmware version. VER_xxx- shows the current firmware version.  


  A B C D E F G H I J K L M  
  N O P Q R S T U V W X Y Z  
  a b c d e f  g h i  j  k l  m  
  n o p q r  s t  u v w x y z  
 

 ·    0 1 2 3 4 5 6 7 8 9  


  C L R   P O S   E N D

F I  R M W A R E _ V E R _ _ _ 

Содержание Polestar EZ550

Страница 1: ...ol le es st ta ar r T Tr ru ue e D Da ay y N Ni ig gh ht t W We ea at th he er rp pr ro oo of f I IR R C Ca am me er ra a w wi it th h 6 6 5 50 0m mm m L Le en ns s a an nd d R RS S4 48 85 5 C Co on nt tr ro ol l E EZ Z5 55 50 0 Volume 1 EverFocus ...

Страница 2: ...should be retained for future reference The information in this manual was current when published The manufacturer reserves the right to revise and improve its products All specifications are therefore subject to change without notice All rights reserved No part of the contents of this manual may be reproduced or transmitted in any form or by any means without written permission of the EverFocus E...

Страница 3: ...not touch the surface of CCD sensor by hand directly Use a soft cloth to remove the dirt from the camera body Use lens tissue or a cotton tipped applicator and ethanol to clean the CCD sensor and the camera lens When the camera is not in use put the cover cap on the lens mount 7 All warnings on the products and in the operating instructions should be adhered to 8 Do not use attachments not recomme...

Страница 4: ...reception which can be determined by turning the equipment off and on the user is encouraged to try to correct the interference by one of the following measures Reorient or relocate the receiving antenna Increase the separation between the equipment and receiver Connect the equipment into an outlet on a circuit different from that to which the receiver is connected Consult the dealer or an experie...

Страница 5: ...ation Guide 21 3 2 RS485 ID Baud Rate Setting 23 3 3 OSD Menu Setup 26 3 3 1 LENS 26 3 3 2 SHUTTER 26 3 3 3 WHITE BALANCE control 28 3 3 4 BACKLIGHT 28 3 3 5 AGC Auto Gain Control 29 3 3 6 DNR Dynamic Noise Reduction 29 3 3 7 SENS UP 30 3 3 8 SPECIAL 31 3 3 8 1 CAMERA ID 31 3 3 8 2 COLOR ADJ 32 3 3 8 3 SYNC 33 3 3 8 4 MOTION DETECTION 33 3 3 8 5 PRIVACY 35 3 3 8 6 MIRROR 37 3 3 8 7 SHARPNESS 37 3 ...

Страница 6: ...rts RS485 remote control and has an external controller for 6 50mm auto Iris lens and OSD setting 1 1 Features 1 3 SONY Super HAD CCD with super high resolution Sens up 128x Built in motor controller for 6 50mm auto Iris lens zoom and focus 3 Axis Bracket True Day Night feature with IR Cut Filter Removable OSD setting menu and RS485 remote control IR distance up to 50 meters about 164 ft and Vari ...

Страница 7: ...ews x 4 for mounting bracket Short Screws x 4 for connecting camera body to bracket Expanding Screws x 4 Hex key x 1 for adjusting bracket Hexagon wrench x 1 for adjusting sunshield Please Note If an item appears to have been damaged in shipment replace it properly in its carton and notify the shipper If any items are missing notify your EverFocus Electronics Corp Sales Representative or Customer ...

Страница 8: ... 1 60 1 100 000 True Day Night Yes Auto White Balance ATW AWC Manual Black Light Comp Yes OFF Low Mid Hi Auto Gain Control Yes OFF Low Mid Hi Digital Noise Reduction Yes OFF Low Mid Hi Sens Up 128x Auto Sync Mode Internal Line lock IR LED Lifespan 20 000 hours Weatherproof IP66 Vandal Resistant Yes Heater Yes built in Power Source 2 types 100VAC 240VAC 24VAC Power Consumption 100VAC 240VAC 18W max...

Страница 9: ...N S T A L L A T I O N 4 1 4 Dimensions Drilling Dimension of holes to holes Dimension of Bracket 45mm 1 8 80mm 3 2 C H A P T E R 1 P R O D U C T O V E R V I E W 220 5mm 8 68 84mm 3 31 106 5mm 4 19 112 7mm 4 44 199mm 7 83 ...

Страница 10: ...C H A P T E R 2 I N S T A L L A T I O N 5 Dimension of whole camera with bracket 275mm 10 8 107 5mm 4 3 243 5mm 9 74 357mm 14 ...

Страница 11: ... Description EZ550 Component description Bracket Sun shield Fixing screw for sunshield Video output Power connector RS485 terminal Control key selection switch Control key C H A P T E R 1 P R O D U C T O V E R V I E W C H A P T E R 1 P R O D U C T O V E R V I E W ...

Страница 12: ...d to connect to power in PE is a ground pin 3 RS 485 communication and External IR power control pin PIN definition a TXD RS485 for keyboard controlling b RXD RS485 for keyboard controlling 4 Power for IR illuminator Referring to above figure pin 12VDC and GND are defined as below a GND Ground b 12VDC provide power source for IR illuminator IR illuminator is optional 110V 240VAC model for 110V 240...

Страница 13: ... details Note when it is connected to RS485 for keyboard control please switch to OSD otherwise it cannot be controlled remotely 6 Control key For setting Lens OSD menu 7 Cable clips Used to fix power cable and RS485 cable 1 7 Related Products In addition you may order the following EverFocus products which are recommended for use with the camera to achieve the best performance EverFocus control k...

Страница 14: ...See 2 4 Warning To prevent electrical shock turn off the electrical power before making electrical connections Do not expose the appliance to water or moisture nor try to operate it in wet areas 2 1 Wiring and Mounting 1 Wire coaxial cable power cable and RS485 cable through the bracket Note 1 Please use RG59 5C2V coaxial cable without connector 2 Use RS485 cable only if you need to control the ca...

Страница 15: ... T A L L A T I O N 14 2 Fix the bracket to wall by using 4 screws 3 Open camera s back cover Loose the 2 screws from the back panel cover then open the back cover Screws for back panel Coaxial cable Power cable RS485 cable ...

Страница 16: ... remove the plug when you need to use it for connection 5 Take coaxial cable power cable and RS485 cable to pass through waterproof conduit place them into camera housing Note Do not connect BNC connector to coaxial cable until coaxial cable has passed through camera housing otherwise your cable might not pass the housing Power cable Φ10 3mm Coaxial cable Φ6mm RS485 Φ5mm ...

Страница 17: ...te 1 Power cable s diameter must be less than 10 mm 2 Only use RG59 5C2V for Video cable 3 RS485 cable must be less then 5 mm 6 Close the waterproof cap and fix waterproof conduit to the base of camera firmly Coaxial cable Power cable RS485 cable ...

Страница 18: ...E N and L Warning To prevent electrical shock turn off the electrical power before making electrical connections Do not connect high voltage power to the camera It may damage the camera Do not short circuit the power leads and expose the wire when connecting the power supply to the camera b Connect Video Make sure connecter is firmly connected c Connecting RS485 optional Connect RS585 cable to 485...

Страница 19: ...with the installation NOTE Before you close the cover please make sure control key is attached firmly and wire doesn t stuck 2 2 Adjusting Camera Position Adjust camera s angle vertically or horizontally by using hex key included in package Screws for back panel Loose this screw to make angle adjustment vertically ...

Страница 20: ...key is attached at inner side of the base Detach the control key and use this key for OSD or Lens setting 2 3 1 Lens Setting Please turn the control key selection switch at the back panel to Lens Use the control key to do lens setting Loose this screw to make angle adjustment horizontally UP ...

Страница 21: ...nection Optional Please refer to Chapter 4 for more details of Keyboard control 1 Connect the cable from keyboard s RS485 port to camera s RS485 port Keyboard is an optional accessory RS485 connecting accessories are included in Everfocus Keyboard package 2 Connect the cable from video output jack of the camera to monitor s input jack The Cursors the mini joystick Mini Joystick UP ...

Страница 22: ...protocols automatically No setting is required 4 The camera default RS485_ID is 99 BAUD_RATE is 9600 Make sure the key board camera ID and Baud rate match For optional changing camera ID and baud rate on camera please refer to 3 2 5 For keyboard setting and operation please see chapter 4 ...

Страница 23: ...he General OSD Menu Simply press the mini joystick to bring up the general OSD menu II Bring up the RS485 Setting Menu Press the mini joystick and hold for 5 seconds to bring up the RS485 setting menu III Navigate among the OSD Menu Items Turn the mini joystick up c or down d to move the cursor up or down IV Change Modes or Setting Parameters Turn the mini joystick left e or right f to adjust the ...

Страница 24: ...For those selected items with sign in the end they have the sub menu for further settings VI Return to Previous Page Press the mini joystick to return to previous page VII Close the Host Menu Screen To close the menu screen navigate to the EXIT item and press the mini joystick Sub Menu s Menu Main Menu LENS LEVEL 25 SETUP LENS DC SHUTTER ___ WHITE BAL ATW BACKLIGHT OFF AGC MIDDLE DNR LOW SENS UP A...

Страница 25: ...on switch at back panel to OSD II Press the mini joystick for 4 seconds until you see the following menu III Turn the mini joystick up c or down d to adjust setting press mini joystick to go next selection IV Please wait 3 seconds after setting any item it will automatically switch to next setting item V Camera setting order a Firmware version VER_xxx shows the current firmware version A B C D E F...

Страница 26: ...be the same as Keyboard s baud rate A B C D E F G H I J K L M N O P Q R S T U V W X Y Z a b c d e f g h i j k l m n o p q r s t u v w x y z 0 1 2 3 4 5 6 7 8 9 C L R P O S E N D F I R M W A R E _ V E R _ _ _ A B C D E F G H I J K L M N O P Q R S T U V W X Y Z a b c d e f g h i j k l m n o p q r s t u v w x y z 0 1 2 3 4 5 6 7 8 9 C L R P O S E N D R S 4 8 5 I D _ 9 9 _ _ _ _ _ A B C D E F G H I J ...

Страница 27: ...red After setting it will show an OSD menu to save setting go to exit menu and press mini joystick Note Camera ID and Baud rate setting can only be performed locally NOT from Keyboard A B C D E F G H I J K L M N O P Q R S T U V W X Y Z a b c d e f g h i j k l m n o p q r s t u v w x y z 0 1 2 3 4 5 6 7 8 9 C L R P O S E N D D A T A _ S T O R E D _ _ _ _ A B C D E F G H I J K L M N O P Q R S T U V ...

Страница 28: ...e Lens is Auto Iris supported NOTE Since DC lens is a built in lens for EZ550 camera it does not support Manual lens please do not select lens as Manual mode it disables sens up and may cause malfunction of lens 2 Please press the mini joystick for saving setting and return to the previous menu 3 3 2 SHUTTER 1 When the SETUP menu is displayed on the screen please direct the arrow to point to SHUTT...

Страница 29: ...lumination and frequency NTSC model 1 100 PAL model 1 120 Ö ESC Reserved Ö Manual Reserved 3 Press the mini joystick when you finish all the settings NOTE 1 With DC lens the shutter speed is fixed as 1 60 for NTSC and 1 50 for PAL SETUP LENS MANUAL SHUTTER MANUAL WHITE BAL ATW BACKLIGHT OFF AGC MIDDLE DNR LOW SENS UP ___ SPECIAL EXIT SETUP LENS MANUAL SHUTTER FLK WHITE BAL ATW BACKLIGHT OFF AGC MI...

Страница 30: ... enables a more precise adjustment Please select ATW or AWC first Then change to manual adjustment mode and press mini joystick Set the suitable color temperature and increase or decrease the red and blue color values at the same time while checking the color changes of the object 3 3 4 BACKLIGHT Even there is a massive backlight behind the object bright images of the background and the object can...

Страница 31: ... more the level of gain increases the brighter the screen and the level of noise increases as well Ö HIGH The gain increases from 6dB up to 42dB Ö MIDDLE The gain increases from 6dB up to 30dB Ö LOW The gain increases from 6dB up to 18dB Ö OFF The gain is fixed at 6dB 3 3 6 DNR Dynamic Noise Reduction Dynamic Noise Reduction in video images has the following effects 1 Images are brighter and sharp...

Страница 32: ...ise level which may cause much ghost imaging NOTE When AGC is turned off DNR will be disabled 3 3 7 SENS UP SENS UP is used to keep a brilliant vivid screen image by automatically detecting changes in the level of light under low light level conditions The value is from x2 x128 1 Please direct the arrow to point to SENS UP on the SETUP menu by turning the mini joystick UP c or DOWN d 2 Select the ...

Страница 33: ...e mini joystick UP c or DOWN d 2 Select ON by turning the mini joystick LEFT e or RIGHT f NOTE 1 The maximum storage magnification in low light level movement situations can be adjusted by pressing the mini joystick in AUTO mode 2 The screen becomes brighter when the magnification increases yet the after image increases as well 3 Please be noted that spots and noise may appear if storage magnifica...

Страница 34: ...to find the desired position to display the name 6 If you would like to cancel the ID inputted please move the cursor to CLR and all the letters inputted will be deleted 7 Select END and press the mini joystick to complete ID input 3 3 8 2 COLOR ADJ Adjust the Color Gain from 0 15 C A M E R A I D A B C D E F G H I J K L M N O P Q R S T U V W X Y Z a b c d e f g h i j k l m n o p q r s t u v w x y ...

Страница 35: ...his helps to improve supervision efficiency The camera detects an object s movement by sensing discrepancy of outline 1 Please direct the arrow to point to MOTION DET by turning the mini joystick UP c or DOWN d 2 Select ON by turning the mini joystick LEFT e or RIGHT f 3 Press the mini joystick z Please select the area you would like to detect from the 4 areas in AREA SEL mode z Please select ON m...

Страница 36: ...mple for detailed steps on moving AREA1 to center 1 The original position of AREA1 was TOP 10 DOWN 25 LEFT 20 and RIGHT 40 2 Increase DOWN scale value by 20 AREA1 position after change is TOP 10 DOWN 45 LEFT 20 and RIGHT 40 3 Increase TOP scale value by 20 AREA1 position after change is TOP 30 DOWN 45 LEFT 20 and RIGHT 40 AREA1 AREA2 AREA3 AREA4 AREA1 AREA1 AREA1 ...

Страница 37: ...to point to PRIVACY by turning the mini joystick UP c or DOWN d 2 Select ON by turning the mini joystick LEFT e or RIGHT f 3 Press the mini joystick z Please select the area you would like to cover from the 4 areas in AREA SEL mode z Please select ON mode for the chosen area z Please select AREA TONE for cover area color The smaller the number the darker the color z Please turn the mini joystick U...

Страница 38: ...of the area to be covered Please refer to the following example for detailed steps on moving AREA1 to center 1 The original position of AREA1 was TOP 10 DOWN 25 LEFT 20 and RIGHT 40 2 Increase DOWN scale value by 20 AREA1 position after change is TOP 10 DOWN 45 LEFT 20 and RIGHT 40 3 Increase TOP scale value by 20 AREA1 position after change is TOP 30 DOWN 45 LEFT 20 and RIGHT 40 AREA1 AREA2 AREA3...

Страница 39: ... setting press the mini joystick This allows you to return to the previous menu 3 3 8 6 MIRROR ON Sets a horizontal image 180 angel inversion OFF Disable the inversion 3 3 8 7 SHARPNESS The contour of the video image becomes cleaner and more distinguishing as the level of SHARPNESS increases If the level goes up extremely it may affect the video image and cause noise ON Enable the SHARPNESS mode S...

Страница 40: ...nd returns to the Setup menu 3 3 9 EXIT Press the mini joystick on EXIT after you finish all the settings It will return to live image SHARPNESS LEVEL 8 SPECIAL CAMERA ID OFF COLOR ADJ SYNC INT MOTIION DET OFF PRIVACY OFF MIRROR OFF SHARPNESS ON RESET RETURN SPECIAL CAMERA ID OFF COLOR ADJ SYNC INT MOTIION DET OFF PRIVACY OFF MIRROR OFF SHARPNESS ON RESET RETURN SPECIAL CAMERA ID OFF COLOR ADJ SYN...

Страница 41: ...C H A P T E R 3 O S D M E N U A N D C O N F I G U R A T I O N 39 ...

Страница 42: ...Baud rate is 9600 Support Protocol EVF 1 EVF 2 and Pelco D 4 1 Key Features with Keyboard 1 OSD can be set up from Keyboard 2 Lens Zoom and Focus can be controlled by keyboard 4 2 OSD Menu Setting by Keyboard a Press Menu to enter SETUP menu b Move the joystick UP c and DOWN d This allows you to move between selection items in setup menu c If the item has sub menu setting sign press Menu again to ...

Страница 43: ...ious menu after setting Move to exit and press menu button when you finish all settings f For detail setting and every setup function Please refer to 3 3 OSD Menu Setup 4 3 Lens Adjustment by Keyboard 1 Press Zoom in or Zoom out to adjust zoom or Turn Joystick clockwise to zoom out Counterclockwise to zoom in 2 Press Focus N or Focus F to adjust focus 3 Press Iris and Iris to adjust Iris ...

Страница 44: ... 81 43 297 0081 www everfocus com Your EverFocus product is designed and manufactured with high quality materials and components which can be recycled and reused This symbol means that electrical and electronic equipment at their end of life should be disposed of separately from your household waste Please dispose of this equipment at your local community waste collection recycling centre In the E...

Отзывы: