


EHN7221/7260/7360
44
【
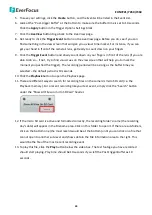
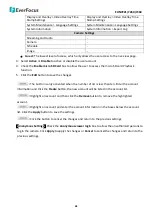
Language Settings
】
Select the language to be displayed on the Web interface of the IP camera. The
default language is English.
New Language:
This function can only be set up in the
Advanced
tab. To add a new language not
listed in the current Language list, click the
Browse
button to locate the new language file (.evb) on
your computer and then click the
Upload
button. If you have requirement on a particular language
not listed in the current Language list, please contact us:
Click
Apply
to apply the changes or
Cancel
to cancel the changes and return to the previous settings.
Note:
Uploading a new language file will cause the system to reboot automatically. Please create
a new network connection to the IP camera when the reboot is complete.
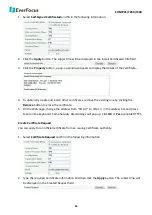
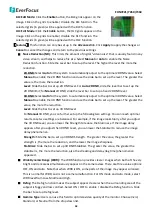
【
Maintenance
】
Reboot:
Click to reboot the IP camera without changing any of the settings. Use this function if
the IP camera is not behaving as expected.
Restore:
Click to restart and reset most of the current settings to their factory default values.
The only settings that will not be changed to default are: IP Settings and DDNS Settings.
Initialize:
This function can only be set up in the
Advanced
tab. This button should be used
with caution. Clicking this button will return all of the camera's settings, including the IP
address, to the factory default values. The camera will then have to be reconfigured.
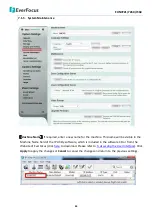
【
Save Configuration Server
】
Save:
To make a backup file of the machine’s current configurations, click this button to save all the
configurations to a configuration file. This will enable the user to reload these configuration settings
if the settings are changed and there is unexpected behavior.
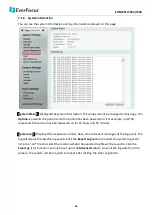
【
Load Configuration Server
】
Select
Video
to apply only the video parameters from the configuration file to the system. Select
Network
to apply only the network parameters from the configuration file to the system. Select
All
to
apply all the parameters from the configuration file to the system.
Browse:
Click the
Browse
button to locate the saved config. File.
Upload:
Click the
Upload
button to restore the system based on the selected parameters (Video,
Network or All).
【
Video Format
】
Select 60Hz (NTSC) or 50Hz (PAL) for your local scanning system. Click
Apply
to save
the setting.


