background image

Federal Communication Commission Interference 

Statement 

This equipment has been tested and found to comply with the limits for a Class A digital device, 
pursuant to Part 15 of the FCC Rules.  These limits are designed to provide reasonable protection 
against harmful interference in a residential installation.  This equipment generates, uses and can 
radiate radio frequency energy and, if not installed and used in accordance with the instructions, may 
cause harmful interference to radio communications.  However, there is no guarantee that 
interference will not occur in a particular installation.  If this equipment does cause harmful 
interference to radio or television reception, which can be determined by turning the equipment off 
and on, the user is encouraged to try to correct the interference by one of the following measures:


Reorient or relocate the receiving antenna. 

Increase the separation between the equipment and receiver. 

Connect the equipment into an outlet on a circuit different from that to which the receiver is 
connected. 

Consult the dealer or an experienced radio/TV technician for help. 

 
FCC Caution: Any changes or modifications not expressly approved by the party responsible for 
compliance could void the user's authority to operate this equipment. 
 
This device complies with Part 15 of the FCC Rules. Operation is subject to the following two 
conditions: (1) This device may not cause harmful interference, and (2) this device must accept any 
interference received, including interference that may cause undesired operation. 
 

Содержание EZ430

Страница 1: ...Operation Instruction 1 1 3 3 C CC CD D O Ou ut td do oo or r I IR R B Bu ul ll le et t C Co ol lo or r C Ca am me er ra a w wi it th h V Va ar ri i f fo oc ca al l E EZ Z4 43 30 0 Volume 1 EverFocus ...

Страница 2: ... temperature could cause deformation discoloration or other damages of the camera Install the camera at where the temperature range will stay between 40 C to 50 C 40 F to 122 F 5 Never aim the camera at the sun or other extremely bright objects whether it is in use or not 6 Do not touch the surface of CCD sensor by hand directly Use a soft cloth to remove the dirt from the camera body Use lens tis...

Страница 3: ...eception which can be determined by turning the equipment off and on the user is encouraged to try to correct the interference by one of the following measures Reorient or relocate the receiving antenna Increase the separation between the equipment and receiver Connect the equipment into an outlet on a circuit different from that to which the receiver is connected Consult the dealer or an experien...

Страница 4: ... 1 1 Features 5 1 2 Accessory Parts List 6 1 3 Specifications 7 1 4 Dimensions 8 1 5 Camera Component Description 10 1 6 Back Panel Layout 11 2 INSTALLATION 12 2 1 Wiring and Mounting 12 2 2 Adjusting Camera Position 13 2 3 Adjusting Image 14 ...

Страница 5: ...reme weather conditions 1 1 Features z 520 TVL of excellent high resolution technology z Up to 30 meters 98 ft of IR range z Vari focal lens to offer you a wide variety of angle viewing z High sensitivity with SONY Super HAD CCD z True Day Night function with removable IR cut filter z Motorized lens controller for easy zoom and focus adjustment z IRIS level adjustment z Cable wires are placed insi...

Страница 6: ...ual x 1 Mounting kit includes Long Screws x 4 for mounting bracket Expanding Screws x 4 Washer x 4 Hex key Wrench x1 Please Note If an item appears to have been damaged in shipment replace it properly in its carton and notify the shipper If any items are missing notify your EverFocus Electronics Corp Sales Representative or Customer Service The shipping carton is the safest container in which the ...

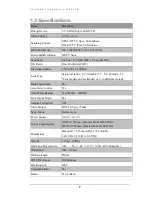
Страница 7: ... F 1 6 Lens models and availability vary in different regions Back Light Comp Yes Auto Gain Control Yes Auto White Balance Yes 2500 K 9000 K True Day Night Yes Gamma Correction 0 45 Video Output BNC 1 0Vp p 75ohm Sync Mode Internal sync Power Source 12VDC 24VAC Power Consumption 12VDC 12W max Heater On IR LED On 24VAC 15W max Heater On IR LED On Dimensions 88mm W x 235 3mm D x 174 2mm H 3 46 W x 9...

Страница 8: ...C H A P T E R 2 I N S T A L L A T I O N 8 Certifications FCC CE 1 4 Dimensions Radius 88mm 3 46 inches Dimension of holes to holes C H A P T E R 1 P R O D U C T O V E R V I E W ...

Страница 9: ...C H A P T E R 2 I N S T A L L A T I O N 9 Dimension of whole camera with bracket C H A P T E R 1 P R O D U C T O V E R V I E W ...

Страница 10: ...R 2 I N S T A L L A T I O N 10 1 5 Camera Component Description Sunshield Fixing Screw Bracket Sun Shield Zoom in out and IRIS Level Control Focus Control Control Mode C H A P T E R 1 P R O D U C T O V E R V I E W ...

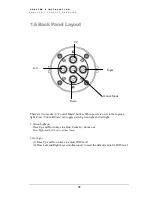
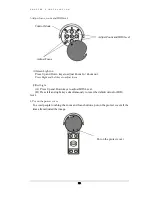
Страница 11: ...n toggle switch green light and red light 1 Green Light on Press Up and Down keys to adjust Zoom In Zoom out Press Right and Left keys to adjust focus 2 Red Light 1 Press Up and Down keys to adjust IRIS Level 2 Press Left and Right keys simultaneously to reset the default value for IRIS level Left Right UP Control Mode Down C H A P T E R 1 P R O D U C T O V E R V I E W ...

Страница 12: ...vent electrical shock turn off the electrical power before making electrical connections Do not expose the appliance to water or moisture nor try to operate it in wet areas Do not connect high voltage power to the camera It may damage the camera Do not short circuit the power leads and expose the wire when connecting the power supply to the camera 2 1 Wiring and Mounting 1 Pull the cables to be co...

Страница 13: ... screws 2 2 Adjusting Camera Position Adjust camera for the best viewing angle by using hex key wrench Note Before you adjust camera s angle please use Hex key Wrench to loose the screw first To adjust the angle easier and to avoid paint off scratches the bracket Adjustment Horizontally ...

Страница 14: ...C H A P T E R 2 I N S T A L L A T I O N 14 2 3 Adjusting Image 1 There is a protect cover at camera s back panel loose screw A 2 Remove the protect cover Screw A Screw B ...

Страница 15: ...adjust focus 2 Red Light A Press Up and Down keys to adjust IRIS Level B Press left and right keys simultaneously to reset the default value for IRIS level 4 Put on the protect cover To avoid people touching the zoom and focus buttons put on the protect cover all the time after adjusted the image Adjust Zoom and IRIS level Adjust Focus Control Mode Put on the protect cover ...

Страница 16: ...tems for used electrical and electronic product Please help us to conserve the environment we live in Ihr EverFocus Produkt wurde entwickelt und hergestellt mit qualitativ hochwertigen Materialien und Komponenten die recycelt und wieder verwendet werden können Dieses Symbol bedeutet dass elektrische und elektronische Geräte am Ende ihrer Nutzungsdauer vom Hausmüll getrennt entsorgt werden sollen B...

Отзывы: