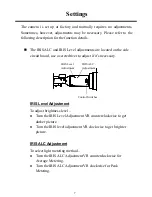
background image


Table of Contents 


Safety Warning …………………………………………1    
 
Introduction……………………………………………..2 
 
Specification…………………………………………….3 
 
Major Parts Names…..…………………………….…..4   
 
Installation Instructions………………………….….…5 
 
Settings………………………………………………….7 
 

Содержание EZ180

Страница 1: ...H Hi ig gh h R Re es so ol lu ut ti io on n B B W W W We ea at th he er rp pr ro oo of f C Ca am me er ra a E EZ Z1 18 80 0 User s Manual and Operation Instructions ...

Страница 2: ...o make changes to the product specifications and documentation without notice All the components of the products including accessories components and outlook are based on the agreements of each deals to satisfy all kinds of users Meanwhile please be advised that every step of operation must follow the instruction of this manual to keep EZ180 working under the best condition Please notice that Ever...

Страница 3: ...Table of Contents Safety Warning 1 Introduction 2 Specification 3 Major Parts Names 4 Installation Instructions 5 Settings 7 ...

Страница 4: ...onment Installed the camera away from stoves or other heat generating devices as the high temperature could cause deformation discoloration or other damages of the camera Install the camera at where the temperature range will stay between 35 50 for 12VDC 45 50 for 24VAC 4 Never face the camera toward the sun Never aim the camera at the sun or other extremely bright objects whether it is in use or ...

Страница 5: ...hat turns on at 10 for cold weather The EZ180 will provide protection against the elements and provide an excellent quality picture Main Features High Resolution 560 TV Lines Two types of built in vari focal lens for versatile applications Designed with sturdy aluminum shell specifically for outdoor surveillance Removable sun shield The heater allows the camera to be used in extremely low temperat...

Страница 6: ... Light Comp On Off switch Auto Gain Control On Off switch Flickerless On Off switch Line Lock On Off switch Sync Mode Internal Sync Weatherproof IP66 Power Source 12VDC 24VAC Power Consumption 12VDC 7 5W max Heater ON 24VAC 10W max Heater ON Dimensions With sun shield 90 7mm W x 70mm H x 172mm L 3 57 W x 2 8 H x 6 8 L Without sun shield 57mm O D x 132mm L 2 2 O D x5 2 L Weight 0 71 kg 1 6 lbs 0 91...

Страница 7: ...eld Cover Back Fixing Plate Major Parts Names and Their Functions Fixing Screw Front Fixing Plate Fixing Screw Front Fixing Plate Mounting Bracket O ring Seal Heater Lens Focus Zoom IRIS ALC Level Adjustment Control Switch Mounting Bracket O ring Seal Heater Lens Focus Zoom IRIS ALC Level Adjustment Control Switch 4 Set Screw ...

Страница 8: ...r veri focal lens f 3 5 8mm or 5 10 meters for veri focal lens f 9 22mm If it is out of focus or any other adjustment is required follow the procedures below a Remove the fixing screw in the front which hold the sun shield cover Remove the sun shield cover b Twist open and carefully remove the housing cover Please pay attention to prevent damage to the O Ring seal c Loosen the focal lens and focus...

Страница 9: ...7 Tighten the swivel screw To strengthen the fixing power of the swivel screw tighten the set screw with the set screw wrench supplied Notes A Make wiring connections only after it has been determined that power has been disconnected B There is a desiccant pack attached to the housing base under the camera which is designed to absorb any moisture trapped inside the housing during adjustment To avo...

Страница 10: ...r to adjust if it s necessary IRIS Level Adjustment To adjust brightness level z Turn the IRIS Level Adjustment VR counterclockwise to get darker picture z Turn the IRIS level adjustment VR clockwise to get brighter picture IRIS ALC Adjustment To select light metering method z Turn the IRIS ALC Adjustment VR counterclockwise for Average Metering z Turn the IRIS ALC Adjustment VR clockwise for Peak...

Страница 11: ...nd reduce the flicker immediately The default setting is Normal BLC Back Light Compensation Normal On When BLC is turned on the AGC ES and IRIS operating point is determined by averaging over the center area instead of entire field of view so that a dimly lit foreground object at center area can be clearly distinguished from brightly lit backgrounds BLC should not be used unless it is needed to co...

Страница 12: ... To select the sync mode between Internal Sync LL off and Line Lock LL on Set the line lock off the camera will synchronize to the internal time base Set the line lock on the camera s vertical synchronization can be driven by the AC signal in the power lines The default setting is Off Note Line Lock sync mode operation is possible only when used with an AC power source it s not possible with a DC ...

Страница 13: ...88 FAX 81 43 297 0081 www everfocus co jp Your EverFocus product is designed and manufactured with high quality materials and components which can be recycled and reused This symbol means that electrical and electronic equipment at their end of life should be disposed of separately from your household waste Please dispose of this equipment at your local community waste collection recycling centre ...

Отзывы: